Scenes
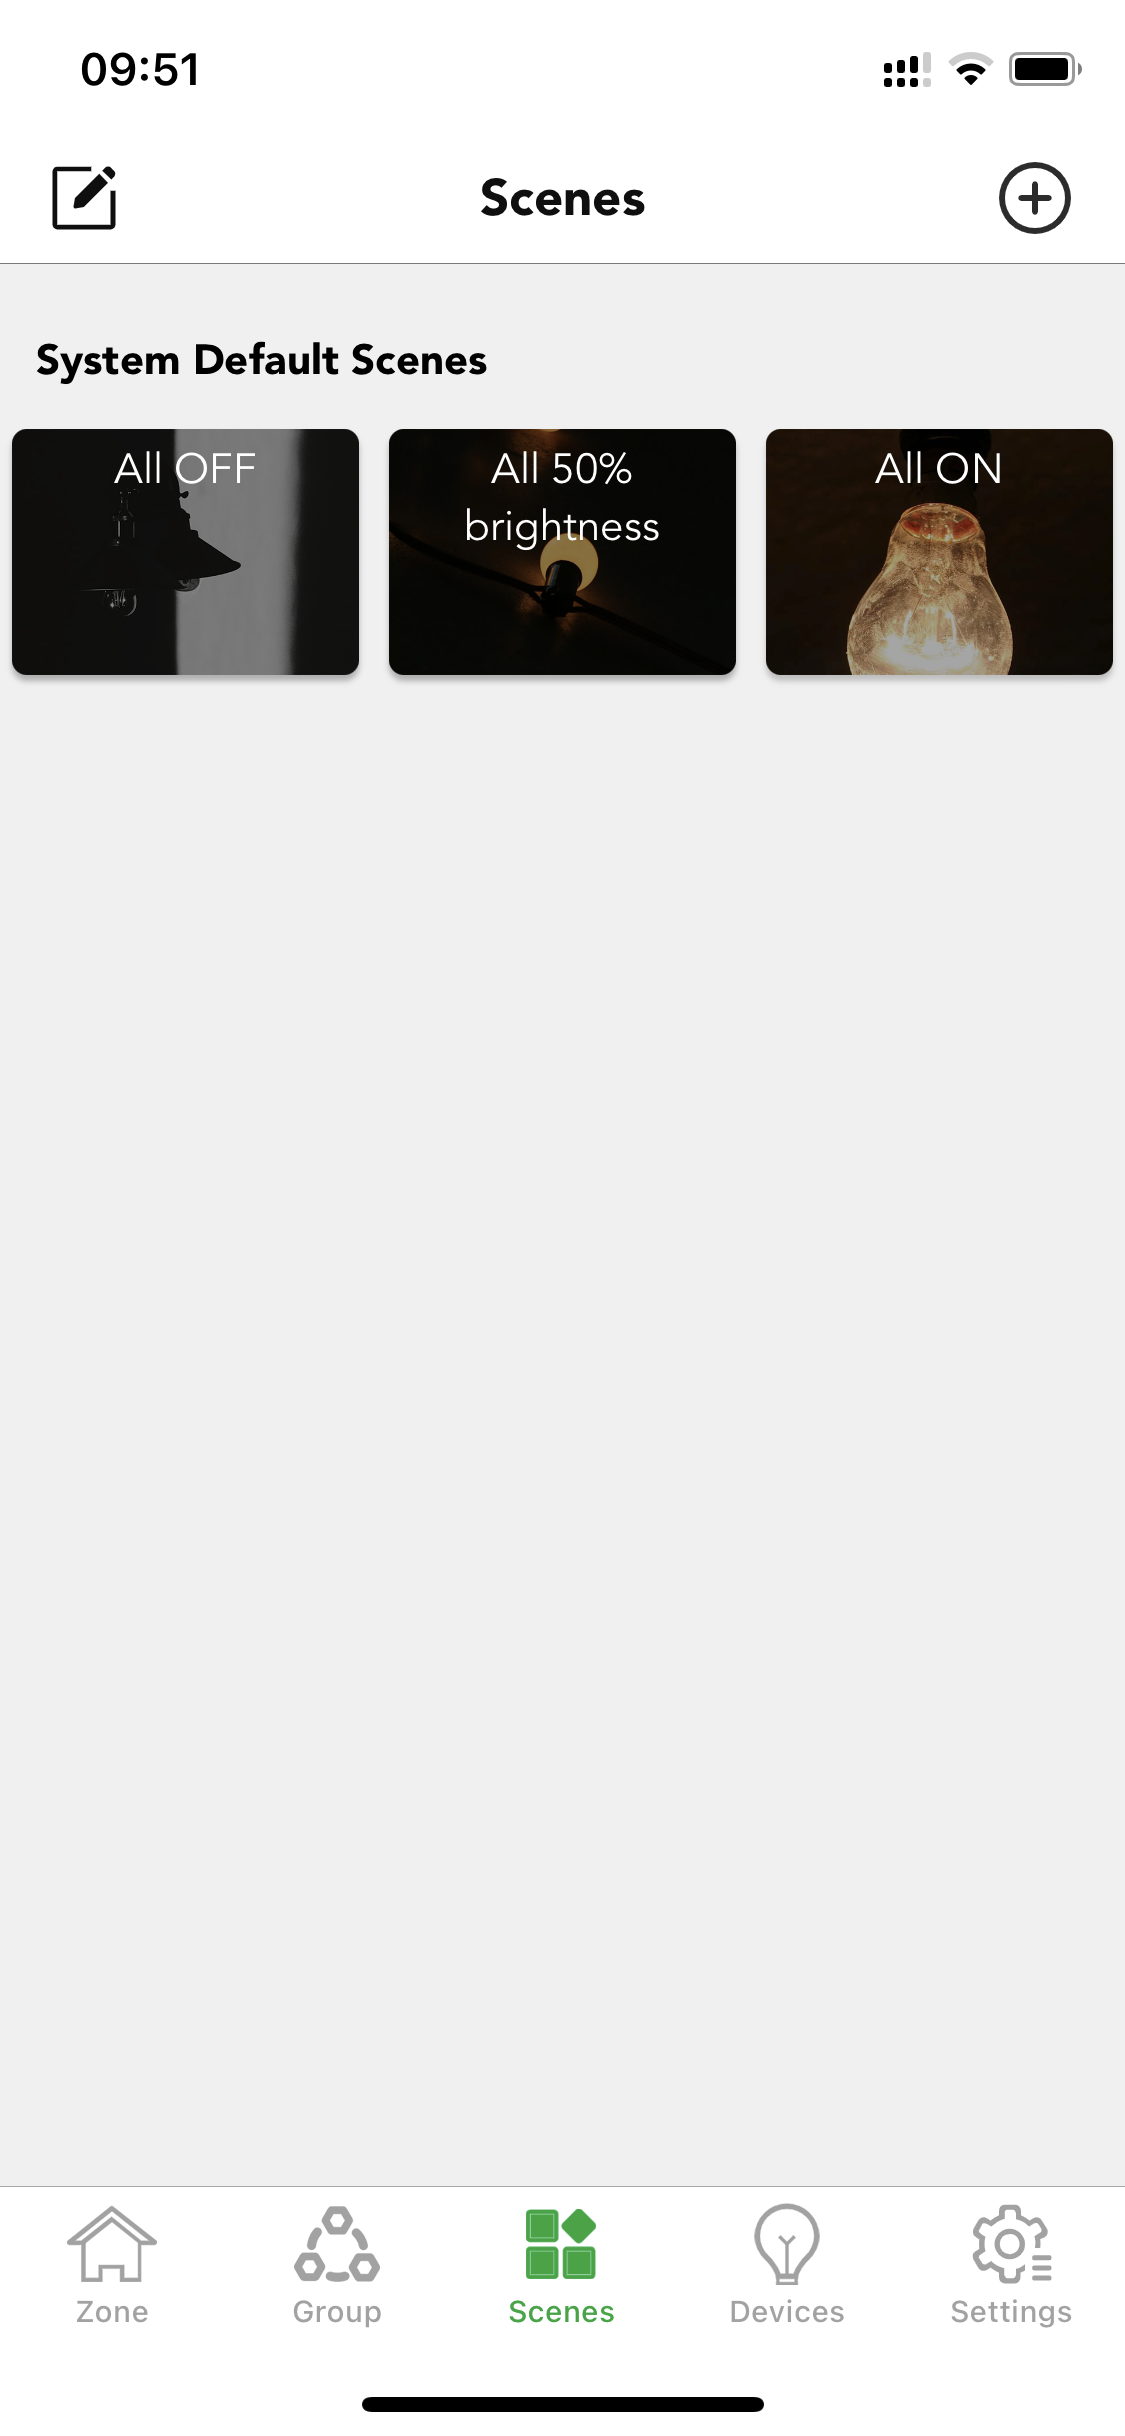
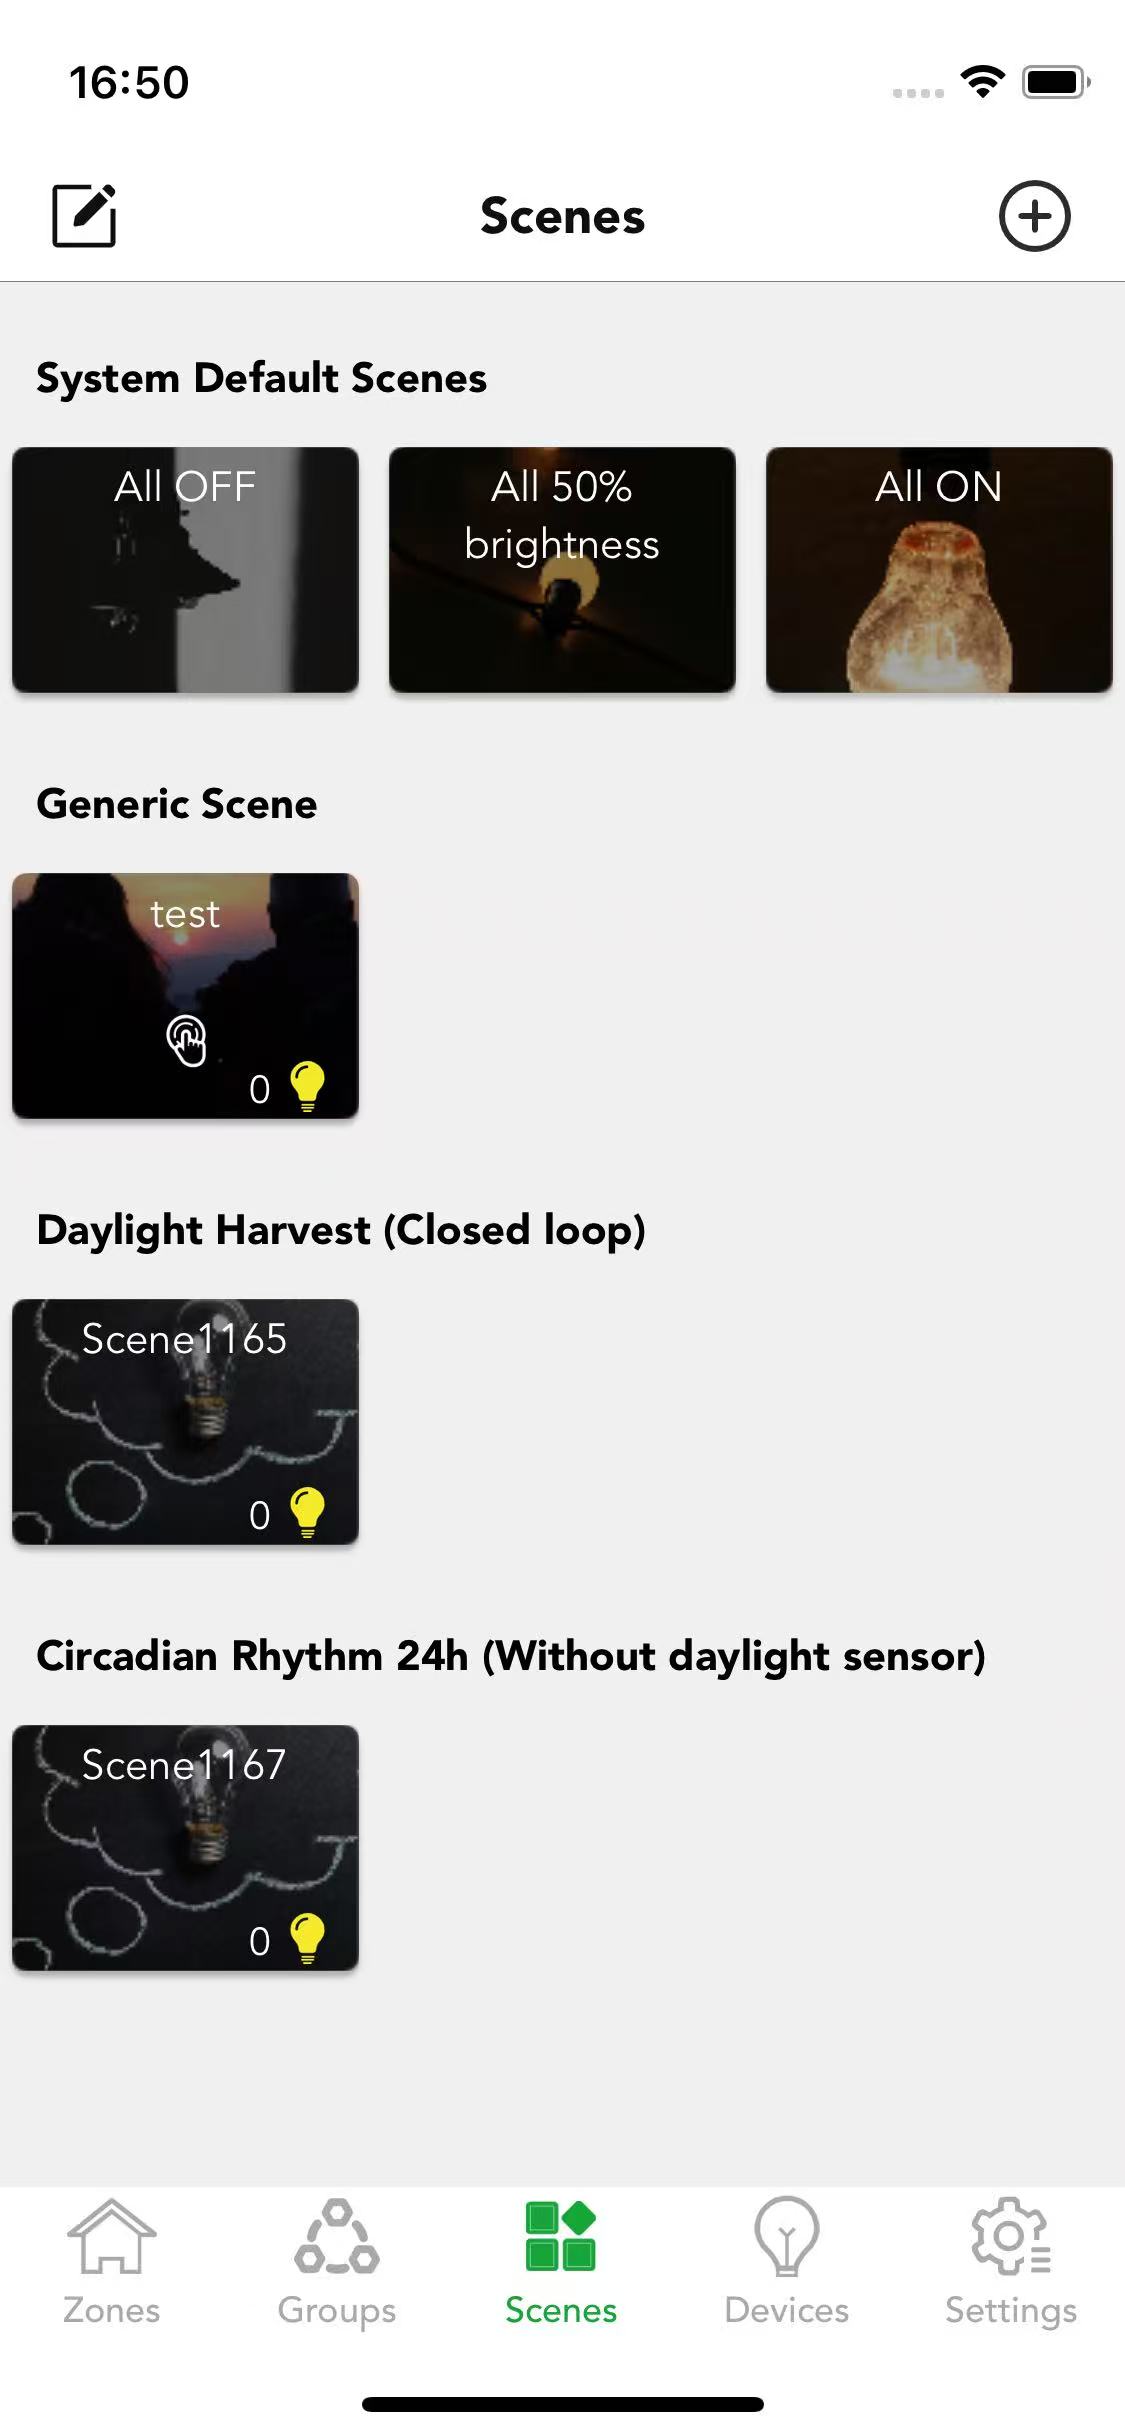
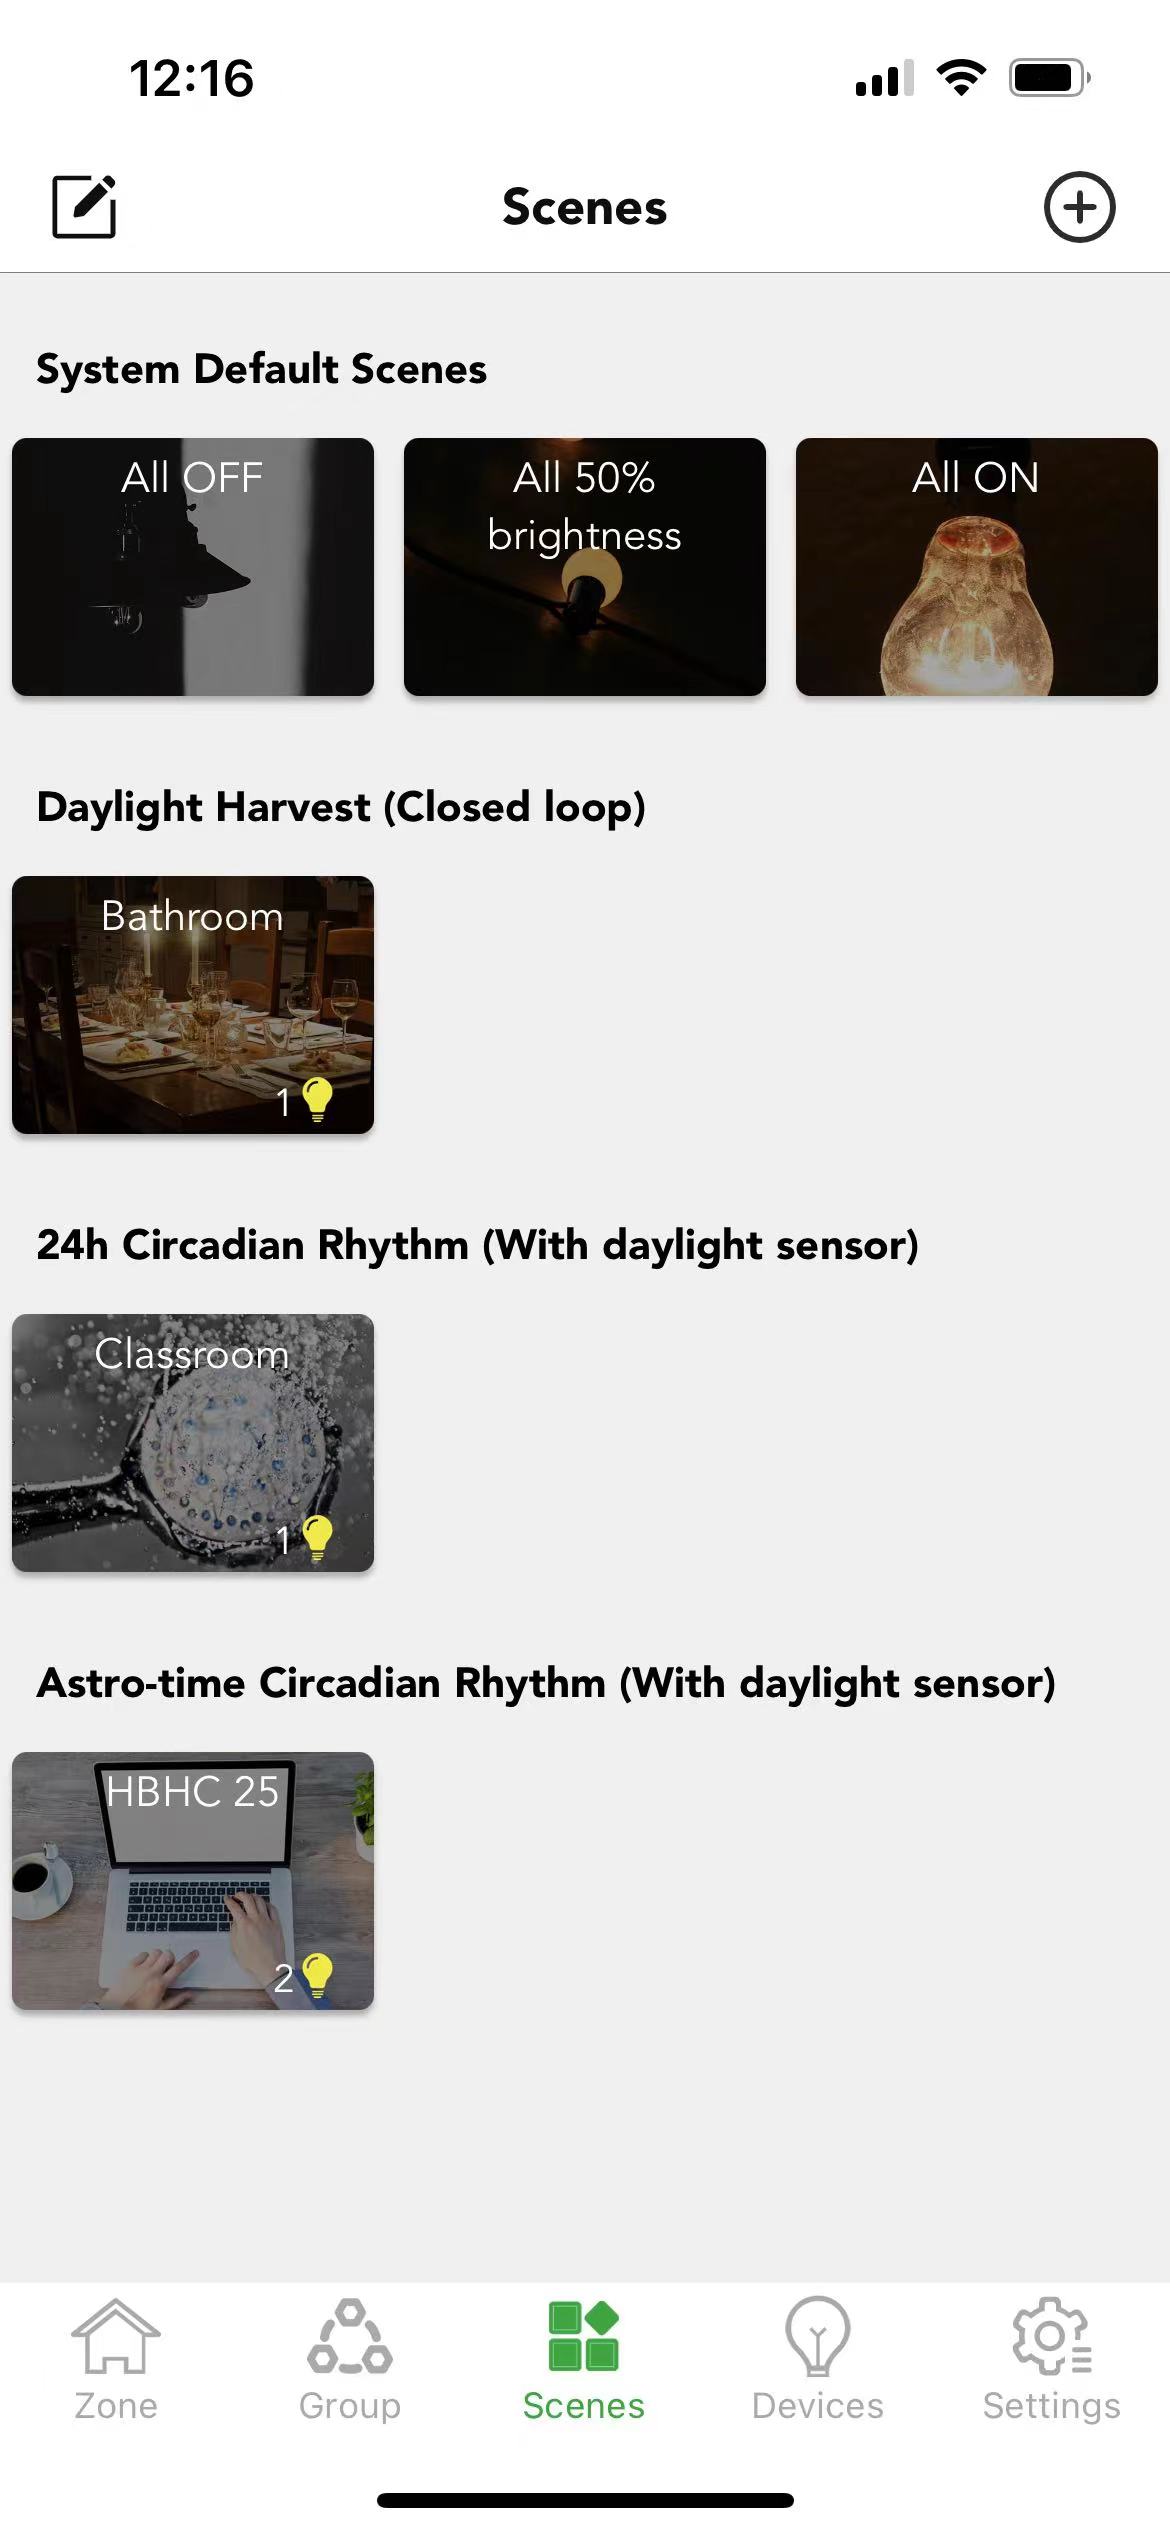
Scenes allow you to create and recall lighting situations. A scene can control any variation of luminaires in the network. Luminaires can be used in multiple scenes, but single luminaire cannot exist in more than 16 scenes at the same time. The number of scenes created in a single mesh network is without limitation. In the system, there are 3 default generic scenes that the users can directly use, they are "All off", "All 50% brightness", "All on". These 3 default scenes are applied to all the luminaires in the network.
Scene will never activate itself automatically. There are three ways in the Koolmesh system to activate the scene function.
1.By manual control
1.1 Users can activate the scene in the scene page by just clicking on the scene picture.
1.2 They can activate the scene through the Push switch (need to be configured).
1.3 They also can activate the scene through Hytronik BLE touch panel HBP02 (Need to be configured).
1.4 The Koolmesh app also supports the Enocean switch (BLE version), the users can activate the scene through the Enocean switch (need to be configured).
2.By the motion sensors
2.1 The scene can be activated by the motion sensor. Once the movements are detected by the motion sensor, then it will activate the scene automatically. Users need to set up the motion sensor first.
3.By the schedule
3.1 Users can set up a schedule to activate a scene at a certain time of day.
Create a new scenes
Users can "create a new scene" by clickink  on the top right corner. Users can edit the existing scene by clicking
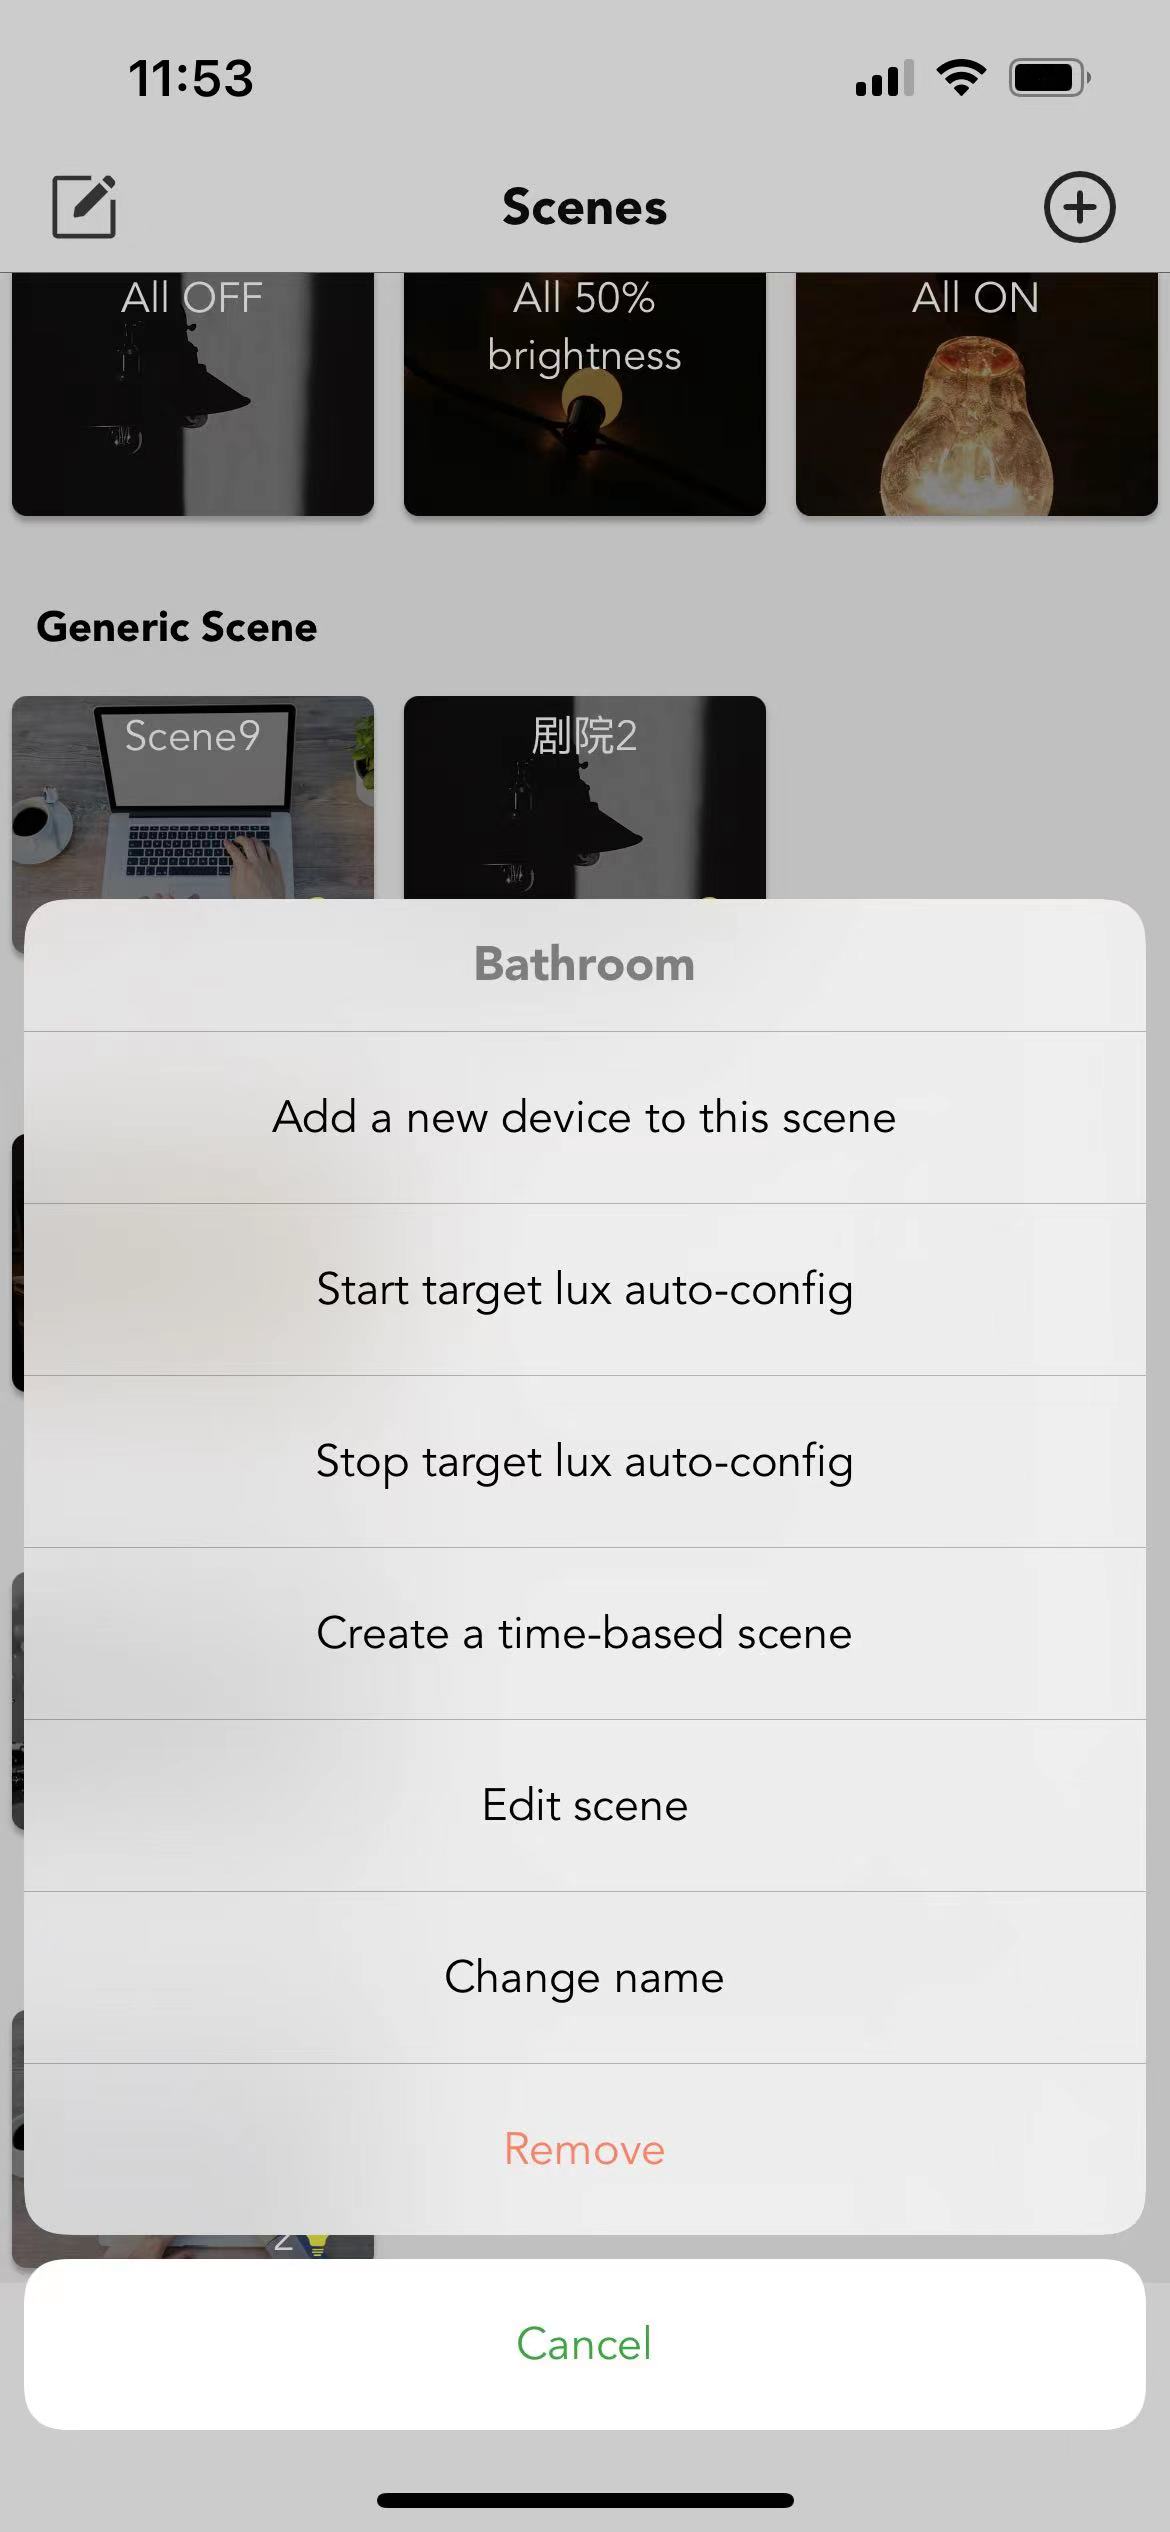
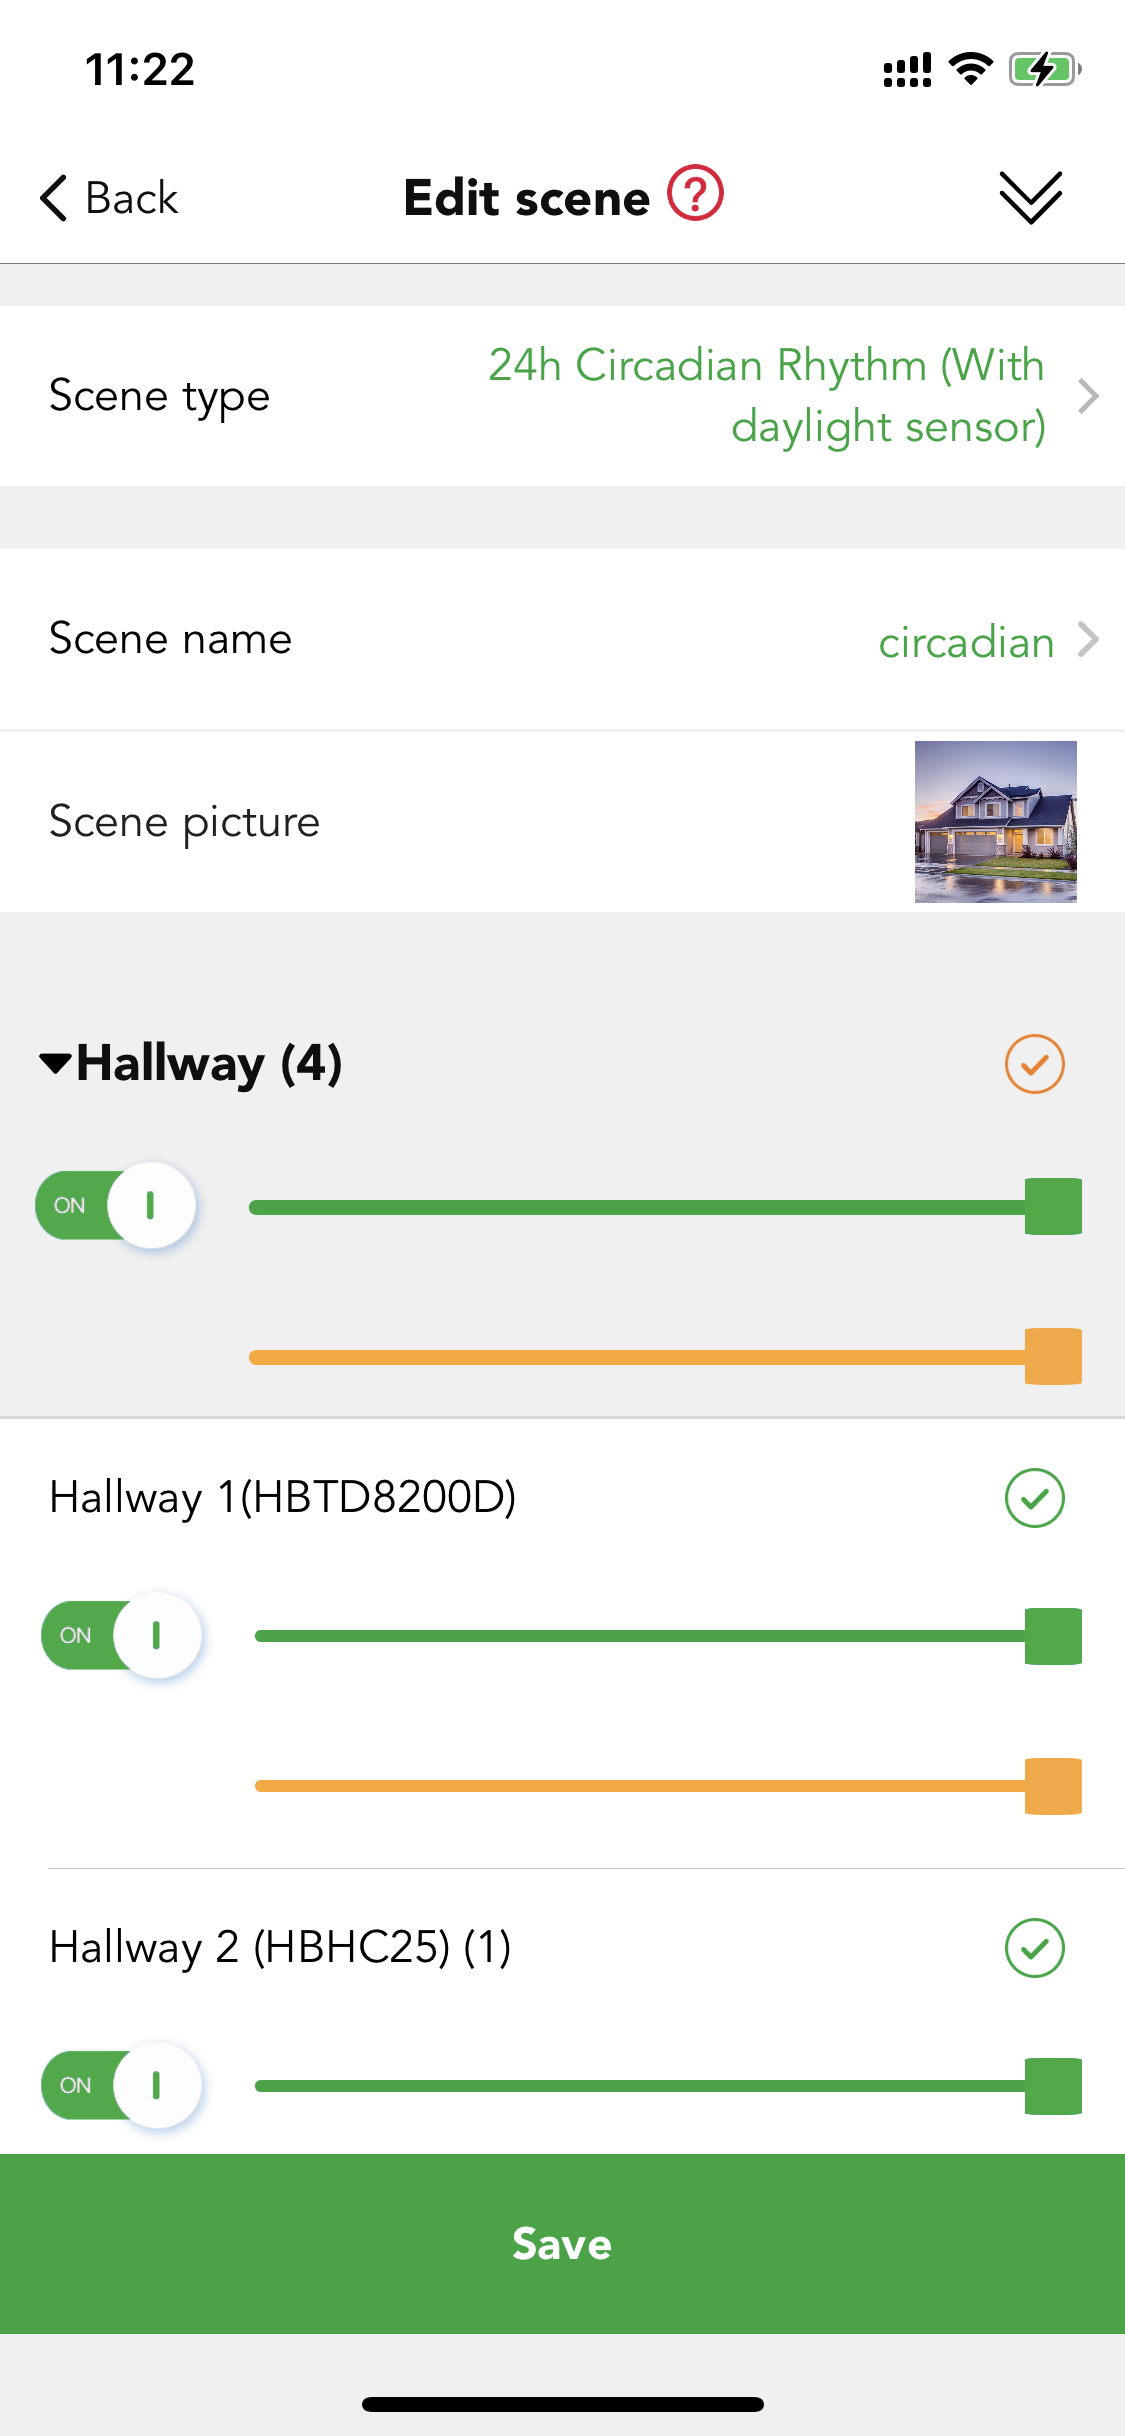
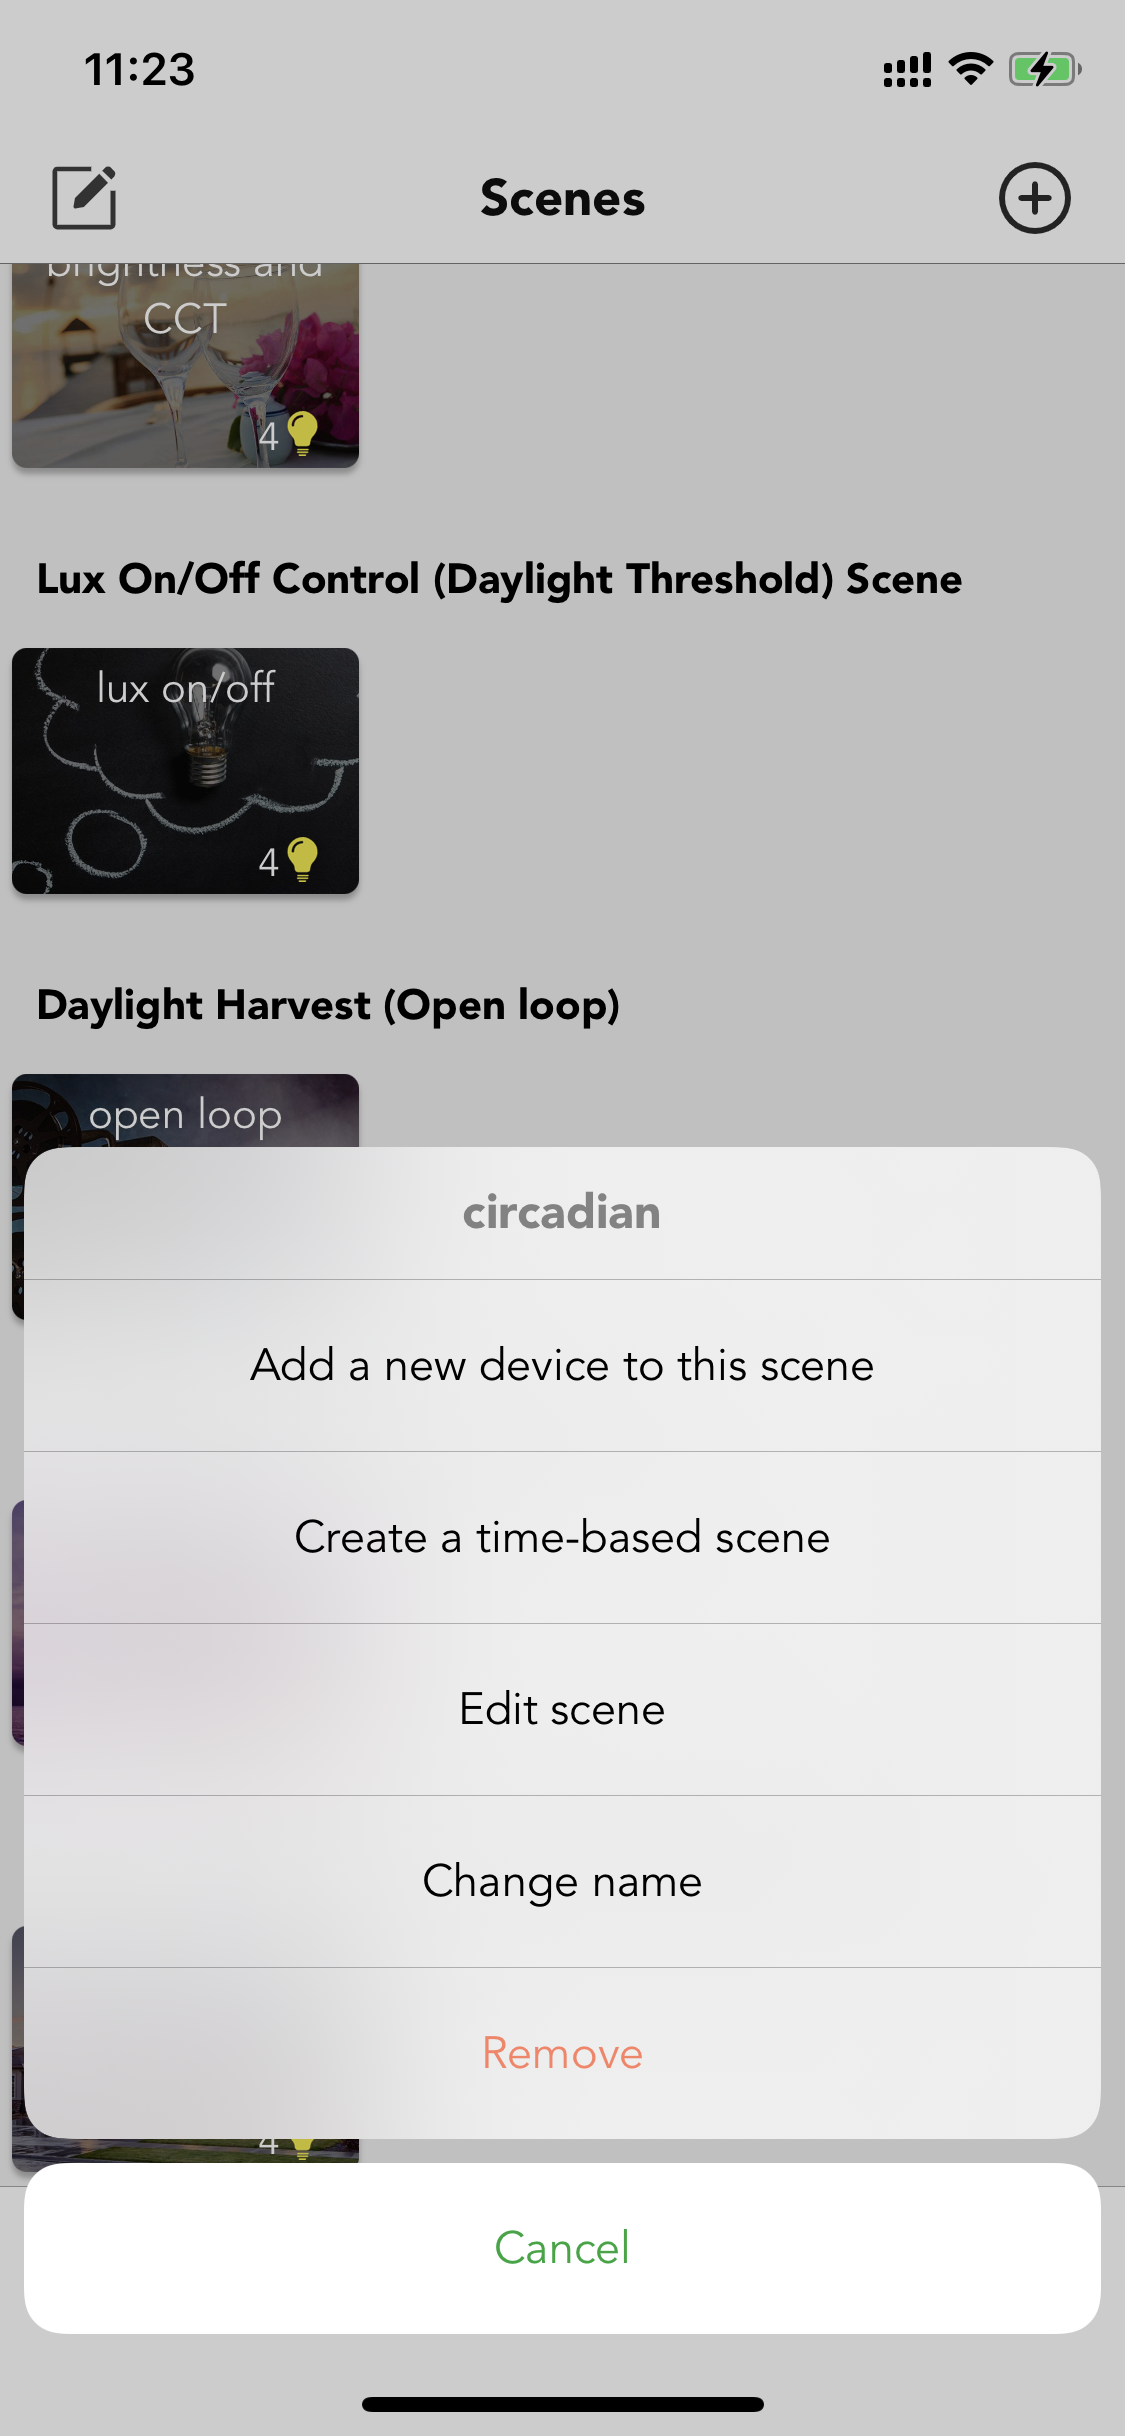
  on the top left corner or just long press on the scene cover. After long pressing on the scene cover, Users can add or remove devices from the scene, create time-based scene and animation scene, edit the scene, change its name, or remove (delete) the scene.
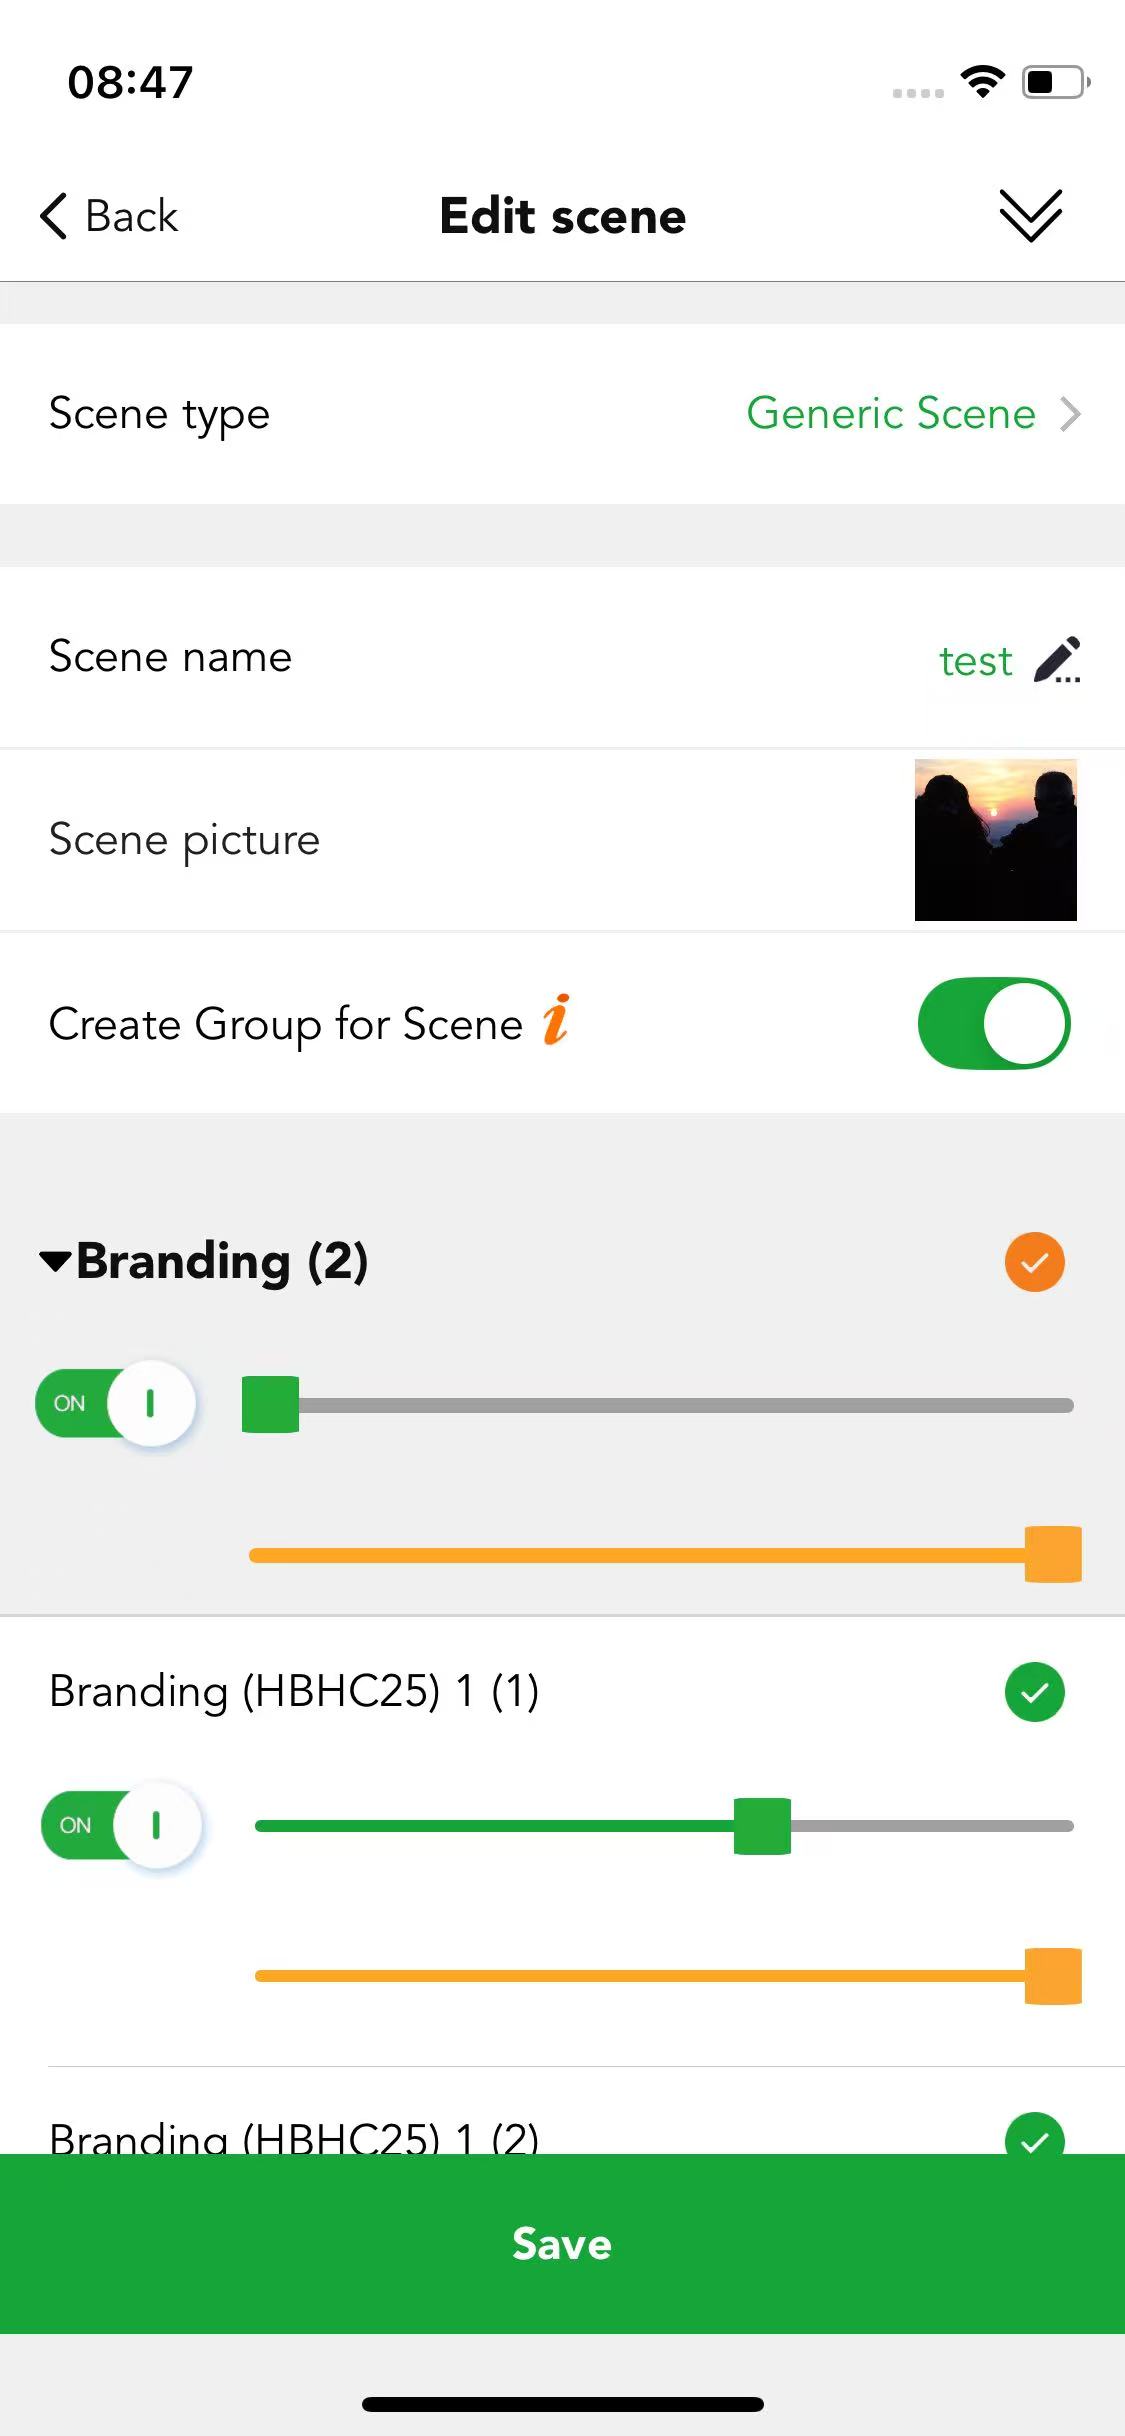
The scene editing page includes a Create Scene Group function.This function can be enabled or disabled via a toggle switch. When activated, a group is created automatically—eliminating the need for manual setup and allowing users to control the group independently as required. This function is disabled by default.
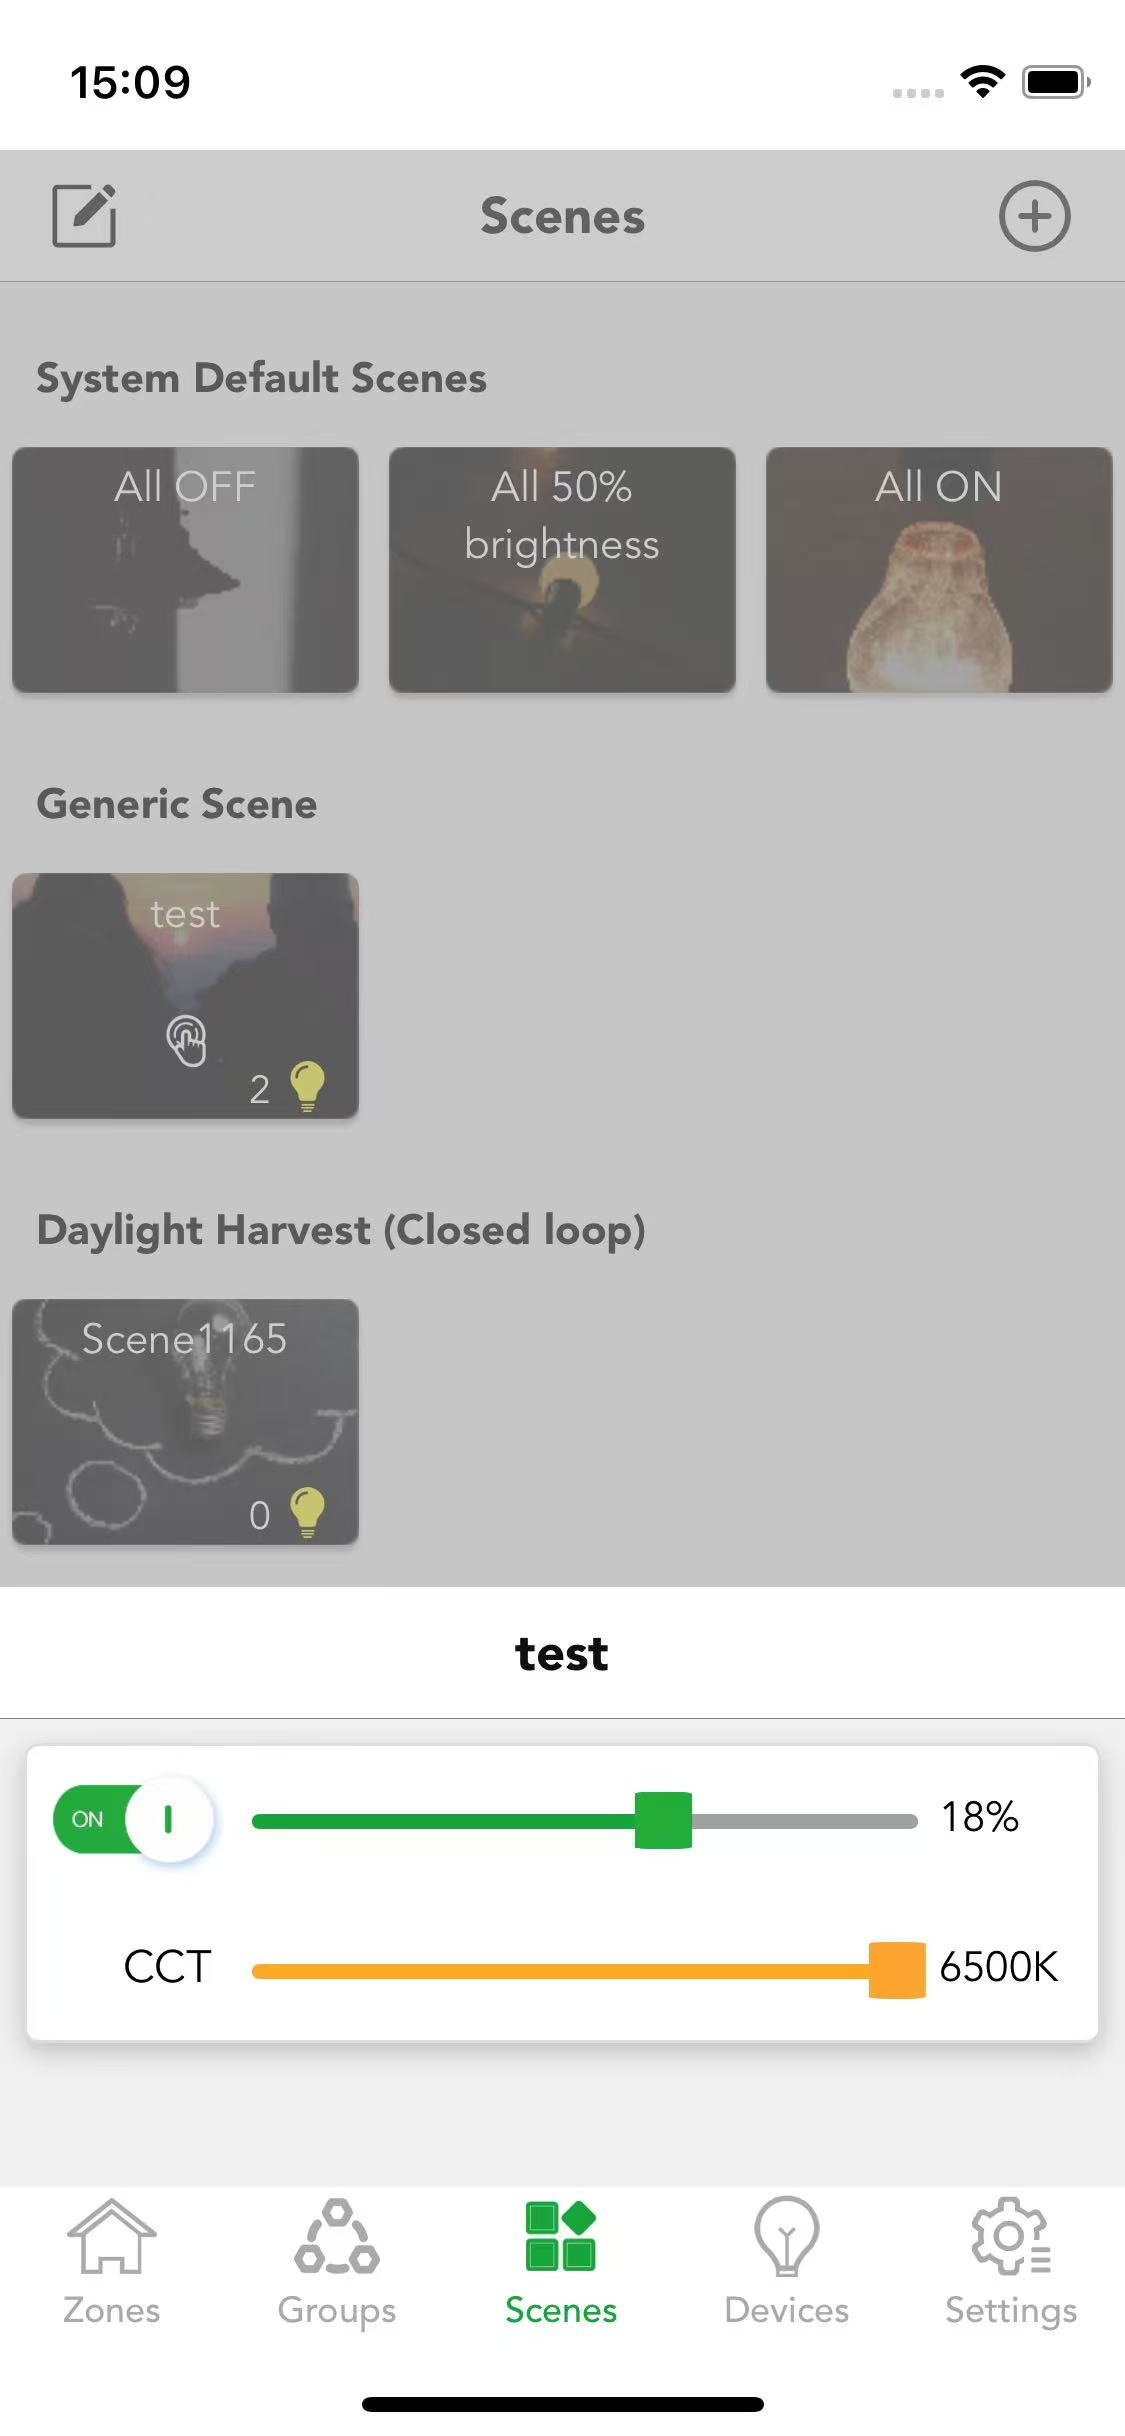
Once this function is enabled, a hand icon will appear on the scene screen; double-click the scene to quickly access and adjust the brightness and color temperature for the entire scene.
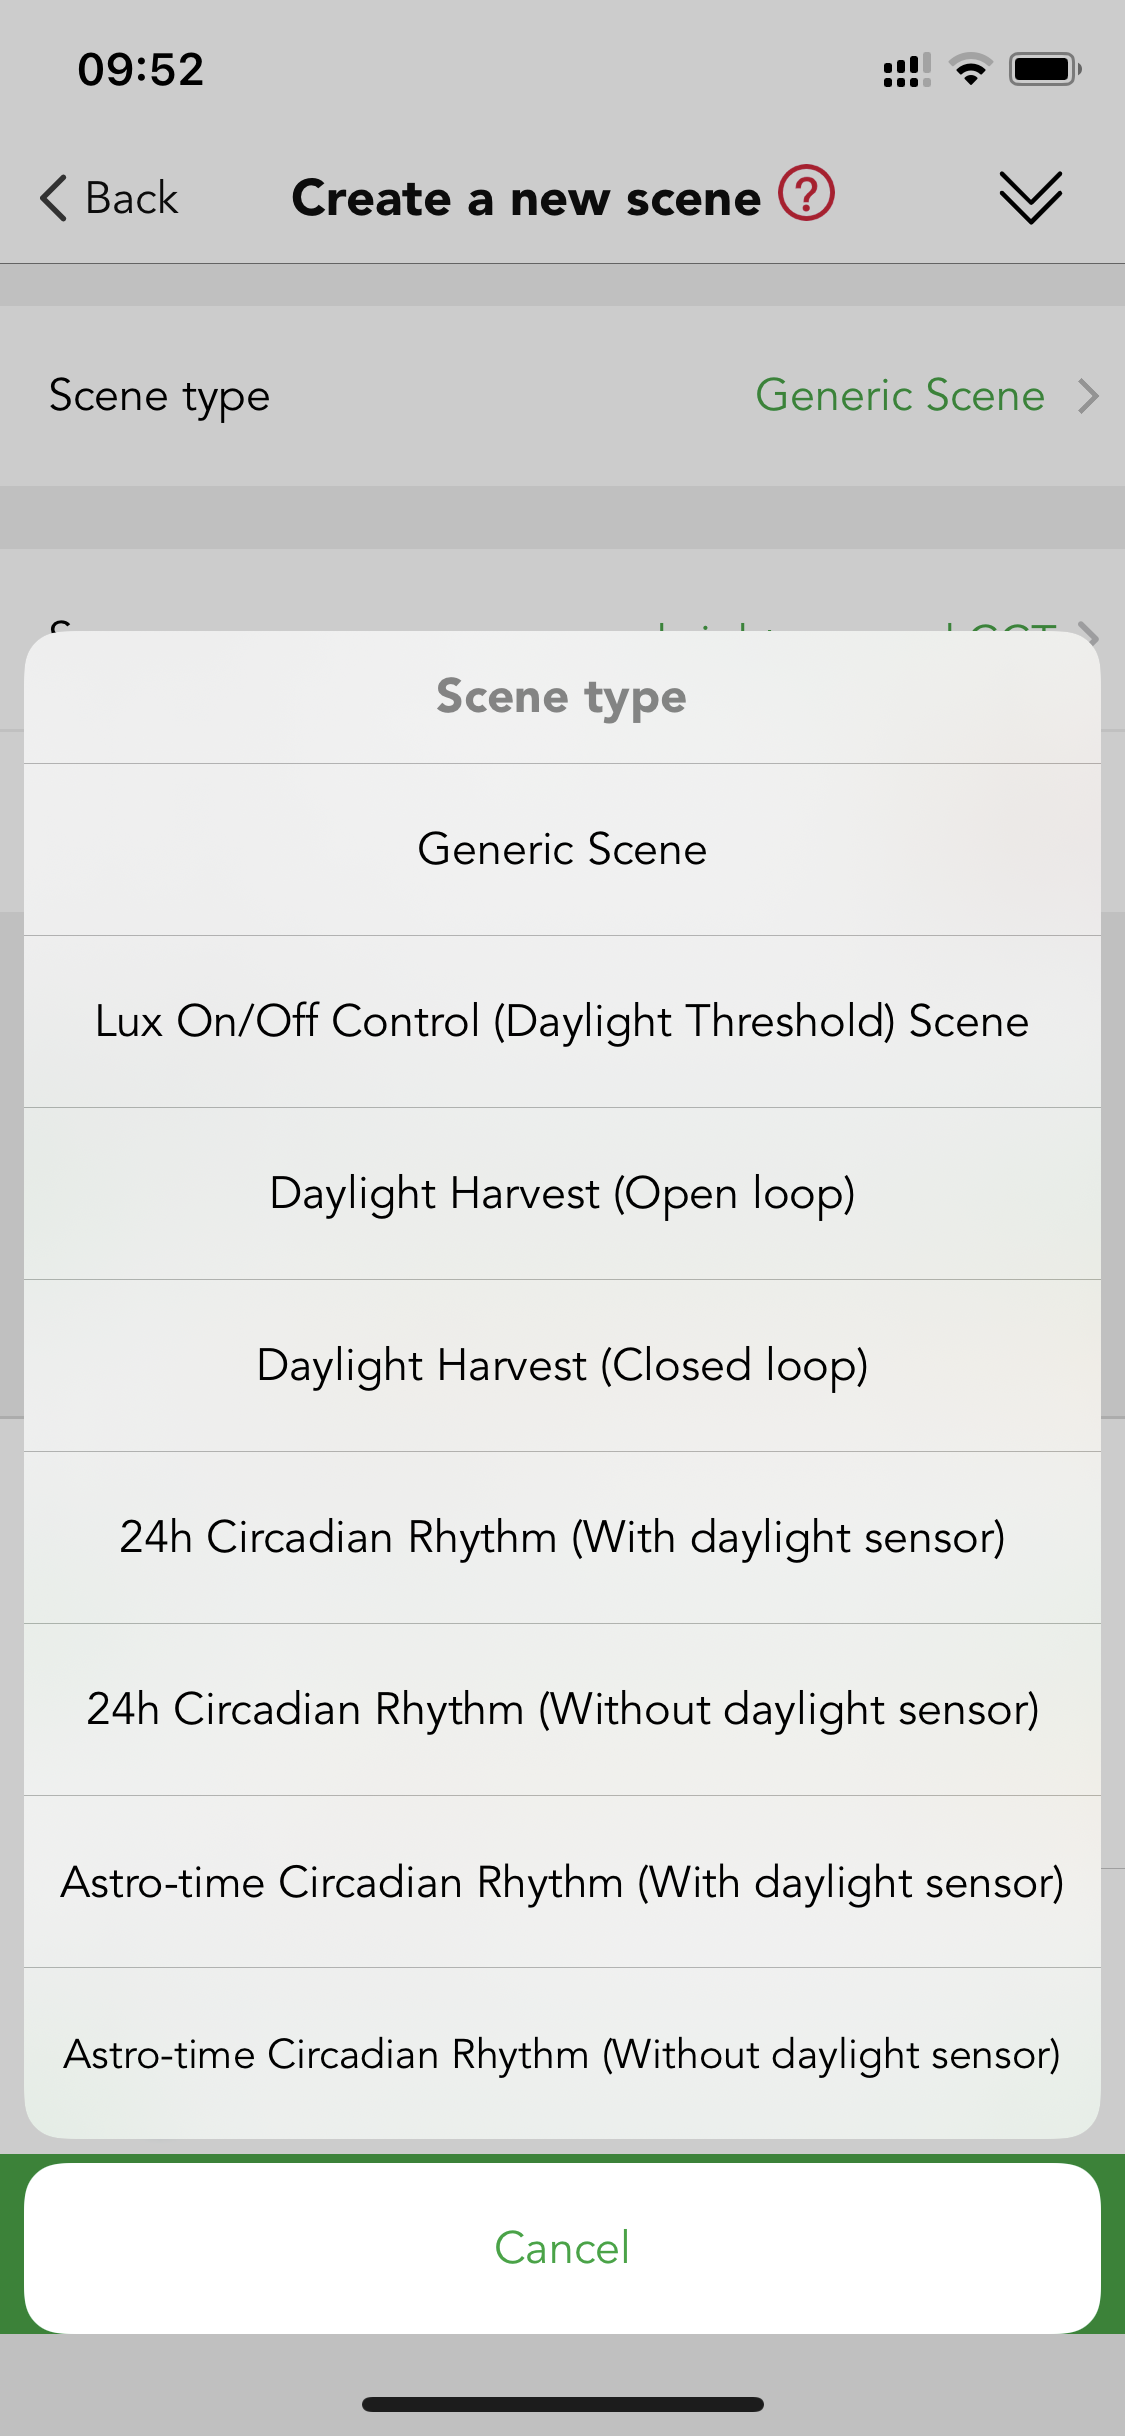
Type of scenes
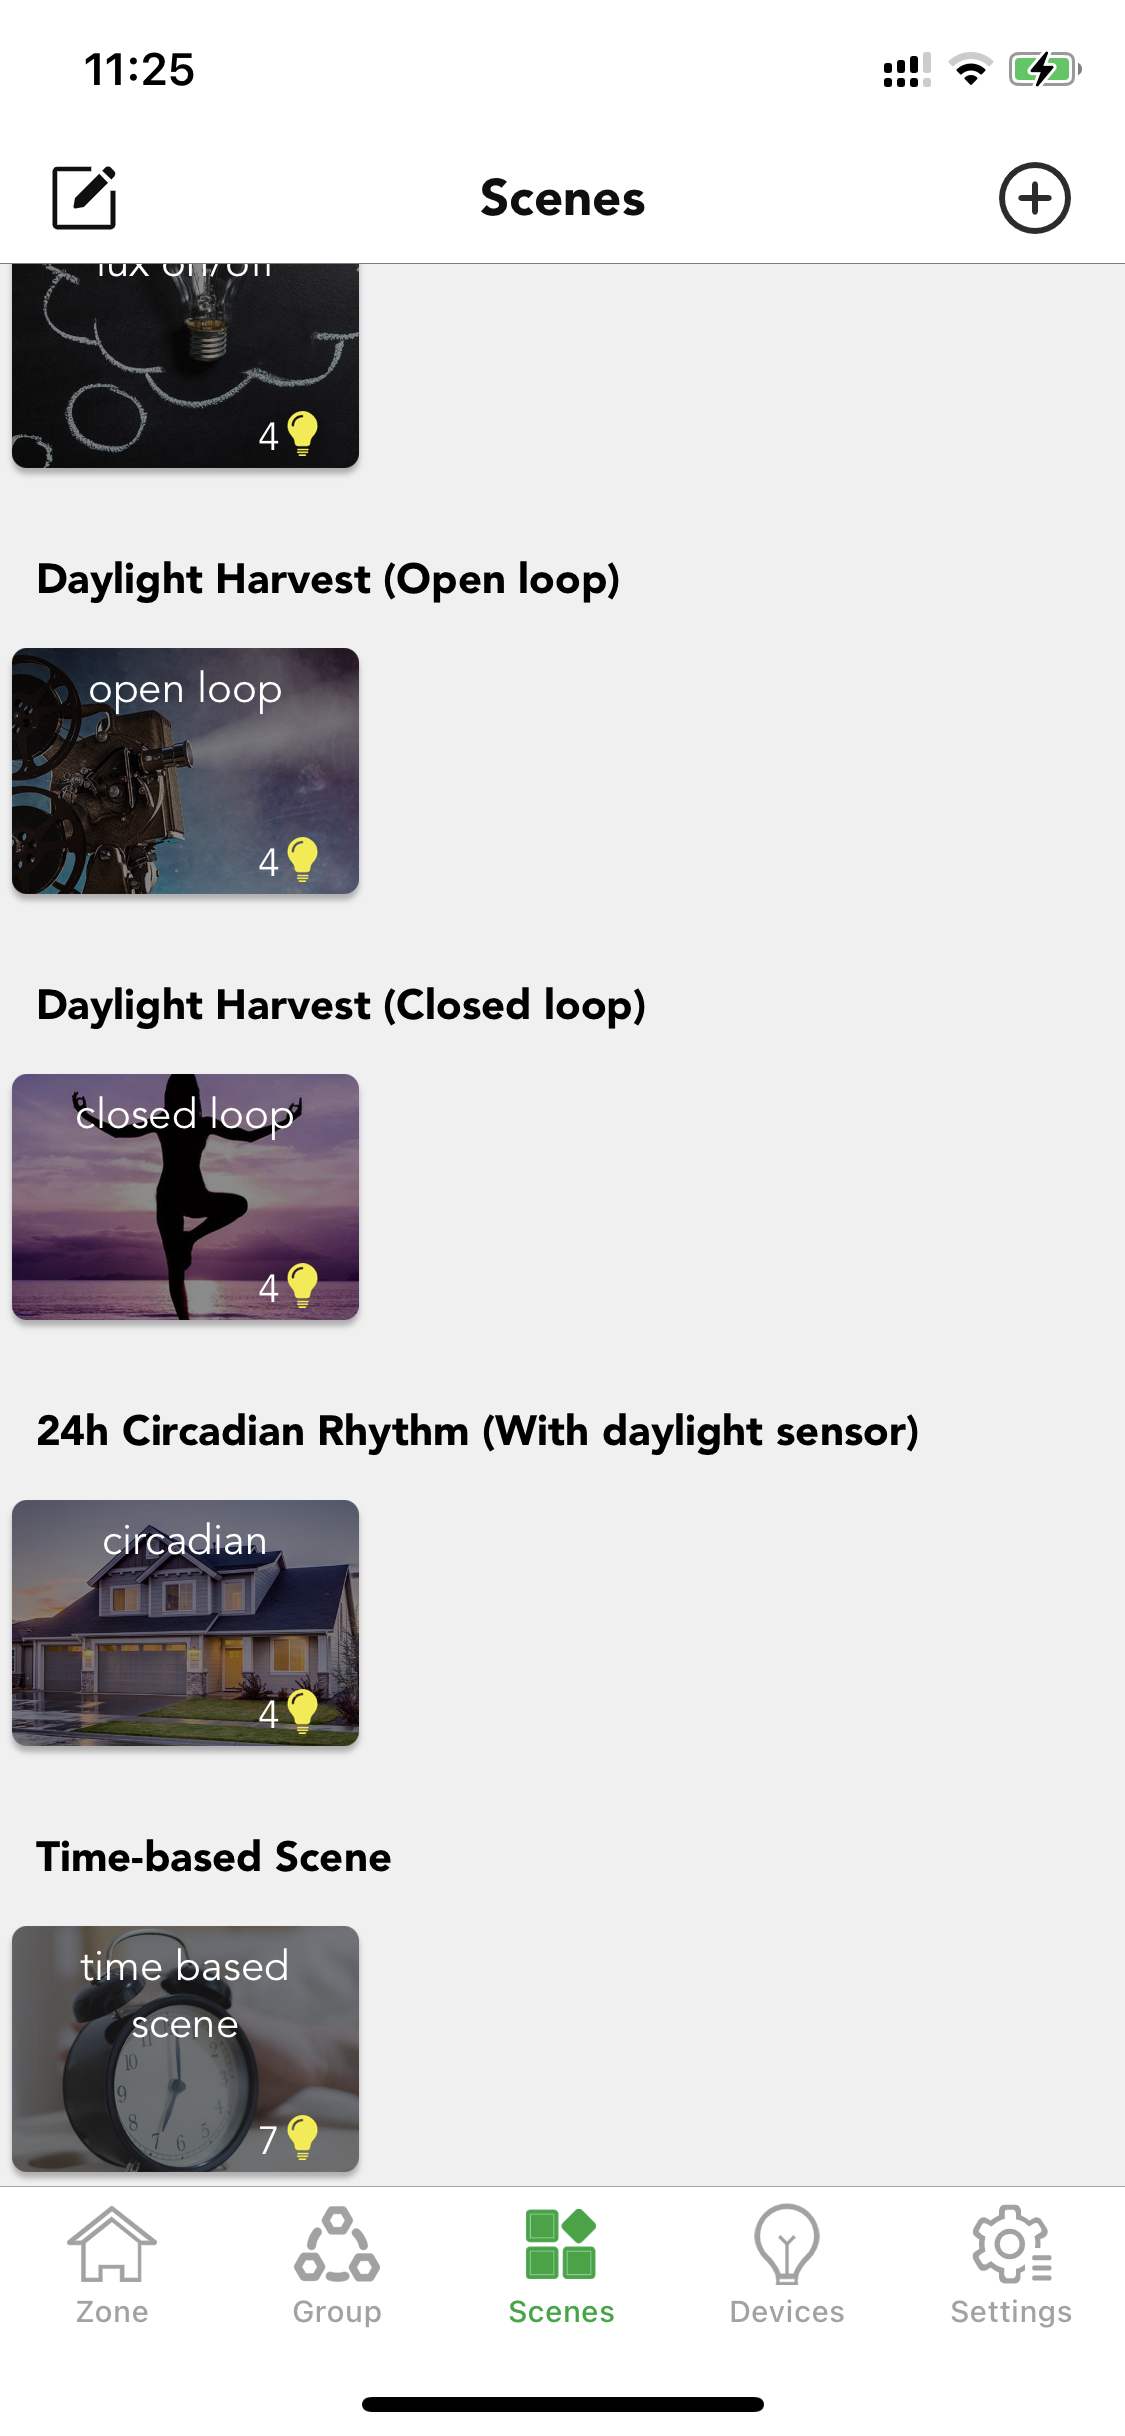
There are 7 types of scenes that can be created in the Koolmesh app. Users can create scenes depending on their requirements. Five of these have 8 variants for popular applications. The other two types are the Time-based scene and the Animation scene, which are more suitable for advanced users or special applications.
Generic Scene
This is a very simple lighting scenario (usually containing several luminaires adjusted to different dimming levels and/or color temperatures) that you wish to be able to recall. Users just need to set a fixed brightness level and color temperature to luminaires.
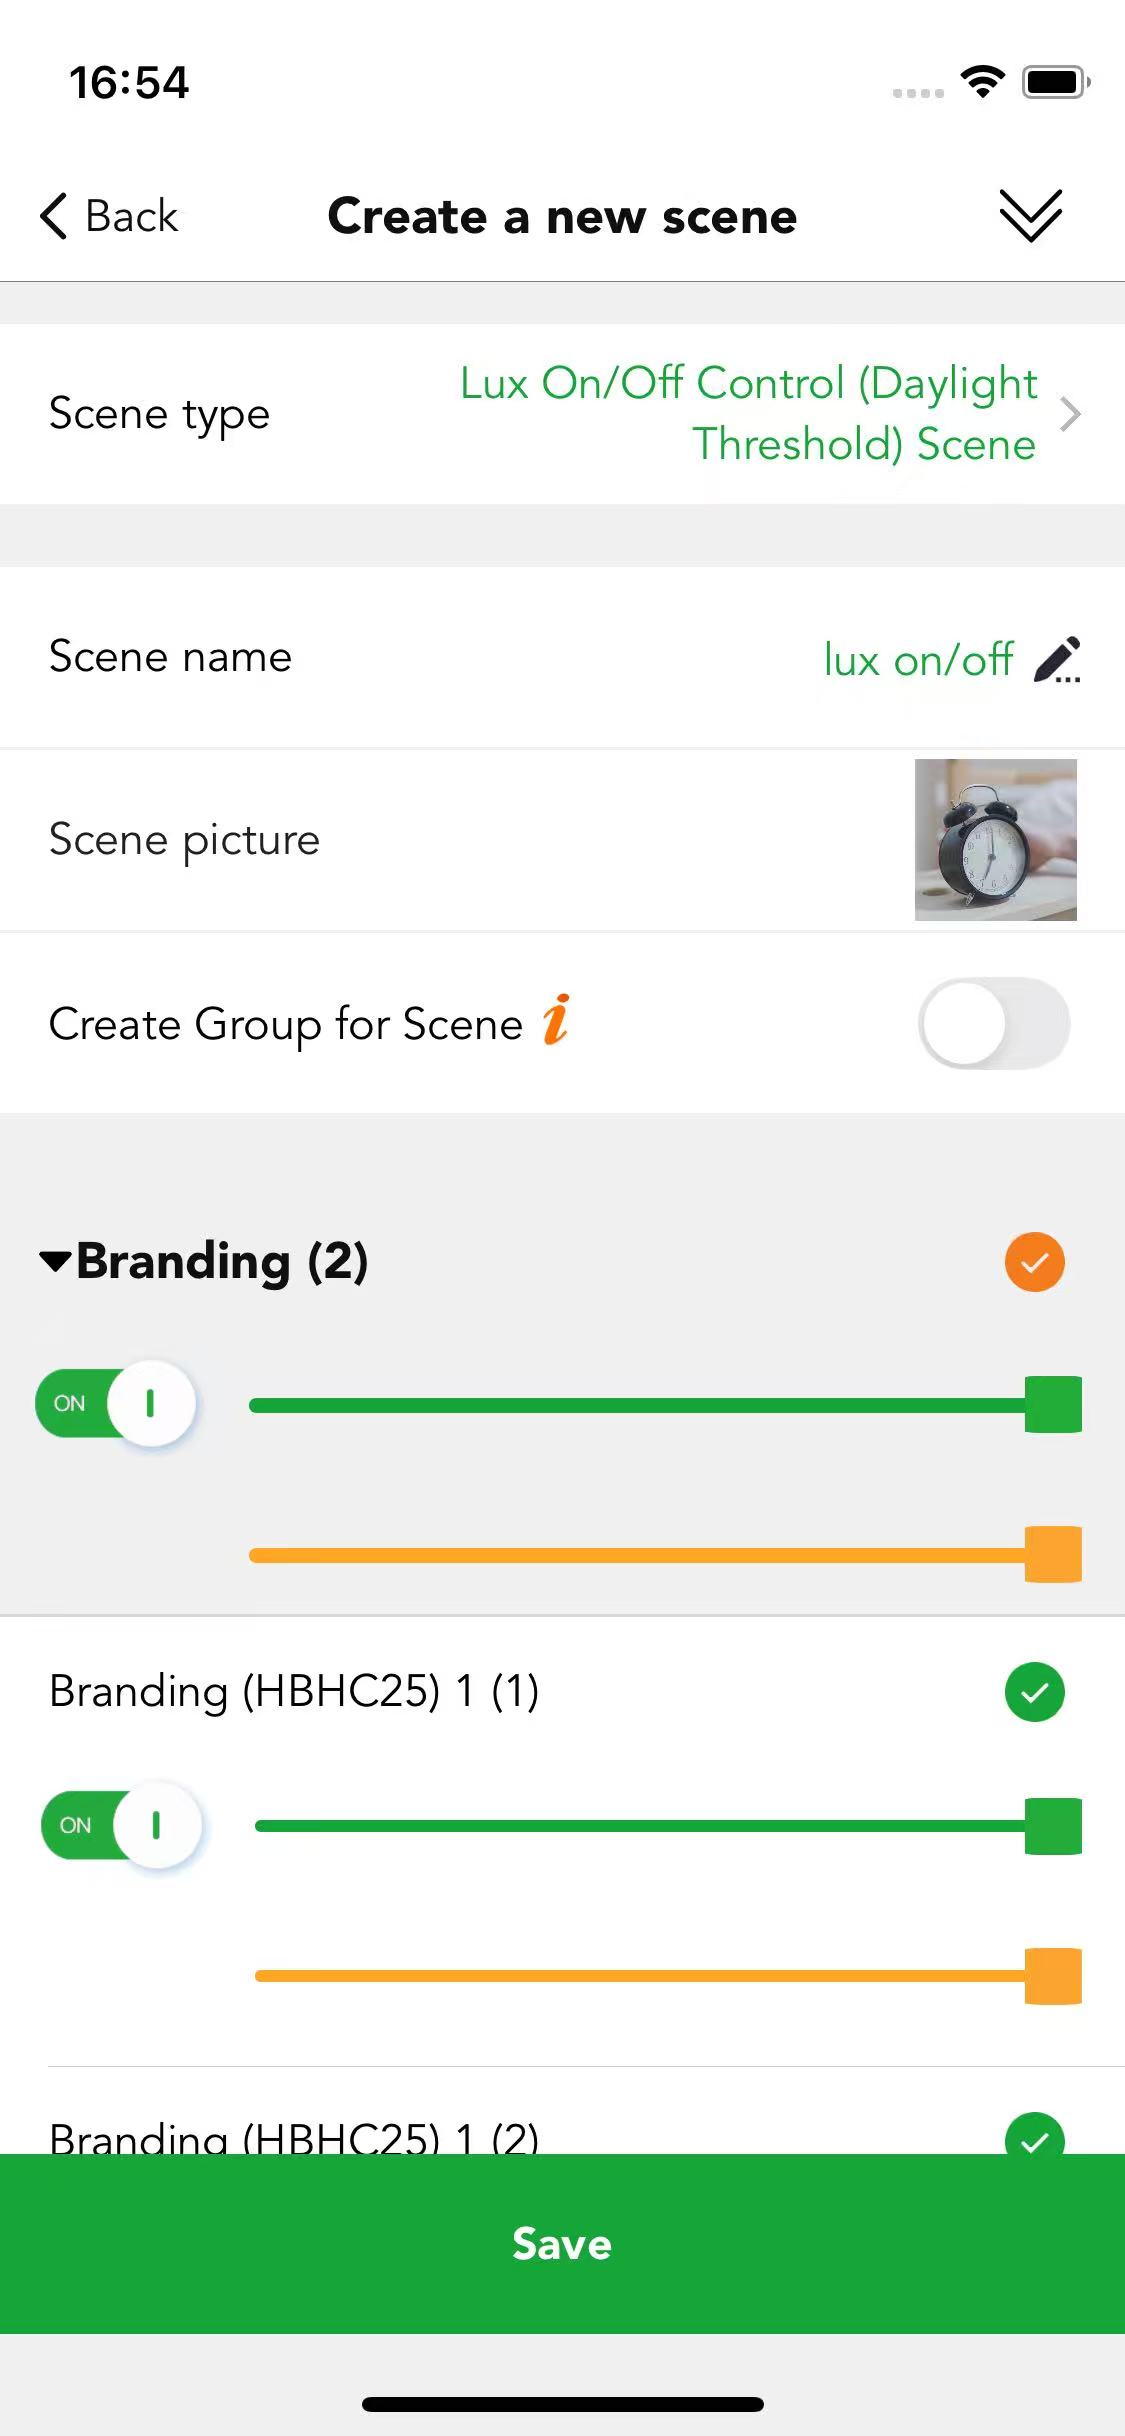
Lux On/Off Control (Daylight Threshold) Scene
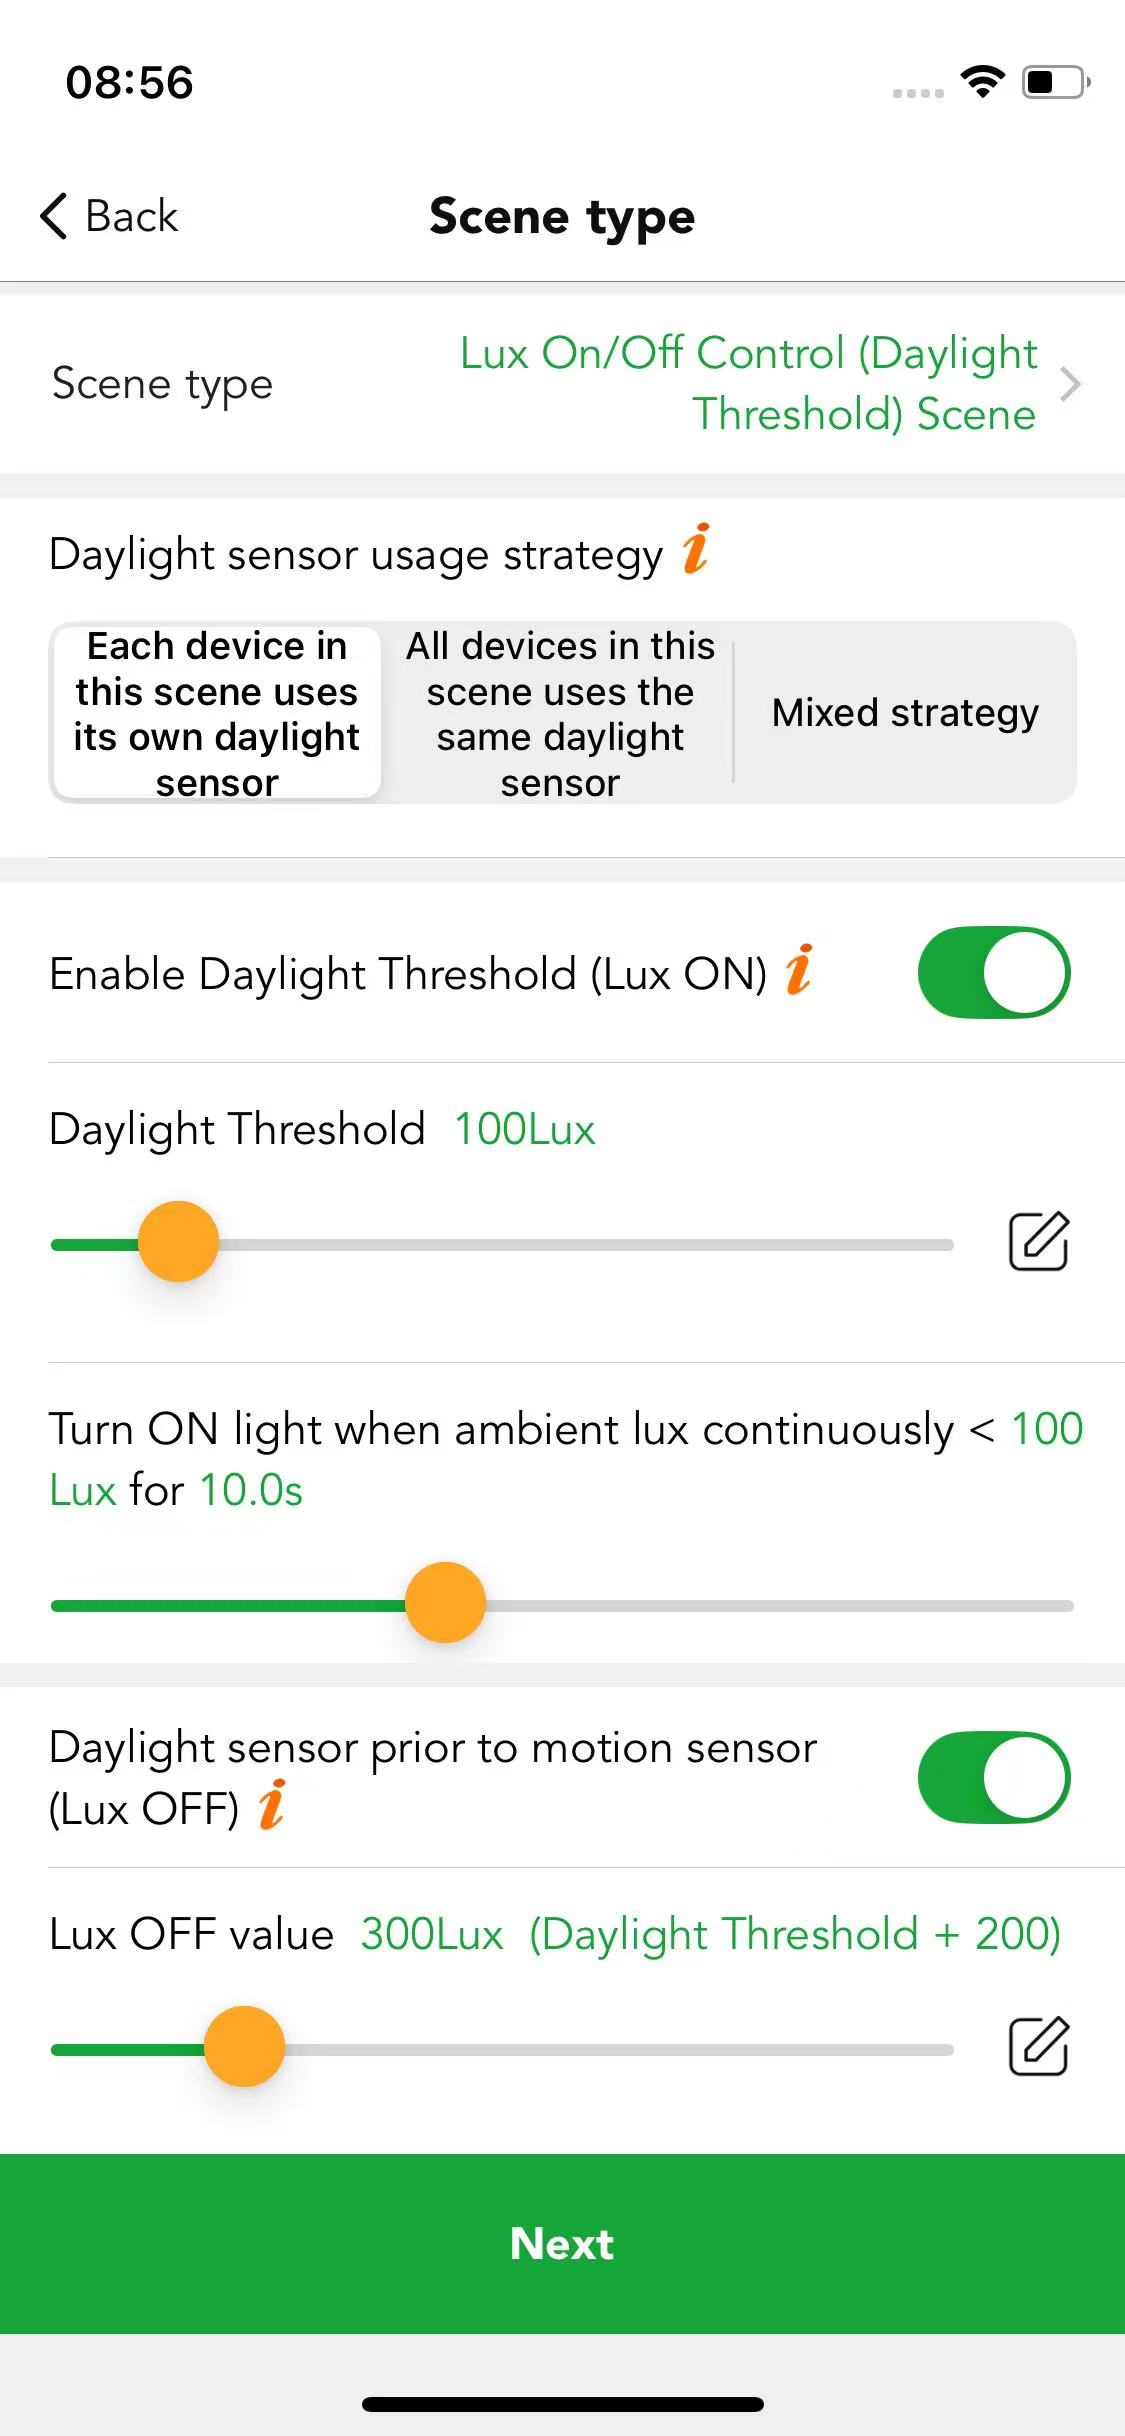
The luminaries turn on and off depending on the lux level setting. The scene's output is always defined by the dimming level(s) of the luminaires selected within the scene. The daylight sensor will keep measuring the ambient lux level. Users need to define the daylight threshold value, if they need the daylight sensor to turn off the luminaires, then they will need to define the Lux off value as well. There are many options in the scene.
● Daylight sensor usage strategy scene
If a dedicated sensor is selected and a daylight sensor is in the luminaire. The scene will run based on the lux reading from this dedicated sensor instead of using the external daylight sensor. If the dedicated daylight sensor is disabled, the scene will run based on lux reading from the external daylight sensor instead.
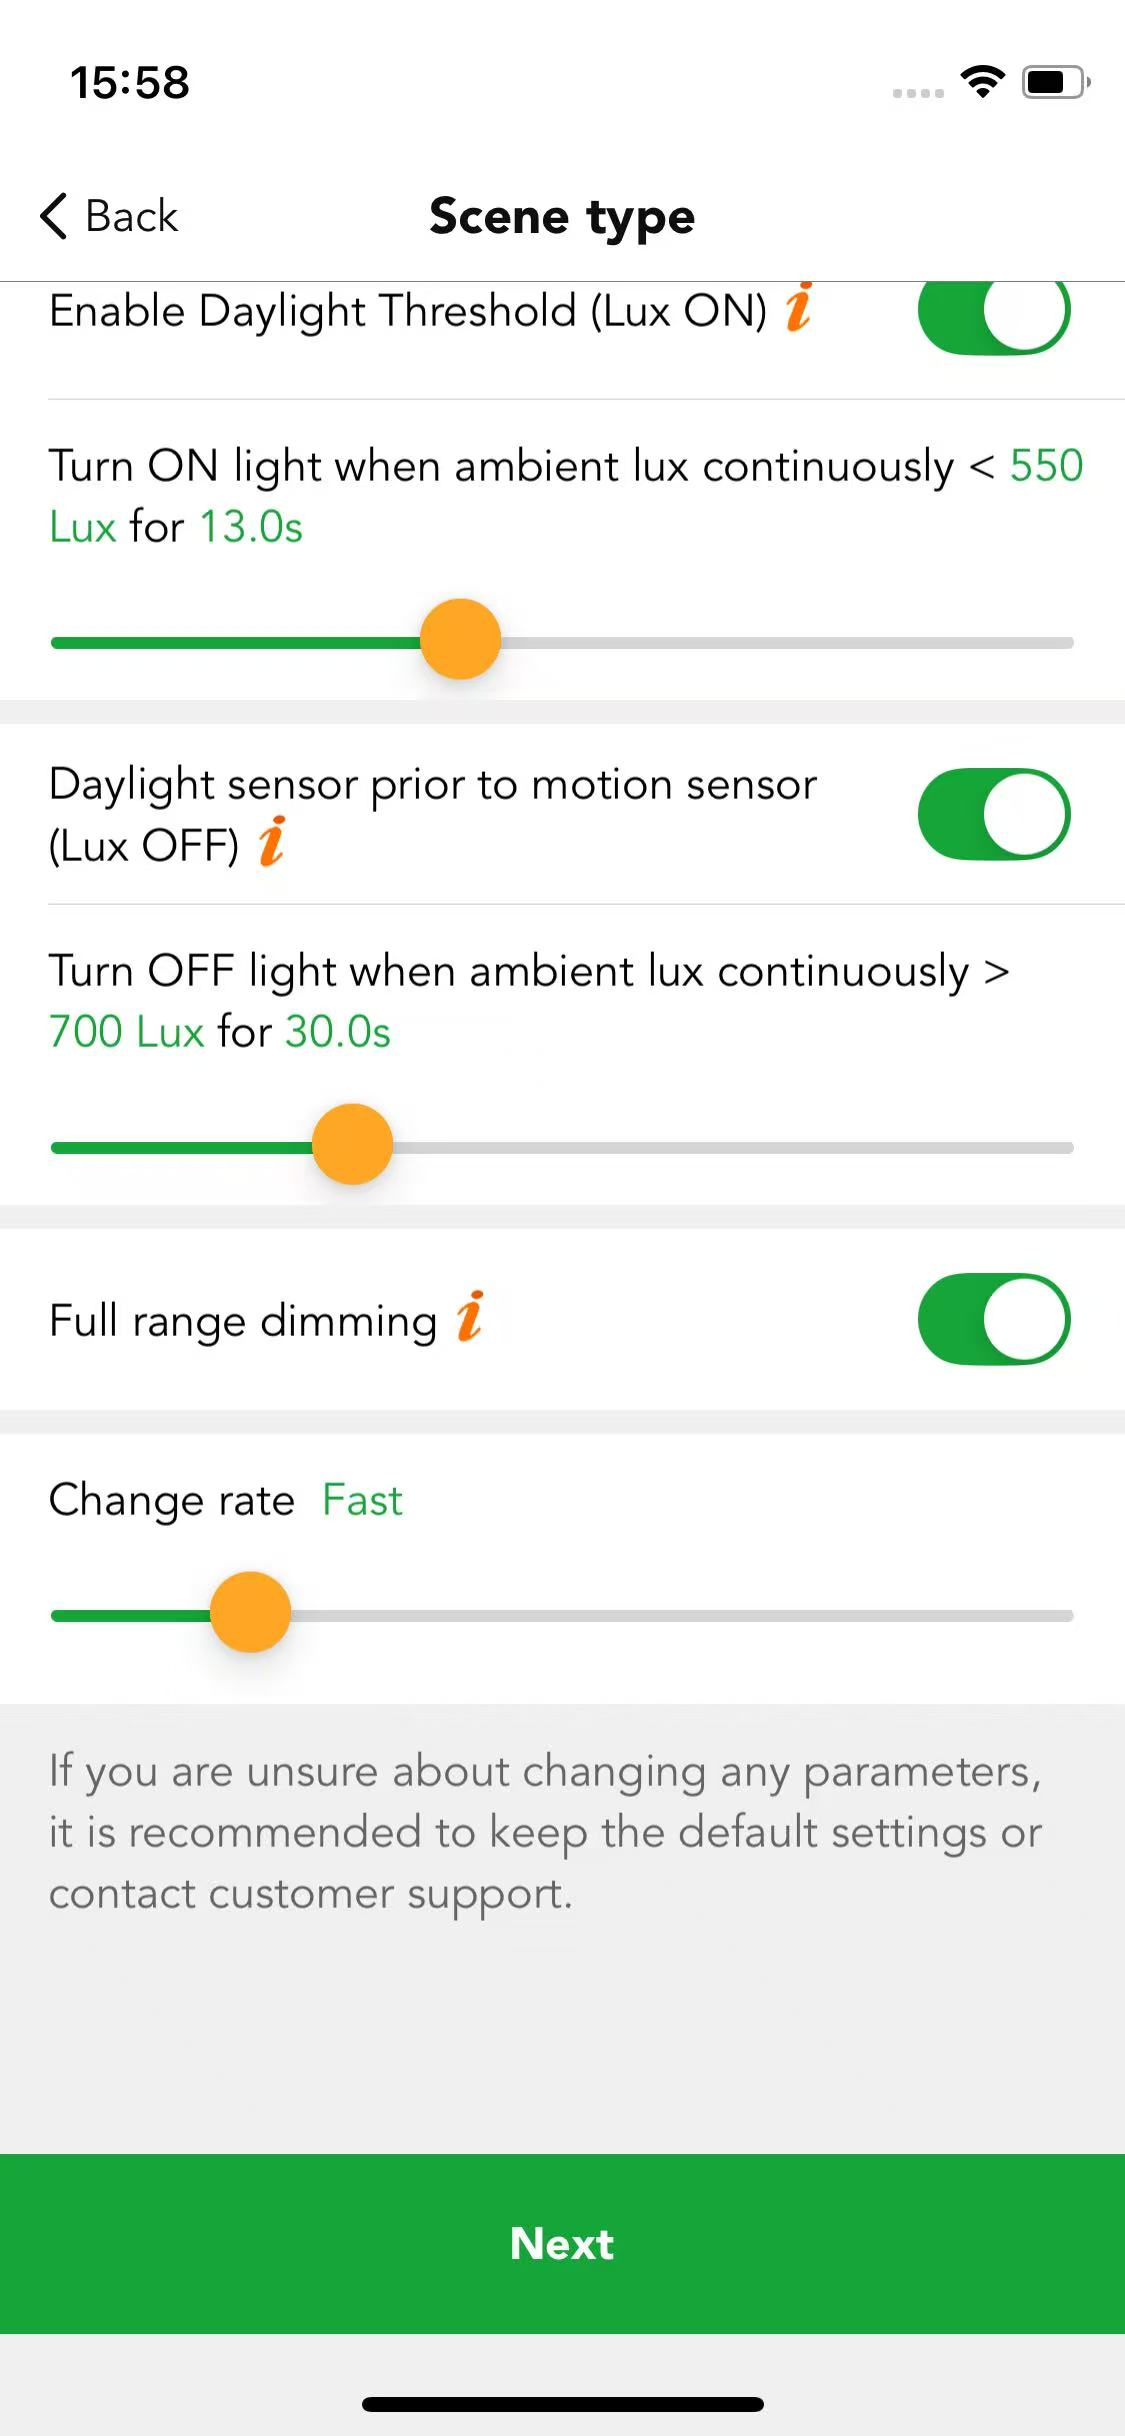
● Enable Daylight Threshold(Lux ON)
You can toggle the switch to enable or disable the Daylight Threshold function. When enabled, the light will not turn on if the ambient light level is above the set threshold, and will only activate when the ambient light level falls below the threshold. When disabled, the light will turn on regardless of the ambient light level, and the Lux OFF function must be deactivated. In constant light mode, the light will only dim to the minimum brightness and will not turn off completely. This function is enabled by default.
● Daylight Threshold
The target value set by the users. When the ambient lux is less than it, the daylight sensor will turn on the luminaires and remain the output until the ambient lux exceeds the lux off value. Users can define the measuring time: when the ambient lux continuously less than daylight threshold value for how long, then the luminaires will be turned on.
● Daylight sensor prior to motion sensor (Lux off)
When the ambient lux is strong enough and exceeds the "Lux off value", then the luminaires will be turned off by the daylight sensor. If this function is disabled, when the daylight threshold scene is activated, then the luminaires will not be turned off by the daylight sensor.
● Lux off value
The target value set by the users, when the ambient lux level is more than this, the daylight sensor will turn off the luminaires. Users can define the measuring time: when the ambient lux continuously more than lux off value for how long, then the luminaires will be turned off.
Case 1: how to create a daylight threshold scene by using a schedule?
Requirements: client wants the luminaires to be on at morning 8:00, then the daylight sensor needs to control the luminaries. When the natural light is not sufficient to 300 lux. Then the luminaires need to be turned on until the natural light is sufficient to meet 500 lux, then the daylight sensor will turn off the luminaires.
1.Create a Lux On/Off Control (Daylight Threshold) Scene
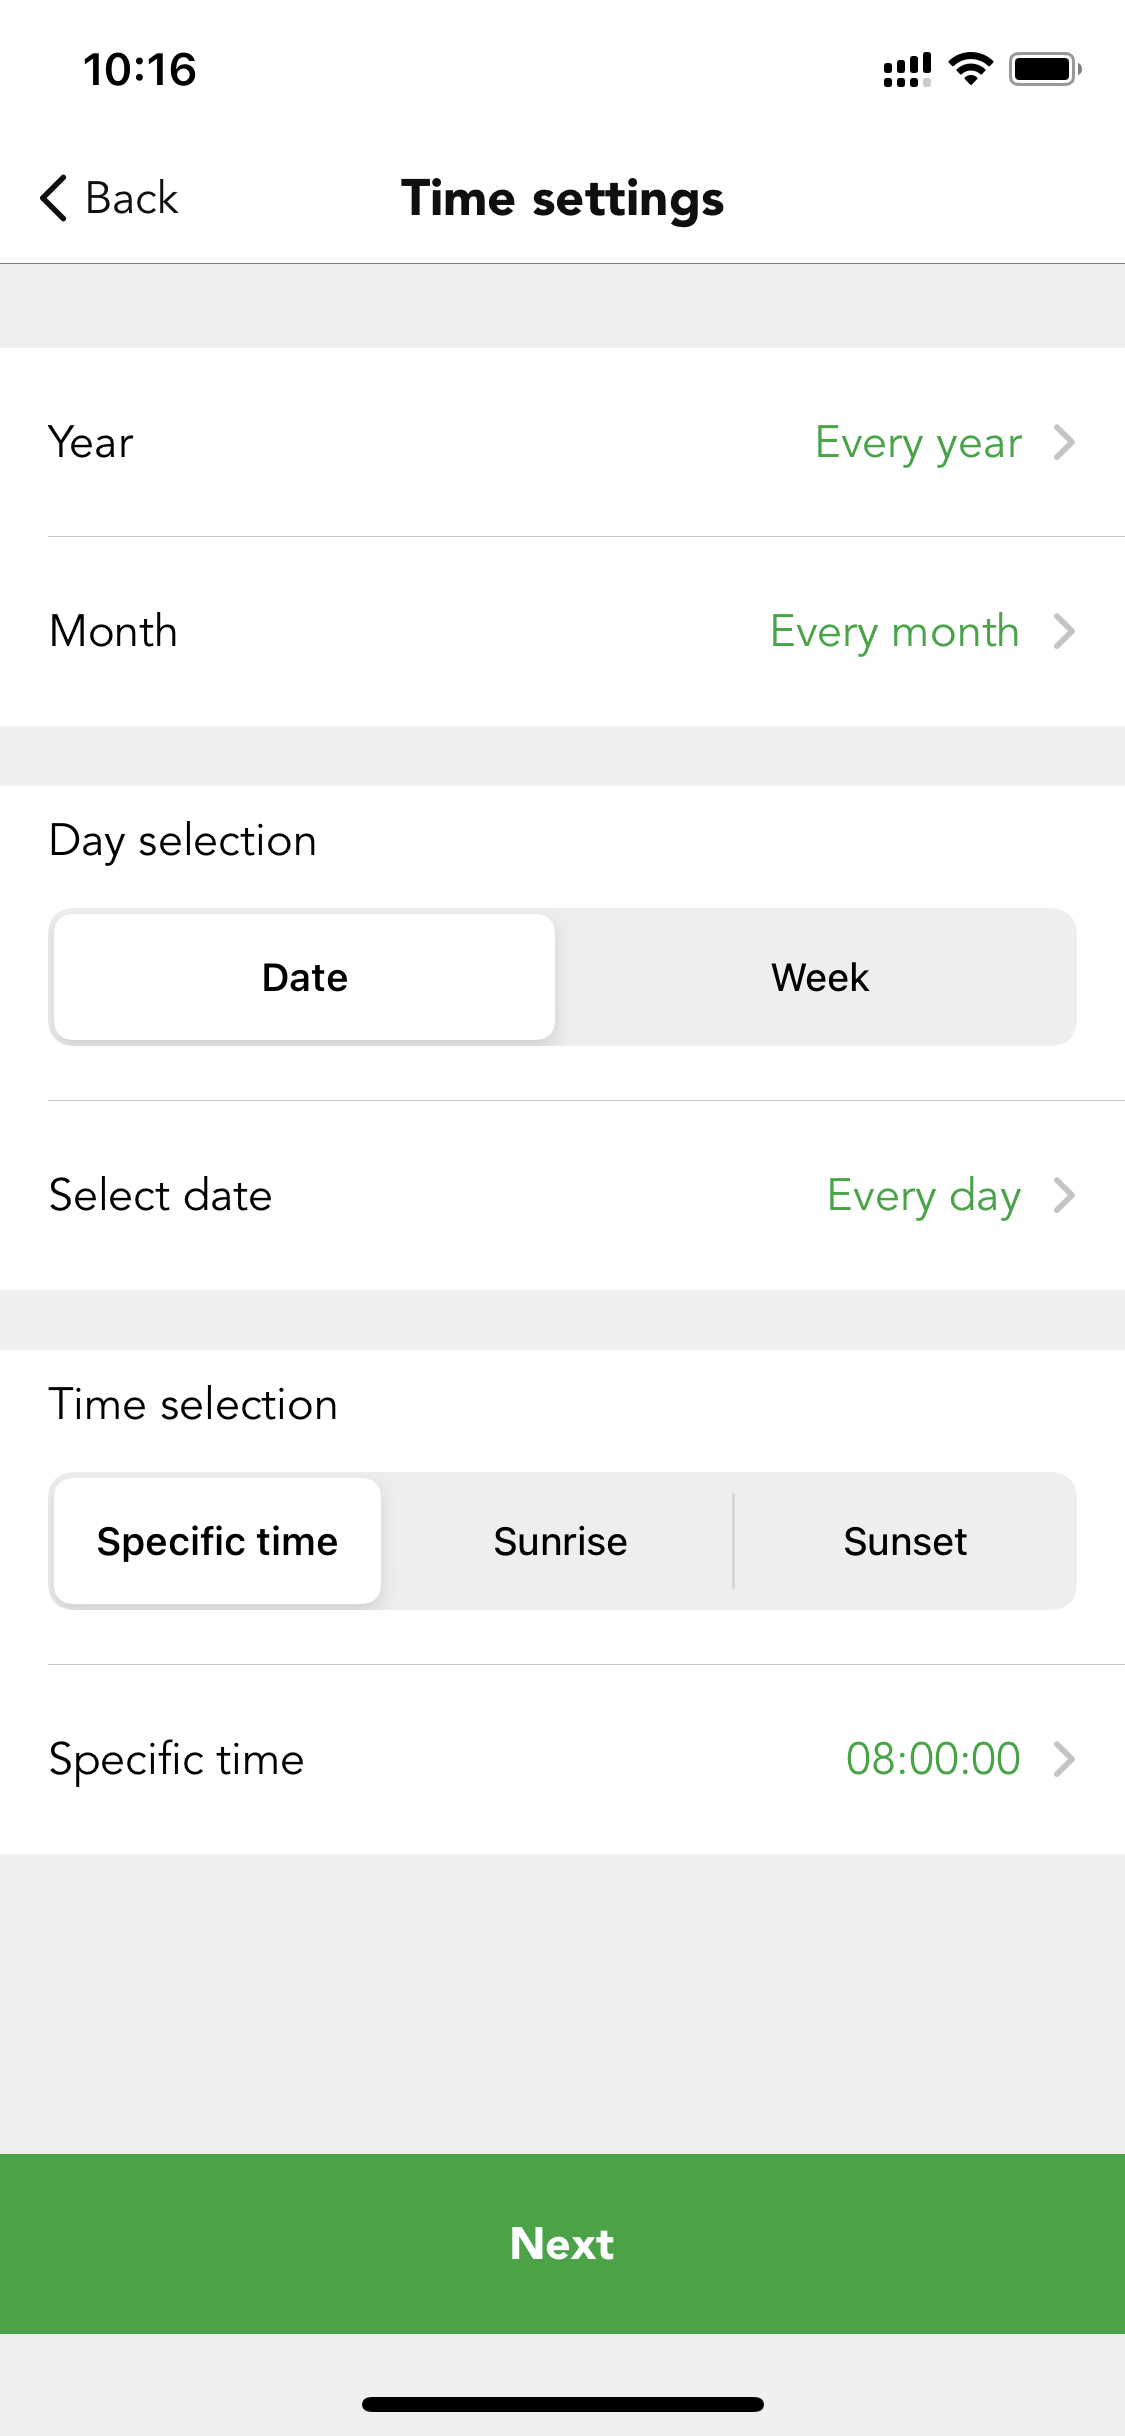
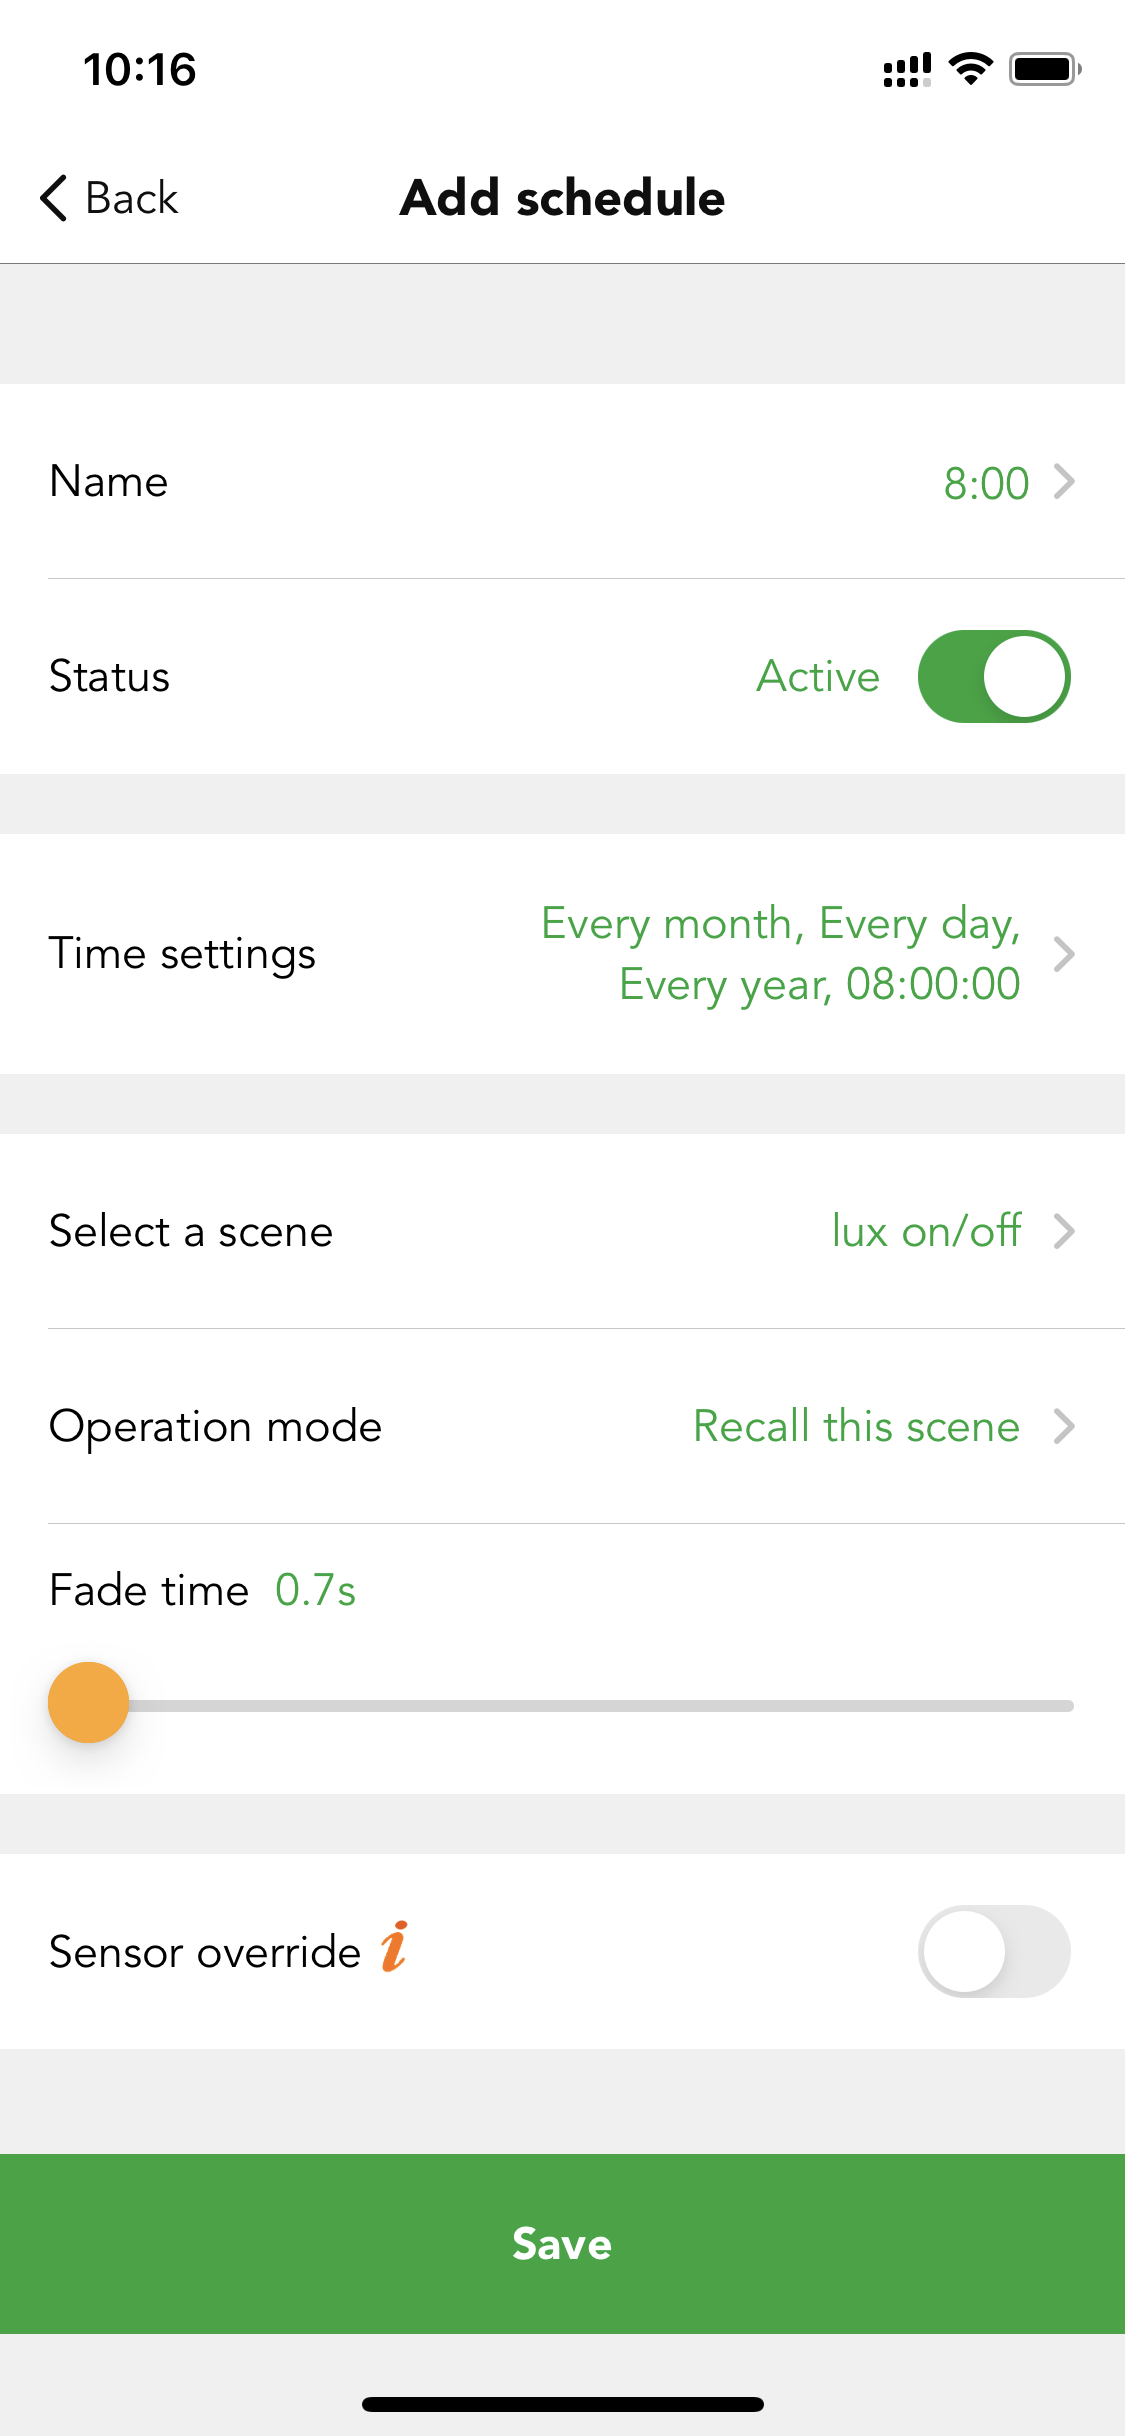
2.Create an 8:00 am schedule to recall this scene
Daylight Harvest Scene
Daylight harvest scenes utilize information provided by daylight sensors to automatically adjust the scene lighting level based on the amount of light available.
There are two types of daylight harvest in the Koolmesh system: open loop and closed loop.
Open loop

When the ambient lux is strong enough and exceeds the "Lux off value", then the luminaires will be turned off by the daylight sensor. If this function is disabled, when the daylight threshold scene is activated, then the luminaires will not be turned off by the daylight sensor but will dim down to a small low level.
● Daylight sensor usage strategy
If a dedicated sensor is selected and a daylight sensor is in the luminaire. The scene will run based on the lux reading from this dedicated sensor instead of using the external daylight sensor. If the dedicated daylight sensor is disabled, the scene will run based on lux reading from the external daylight sensor instead (need to choose the control object of this daylight sensor).
● Enable Daylight Threshold(Lux ON)
You can toggle the switch to enable or disable the Daylight Threshold function. When enabled, the light will not turn on if the ambient light level is above the set threshold, and will only activate when the ambient light level falls below the threshold. When disabled, the light will turn on regardless of the ambient light level, and the Lux OFF function must be deactivated. In constant light mode, the light will only dim to the minimum brightness and will not turn off completely. This function is enabled by default.
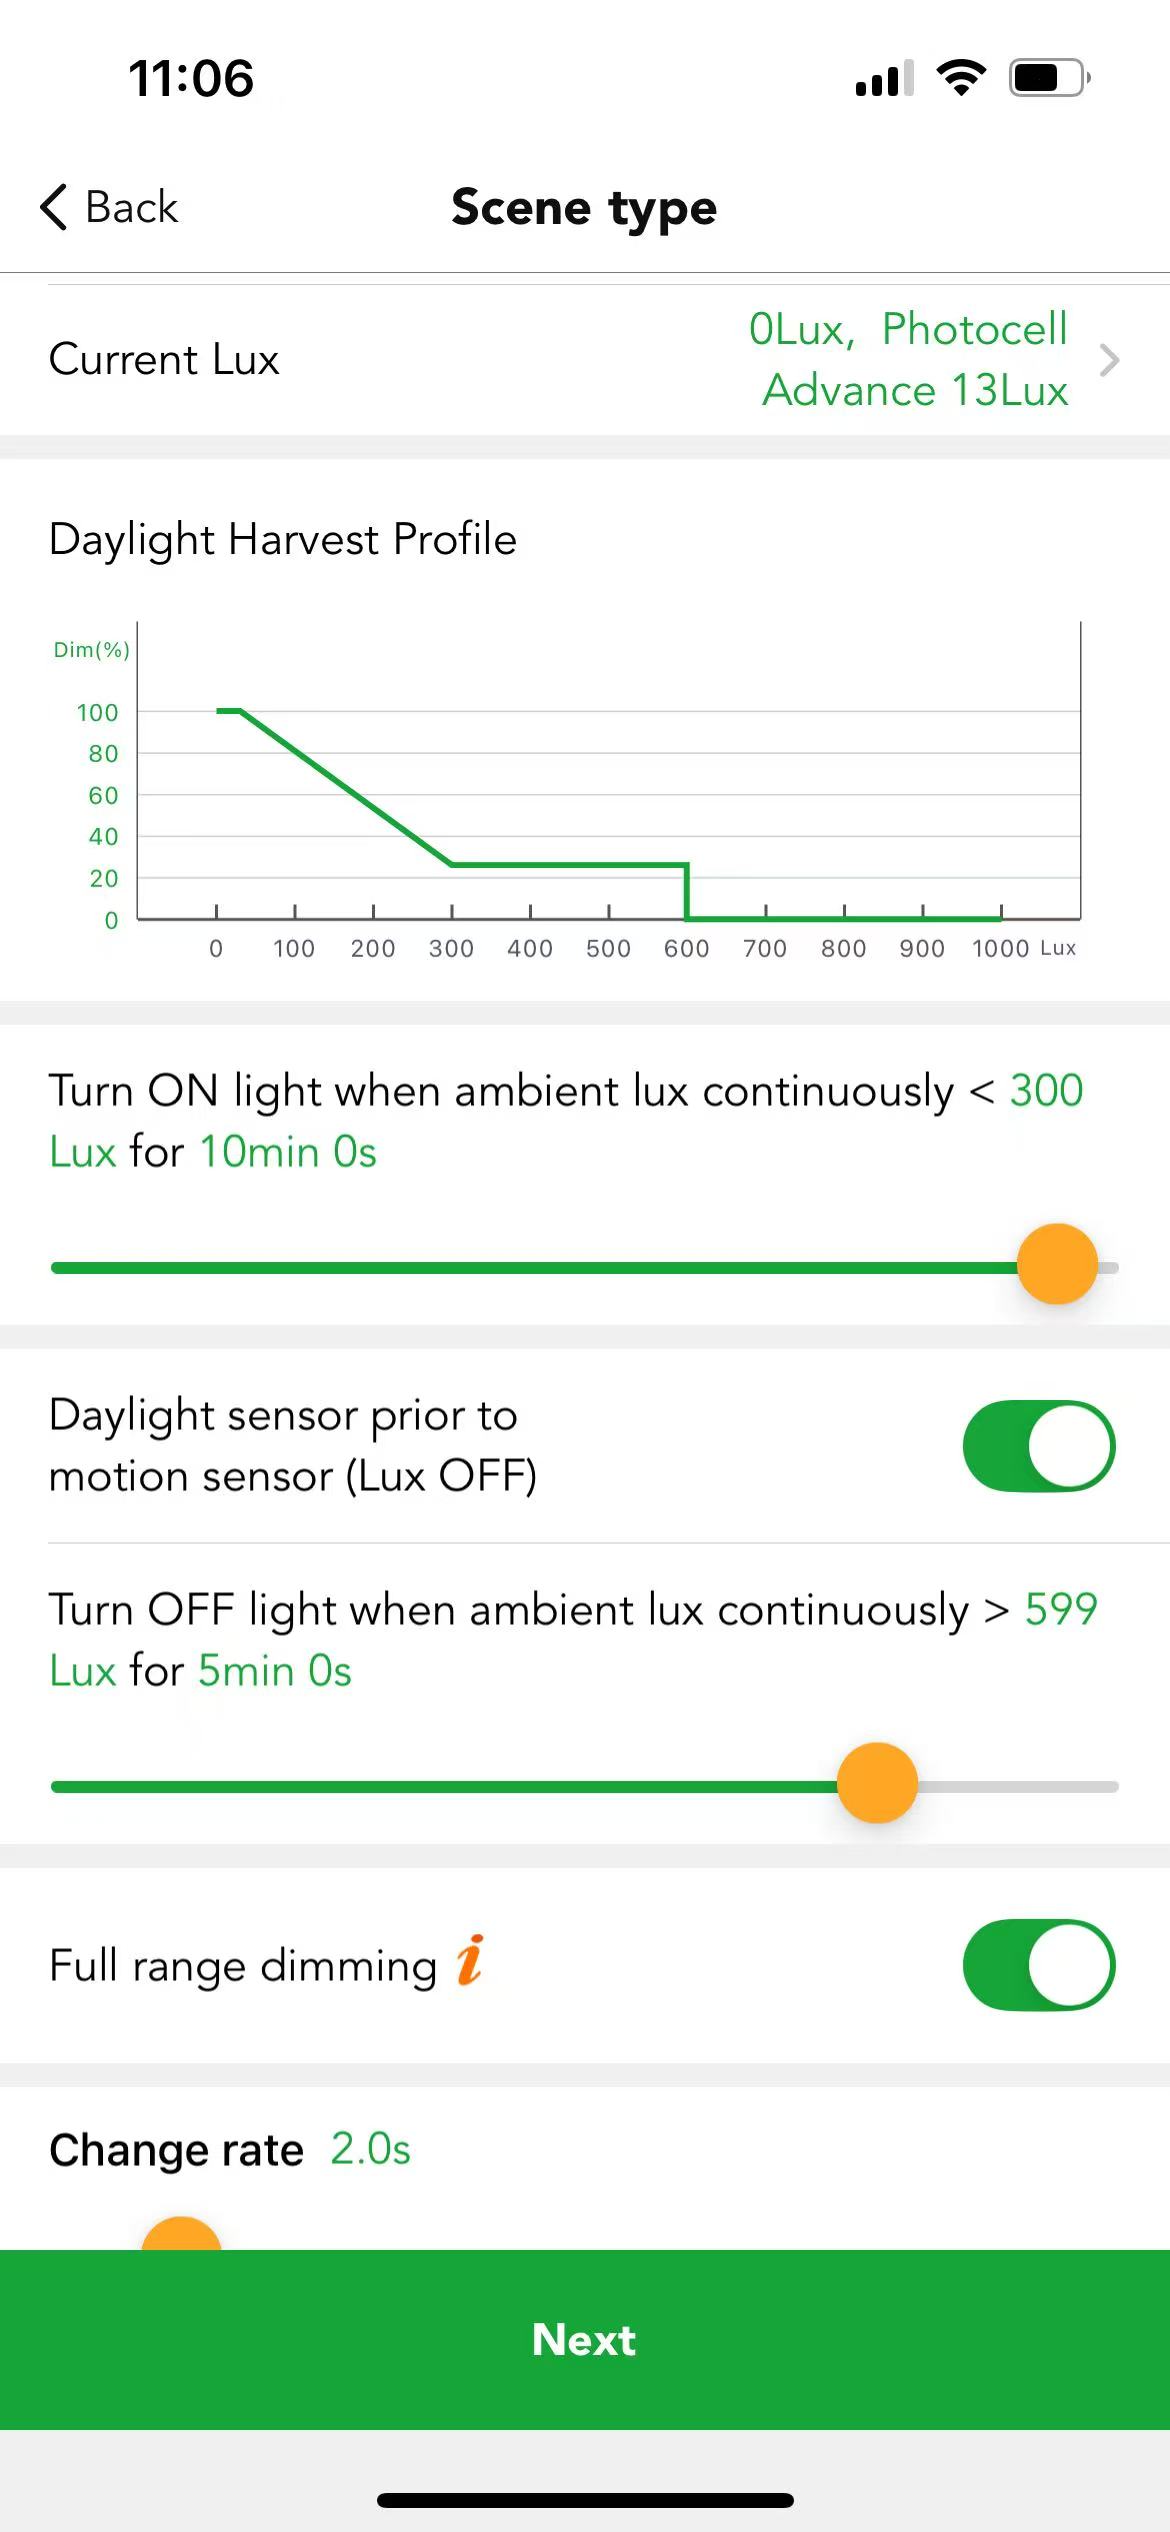
● Daylight harvest profile
Koolmesh system provide two ways to setup the daylight harvest profile.
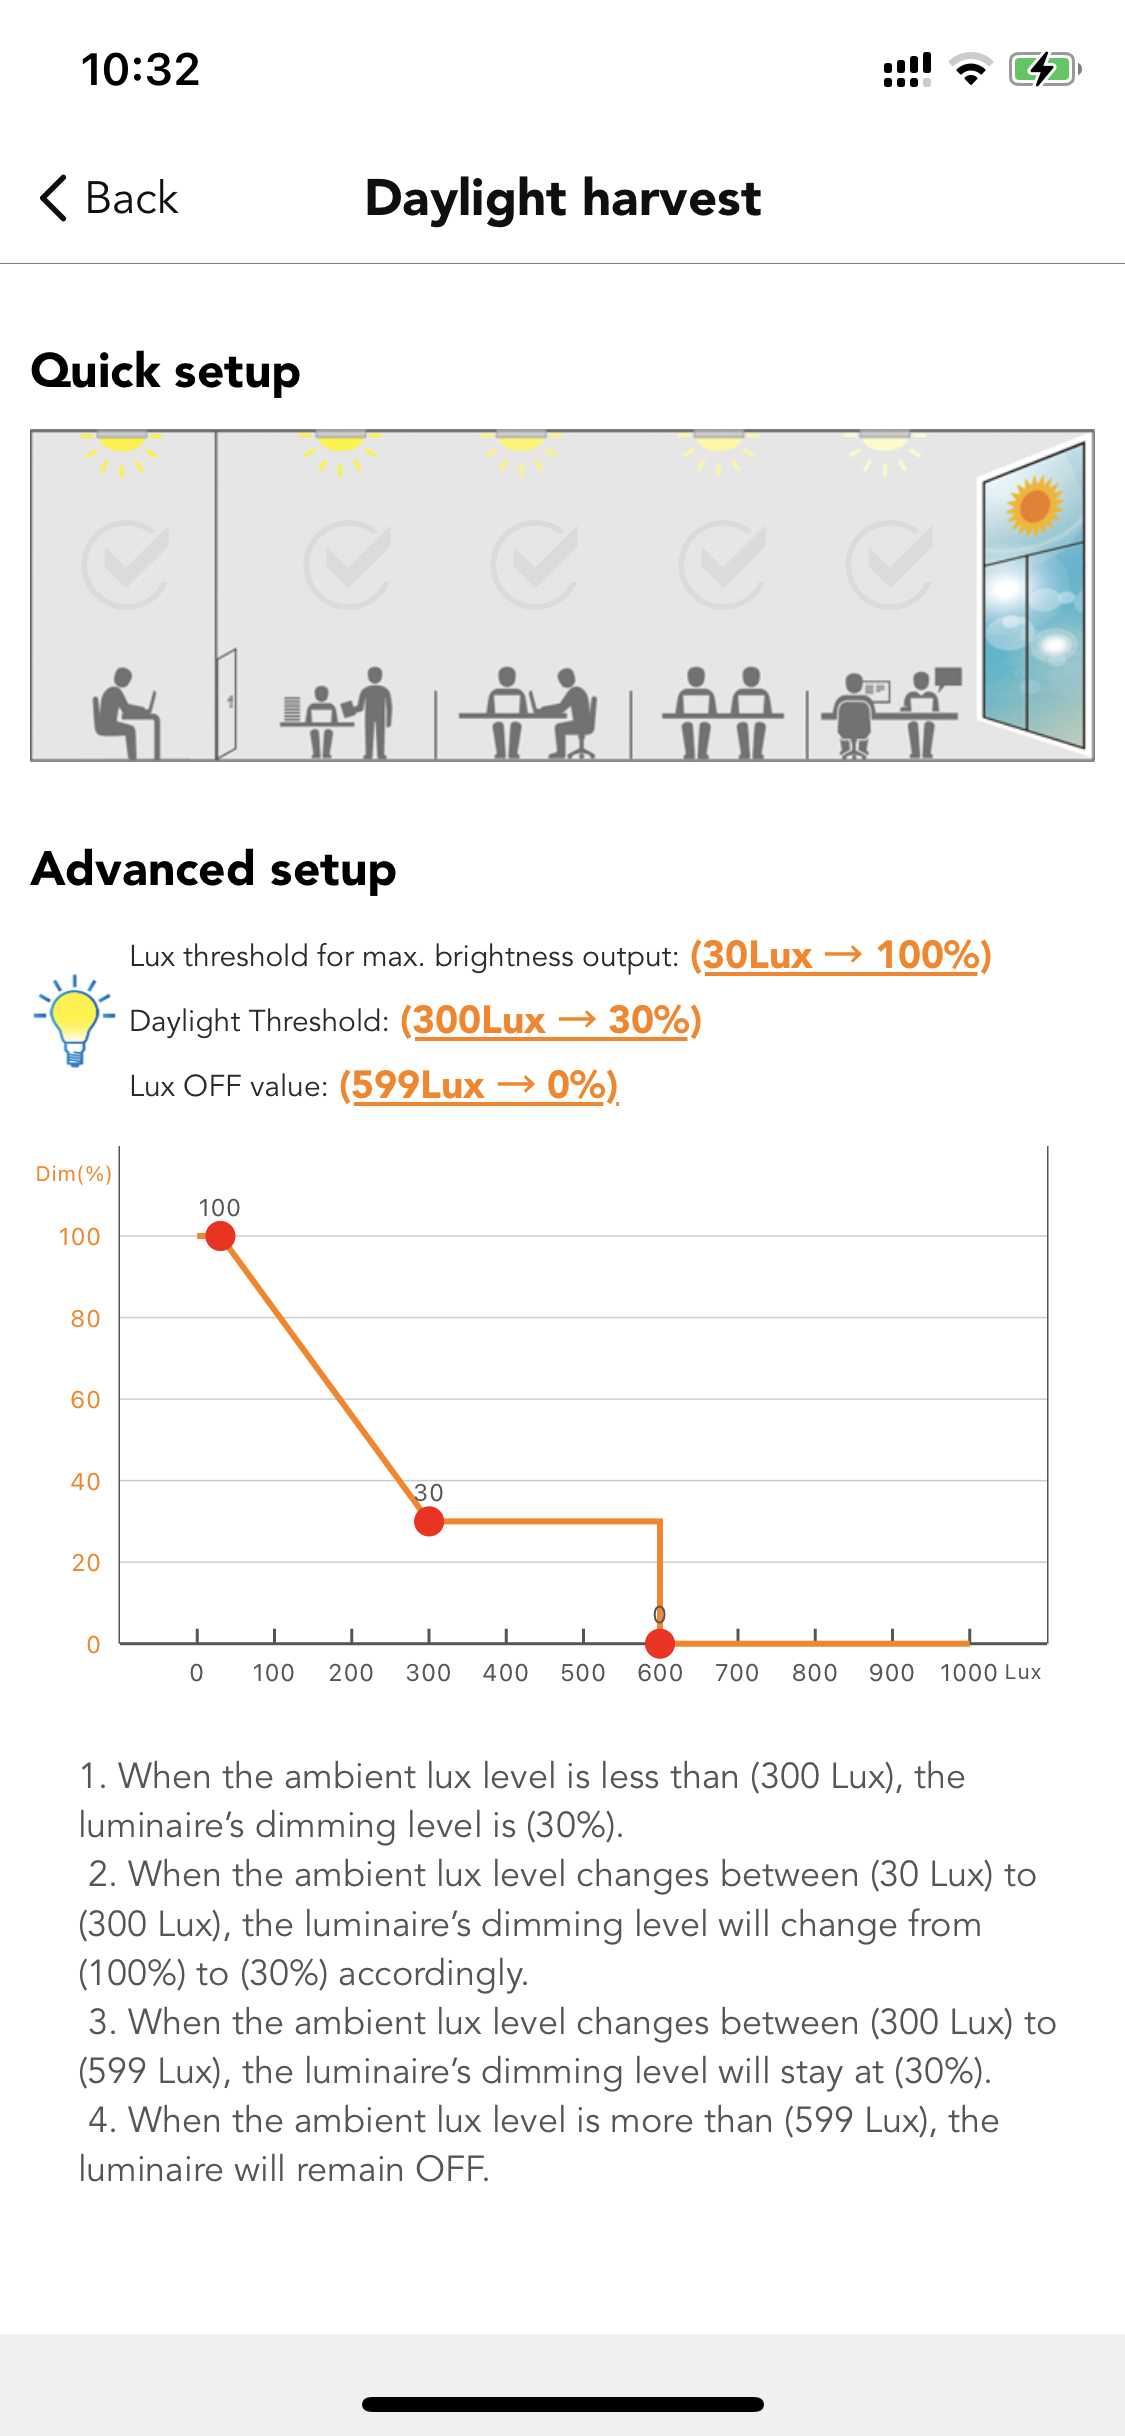
a. Quick setup
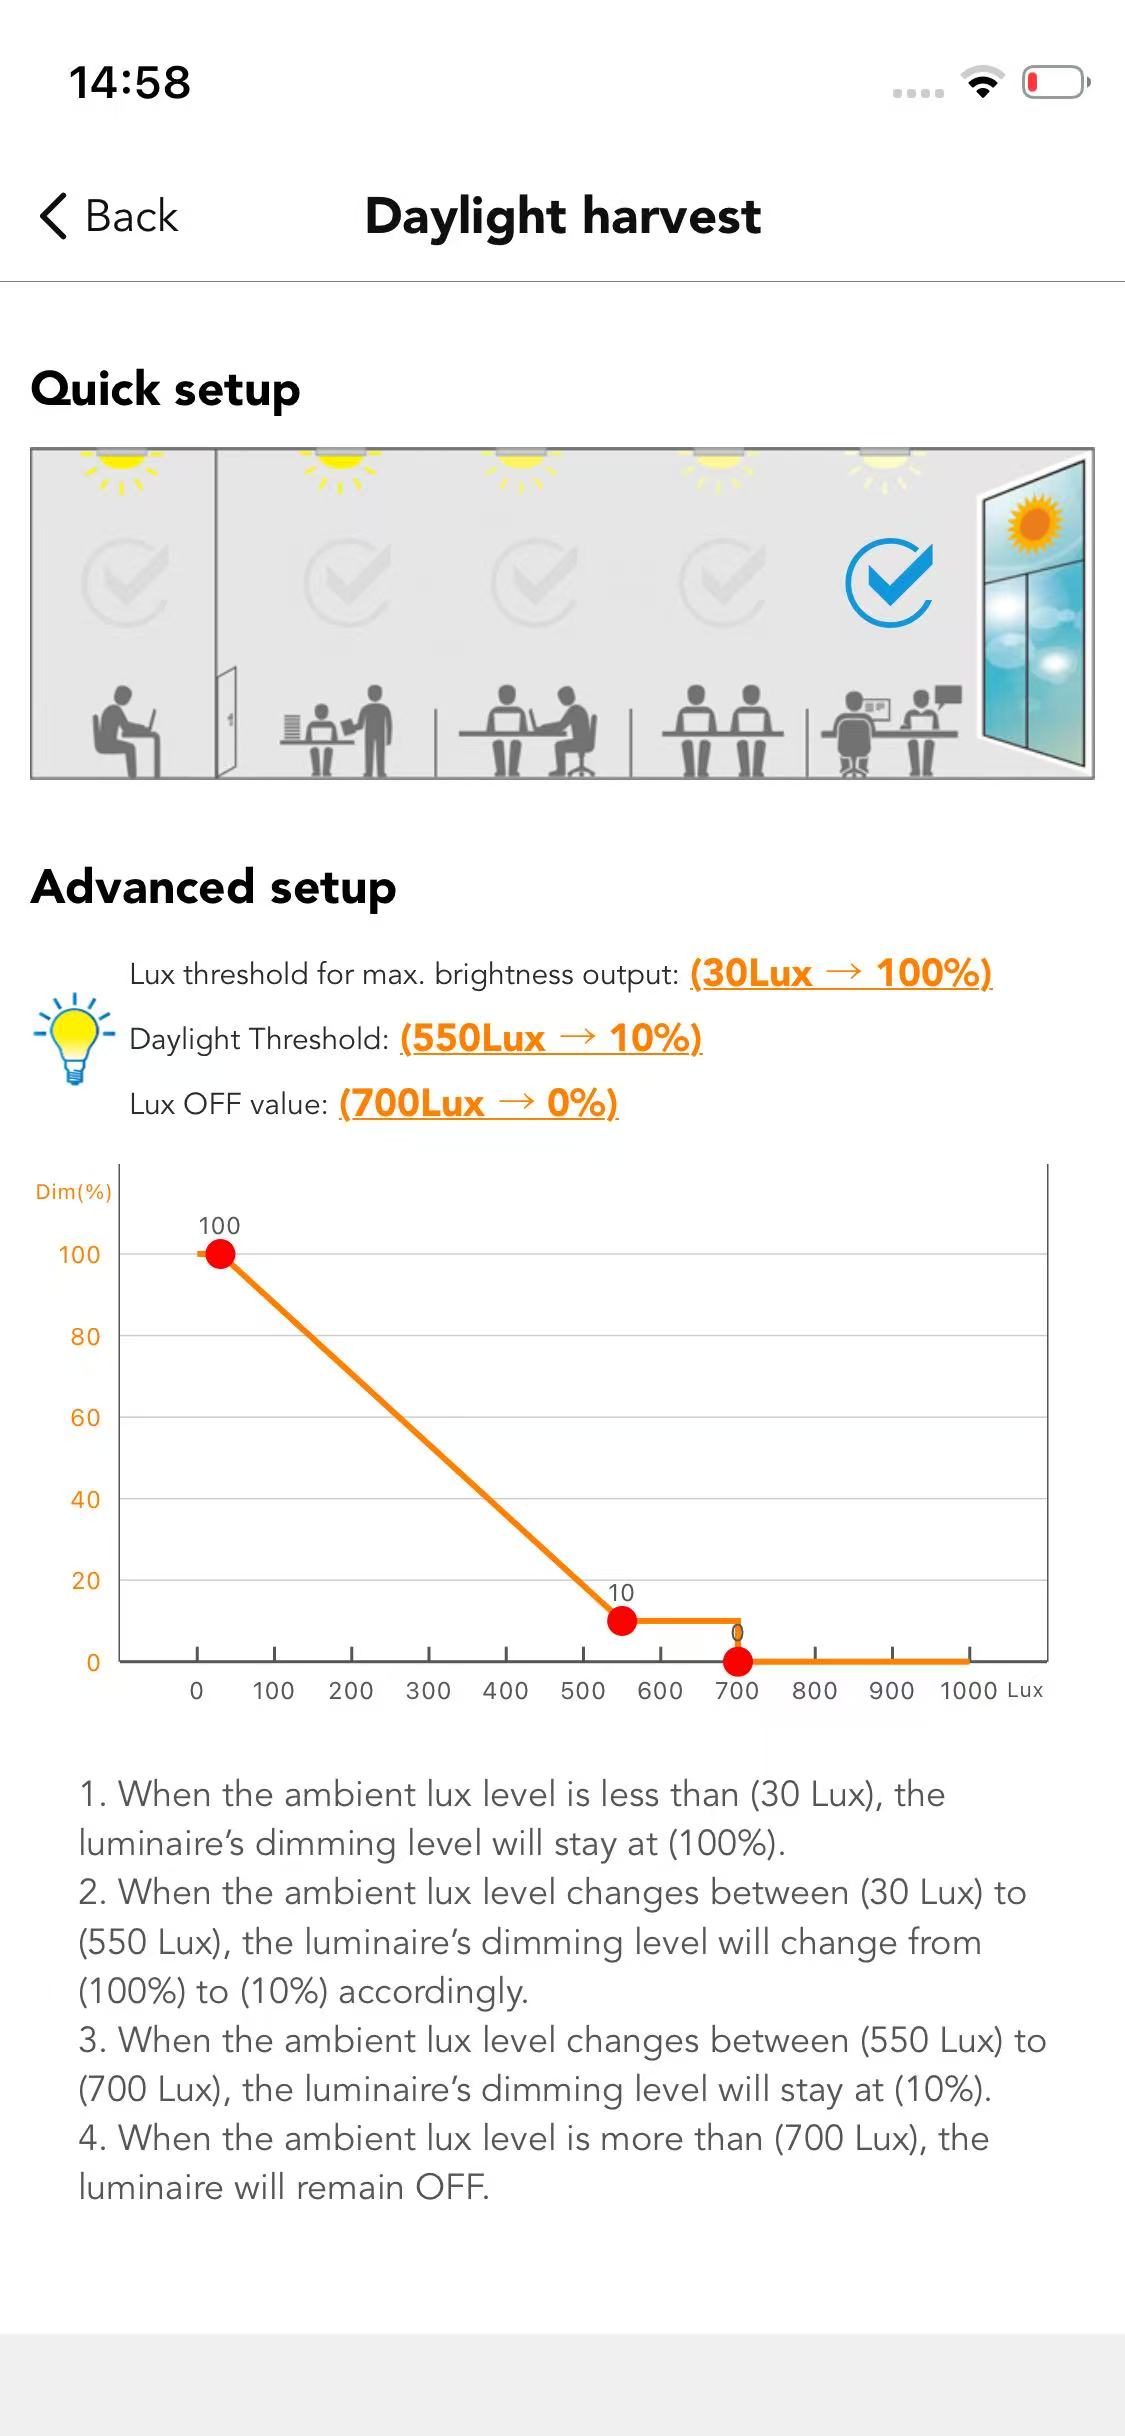
Users do not need to know what's the exact value of each option but just need to quickly click on the picture to select the preset profile according to distance between their luminaire's location and the outside window. The quick setup will be very useful for the users who do not need to have very accurate settings but will save a lot of time for them. When they select the preset profile, they also can change the detail value in the below Advanced setup.
b. Advanced setup
It is more accurate and powerful for the users, they can adjust the dimming output according to the lux level. For example, when the ambient lux level is less than 30 lux, the luminaire’s dimming level is 100%. When the ambient lux level changes between 30 lux to 550 lux, the luminaries' dimming level will change from 100% to 10% accordingly. When the ambient lux level changes between 550 lux to 700 lux, the luminaries' dimming level will stay at 10%. When the ambient lux level is more than 700 lux, the luminaries will remain off. Users can change the value by dragging the red coordinate points in the diagram.
● Measuring time
Users can define the measuring time. For how late luminaries will turn on/off before ambient lux continuously detected lower/higher than daylight threshold value.
● Daylight sensor prior to motion sensor (Lux off)
When the ambient lux is strong enough and exceeds the "Lux off value", then the luminaires will be turned off by the daylight sensor. If this function is disabled, when the daylight threshold scene is activated, then the luminaires will not be turned off by the daylight sensor but will dim down to a small low level.
● Full range dimming
This is the valid dimming range when the device is running this scene.
On: range from device min. Brightness level to device max. brightness level.
Off: range from device min. brightness level to scene brightness level.
● Change rate
When the detected lux value does not meet the target level, the system will adjust the luminaires' output to bring the ambient lux level in line with the target. Slide the dimming rate slider to set the desired dimming change rate as needed. Three adjustment options are available – Fast, Medium, and Slow – for users to select according to actual requirements.
Case 2:
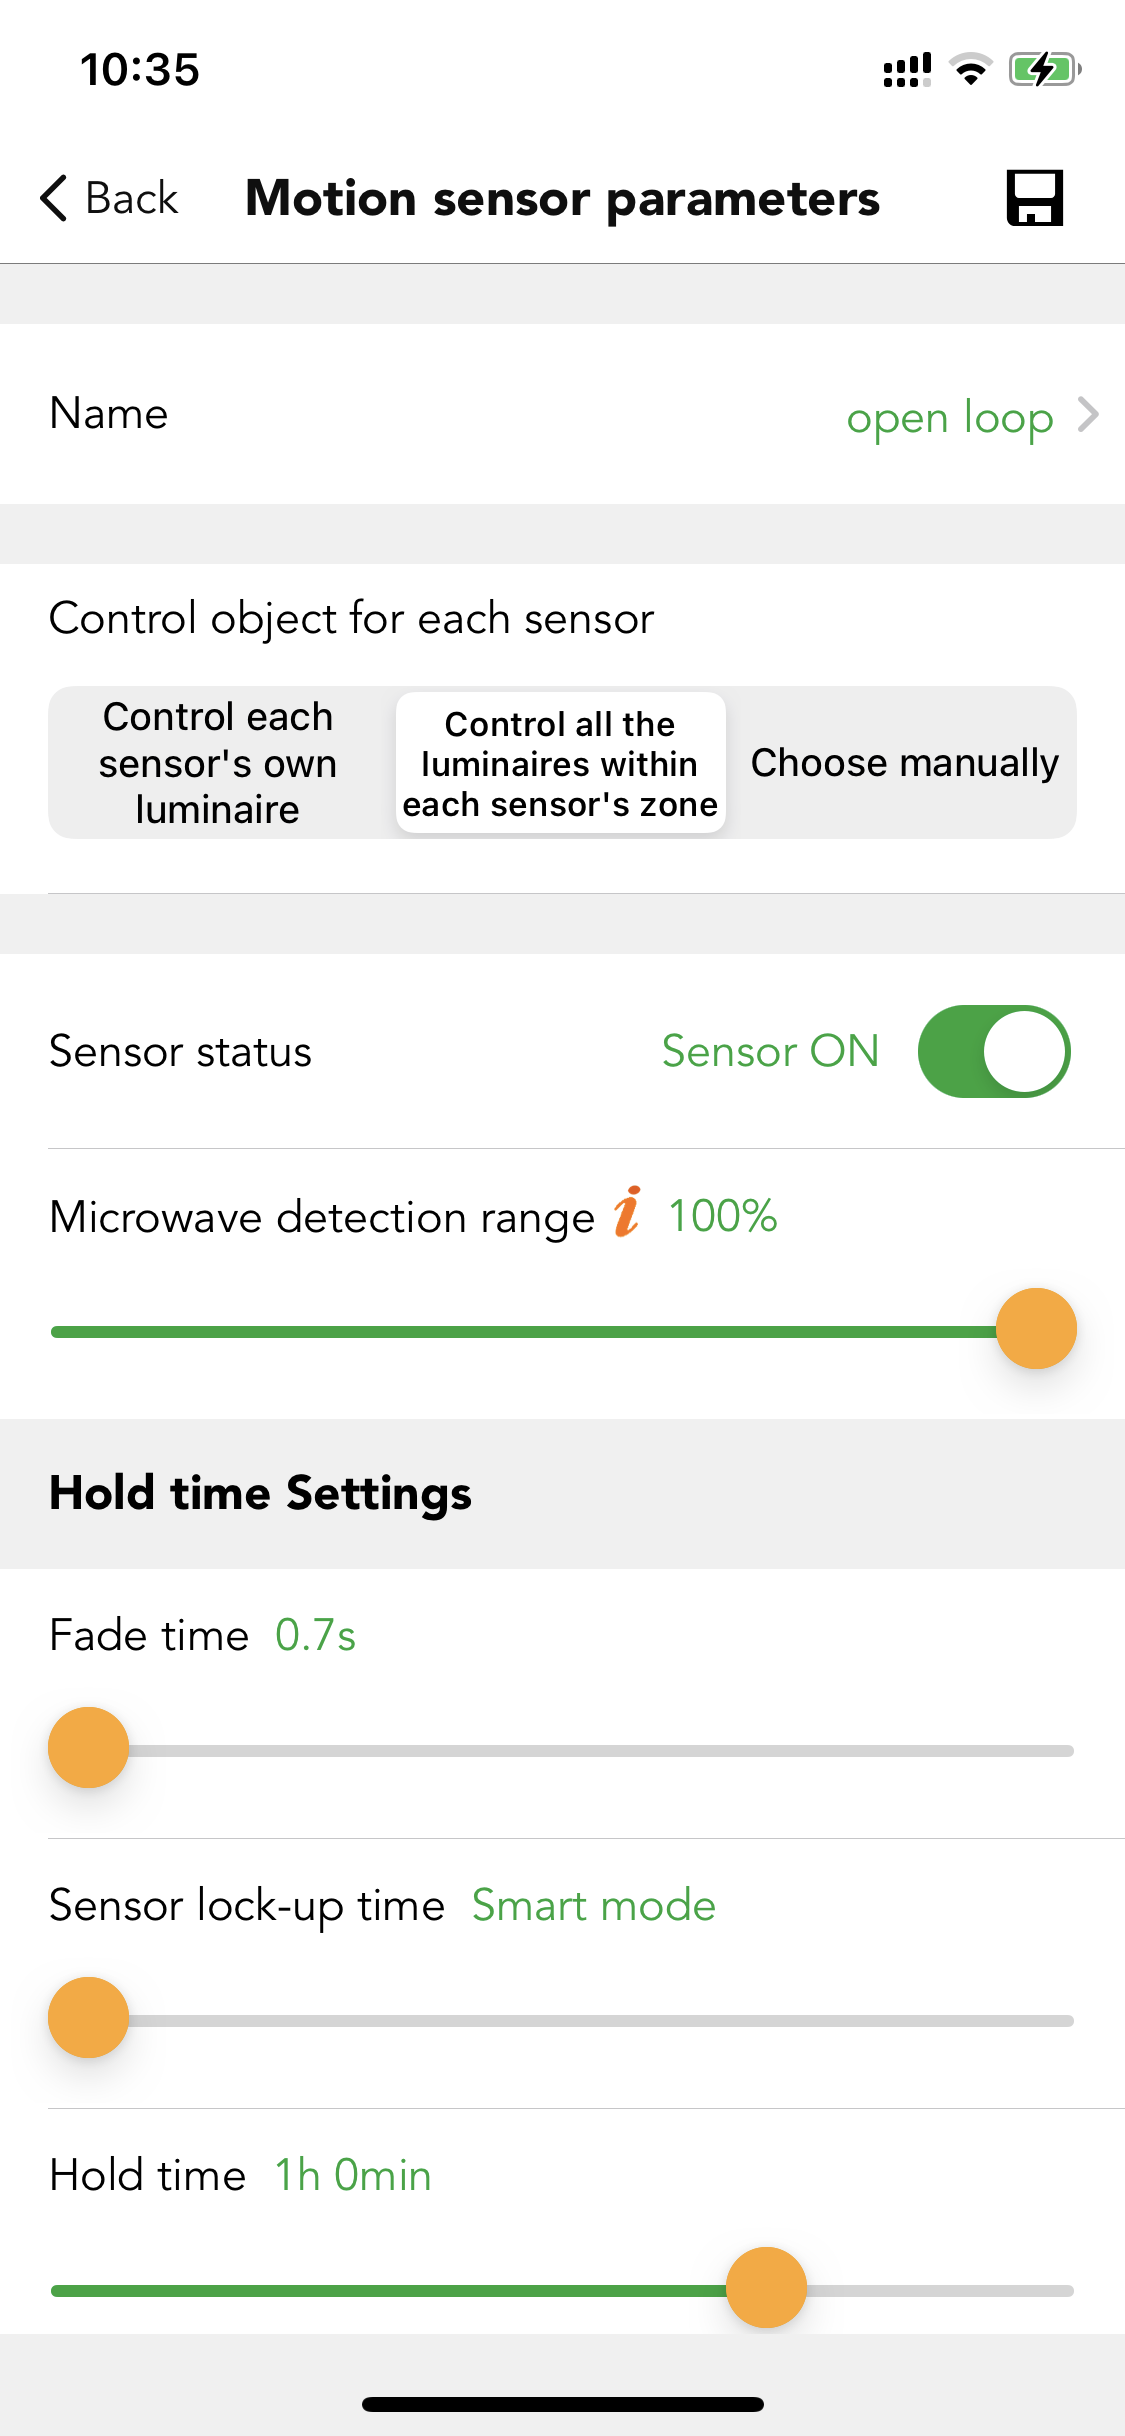
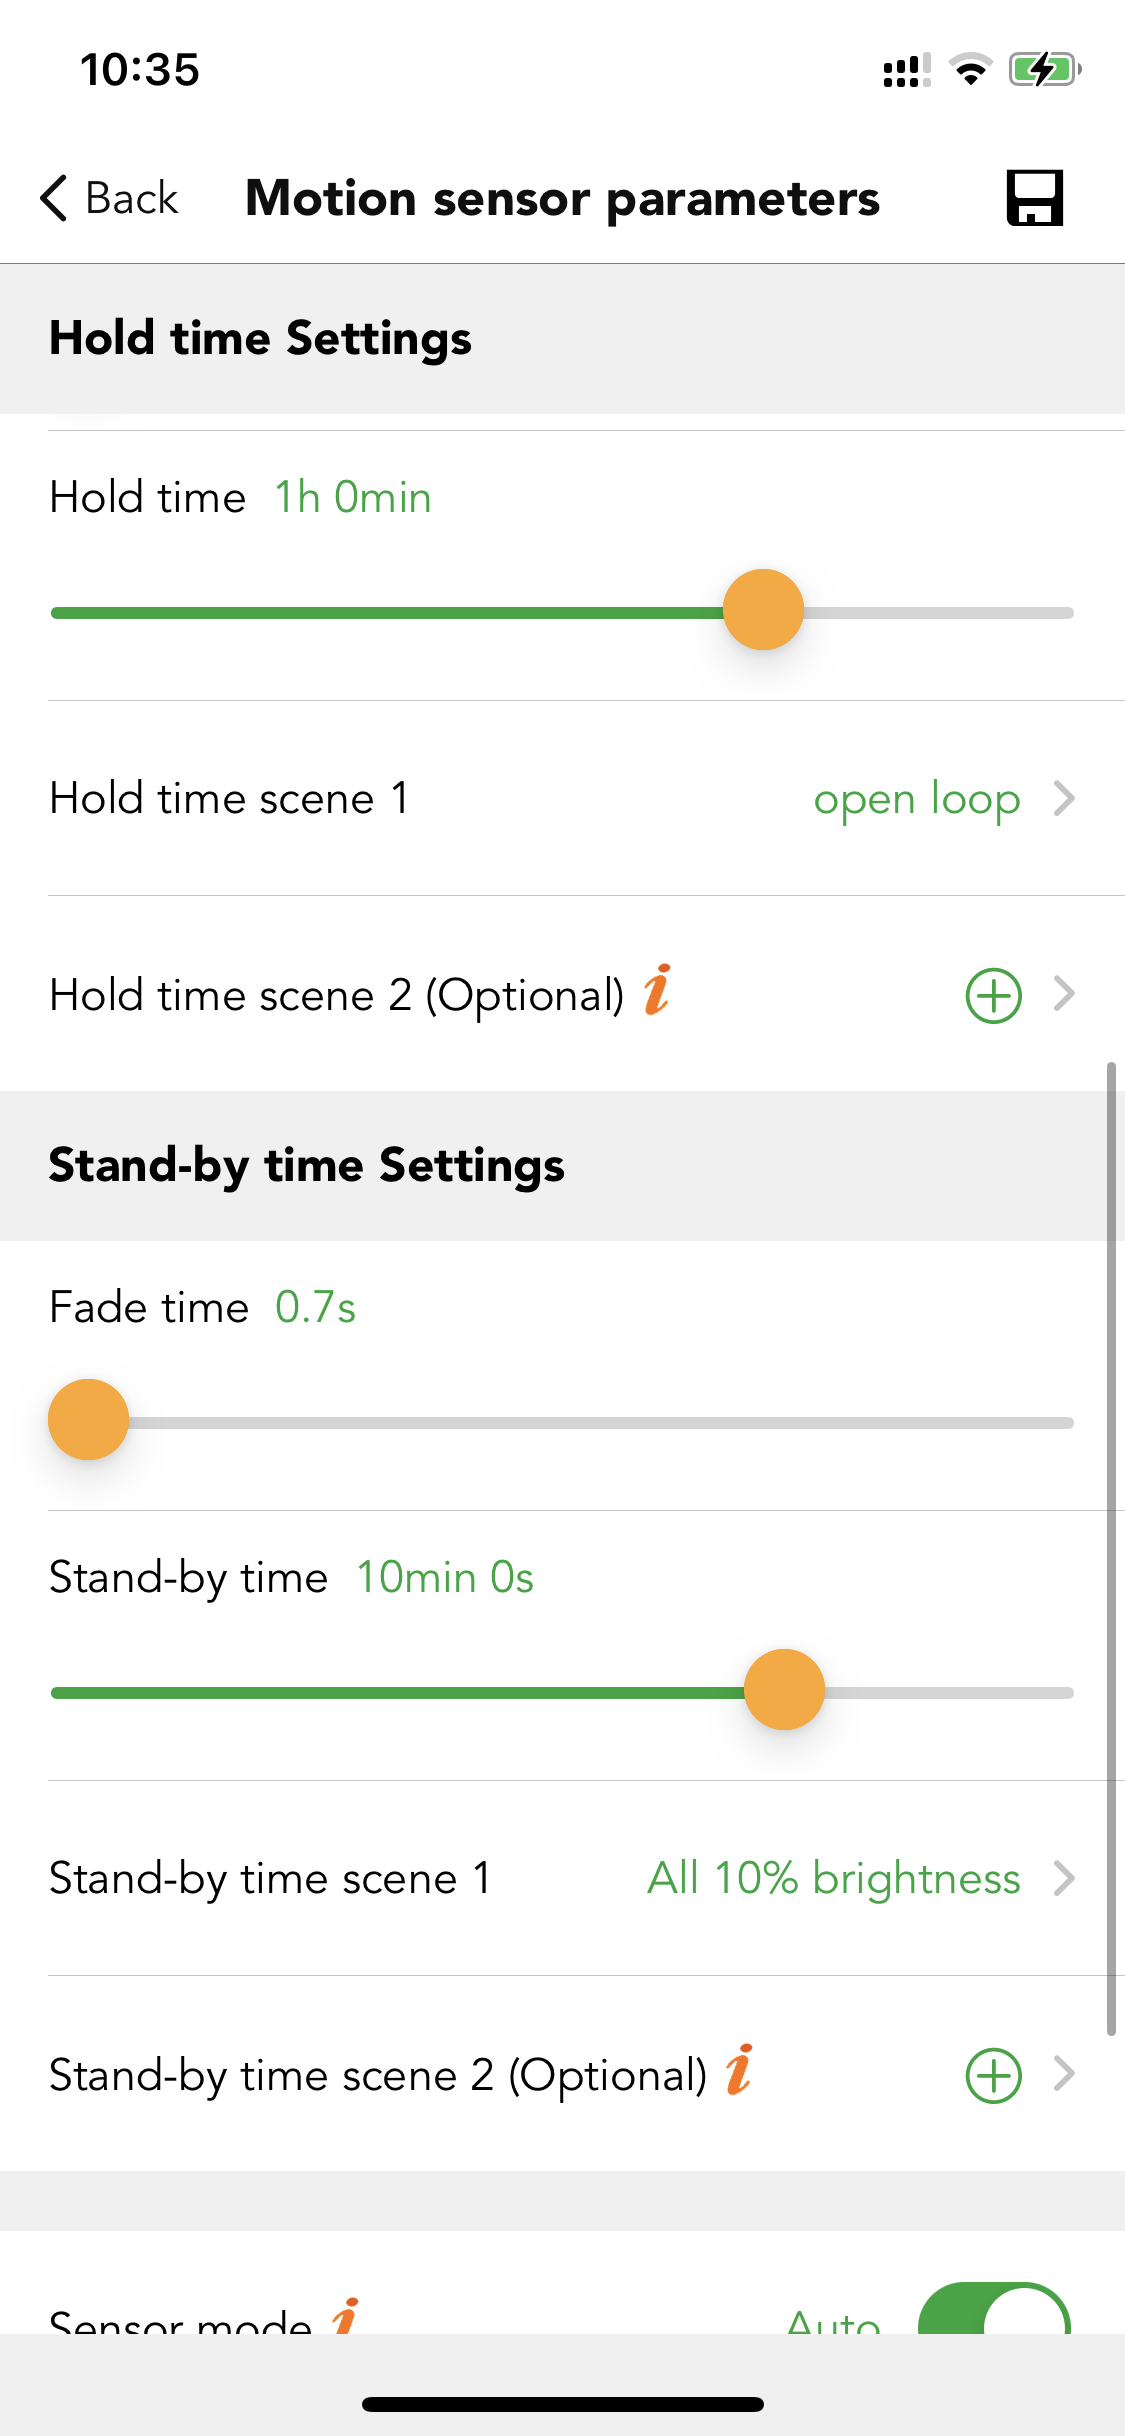
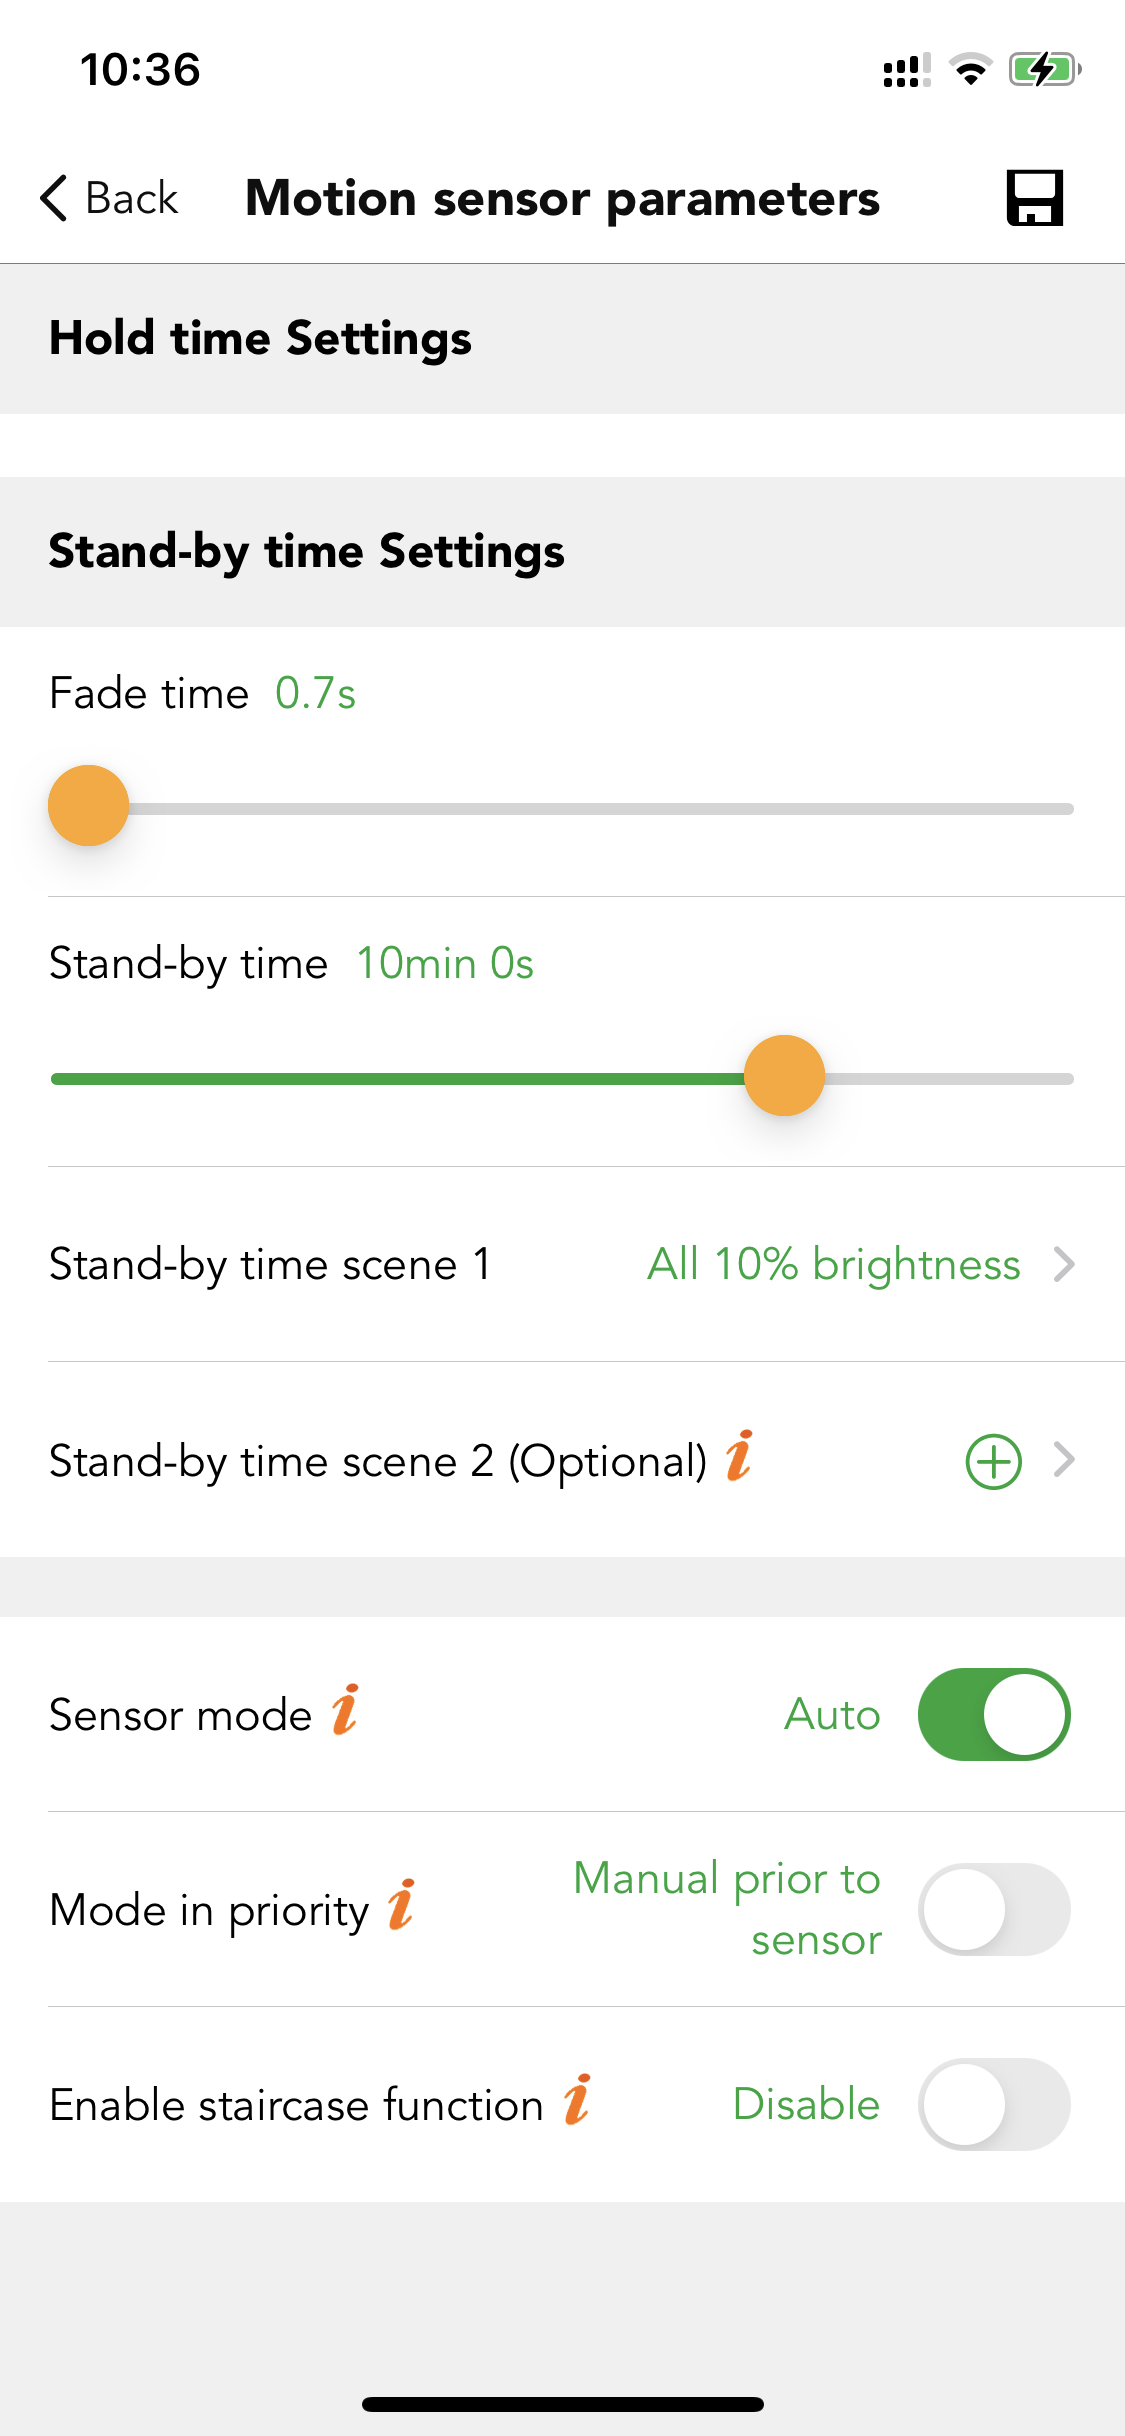
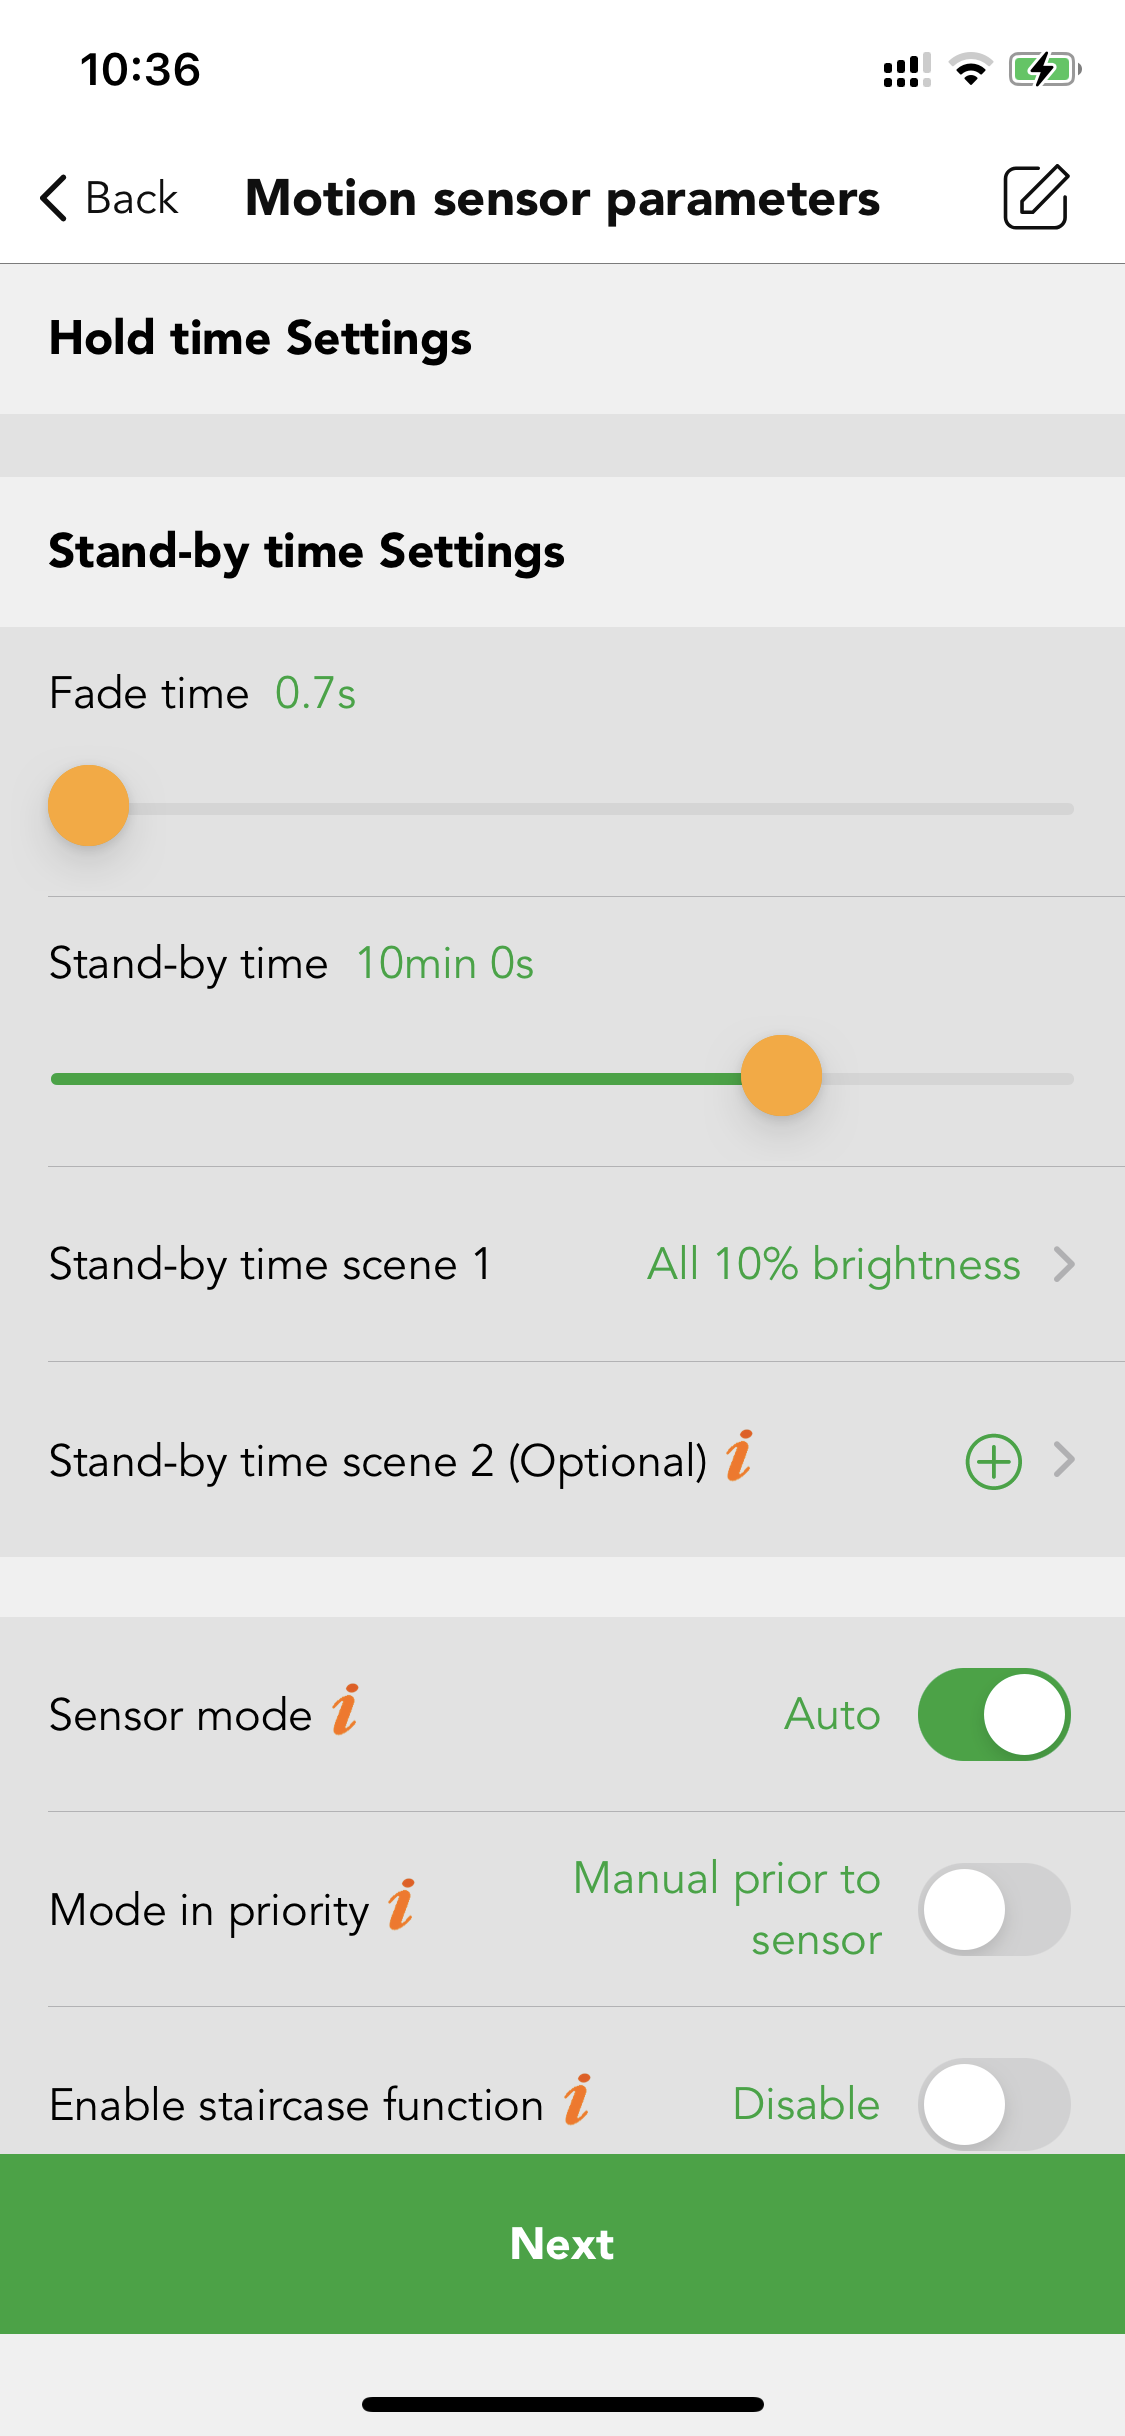
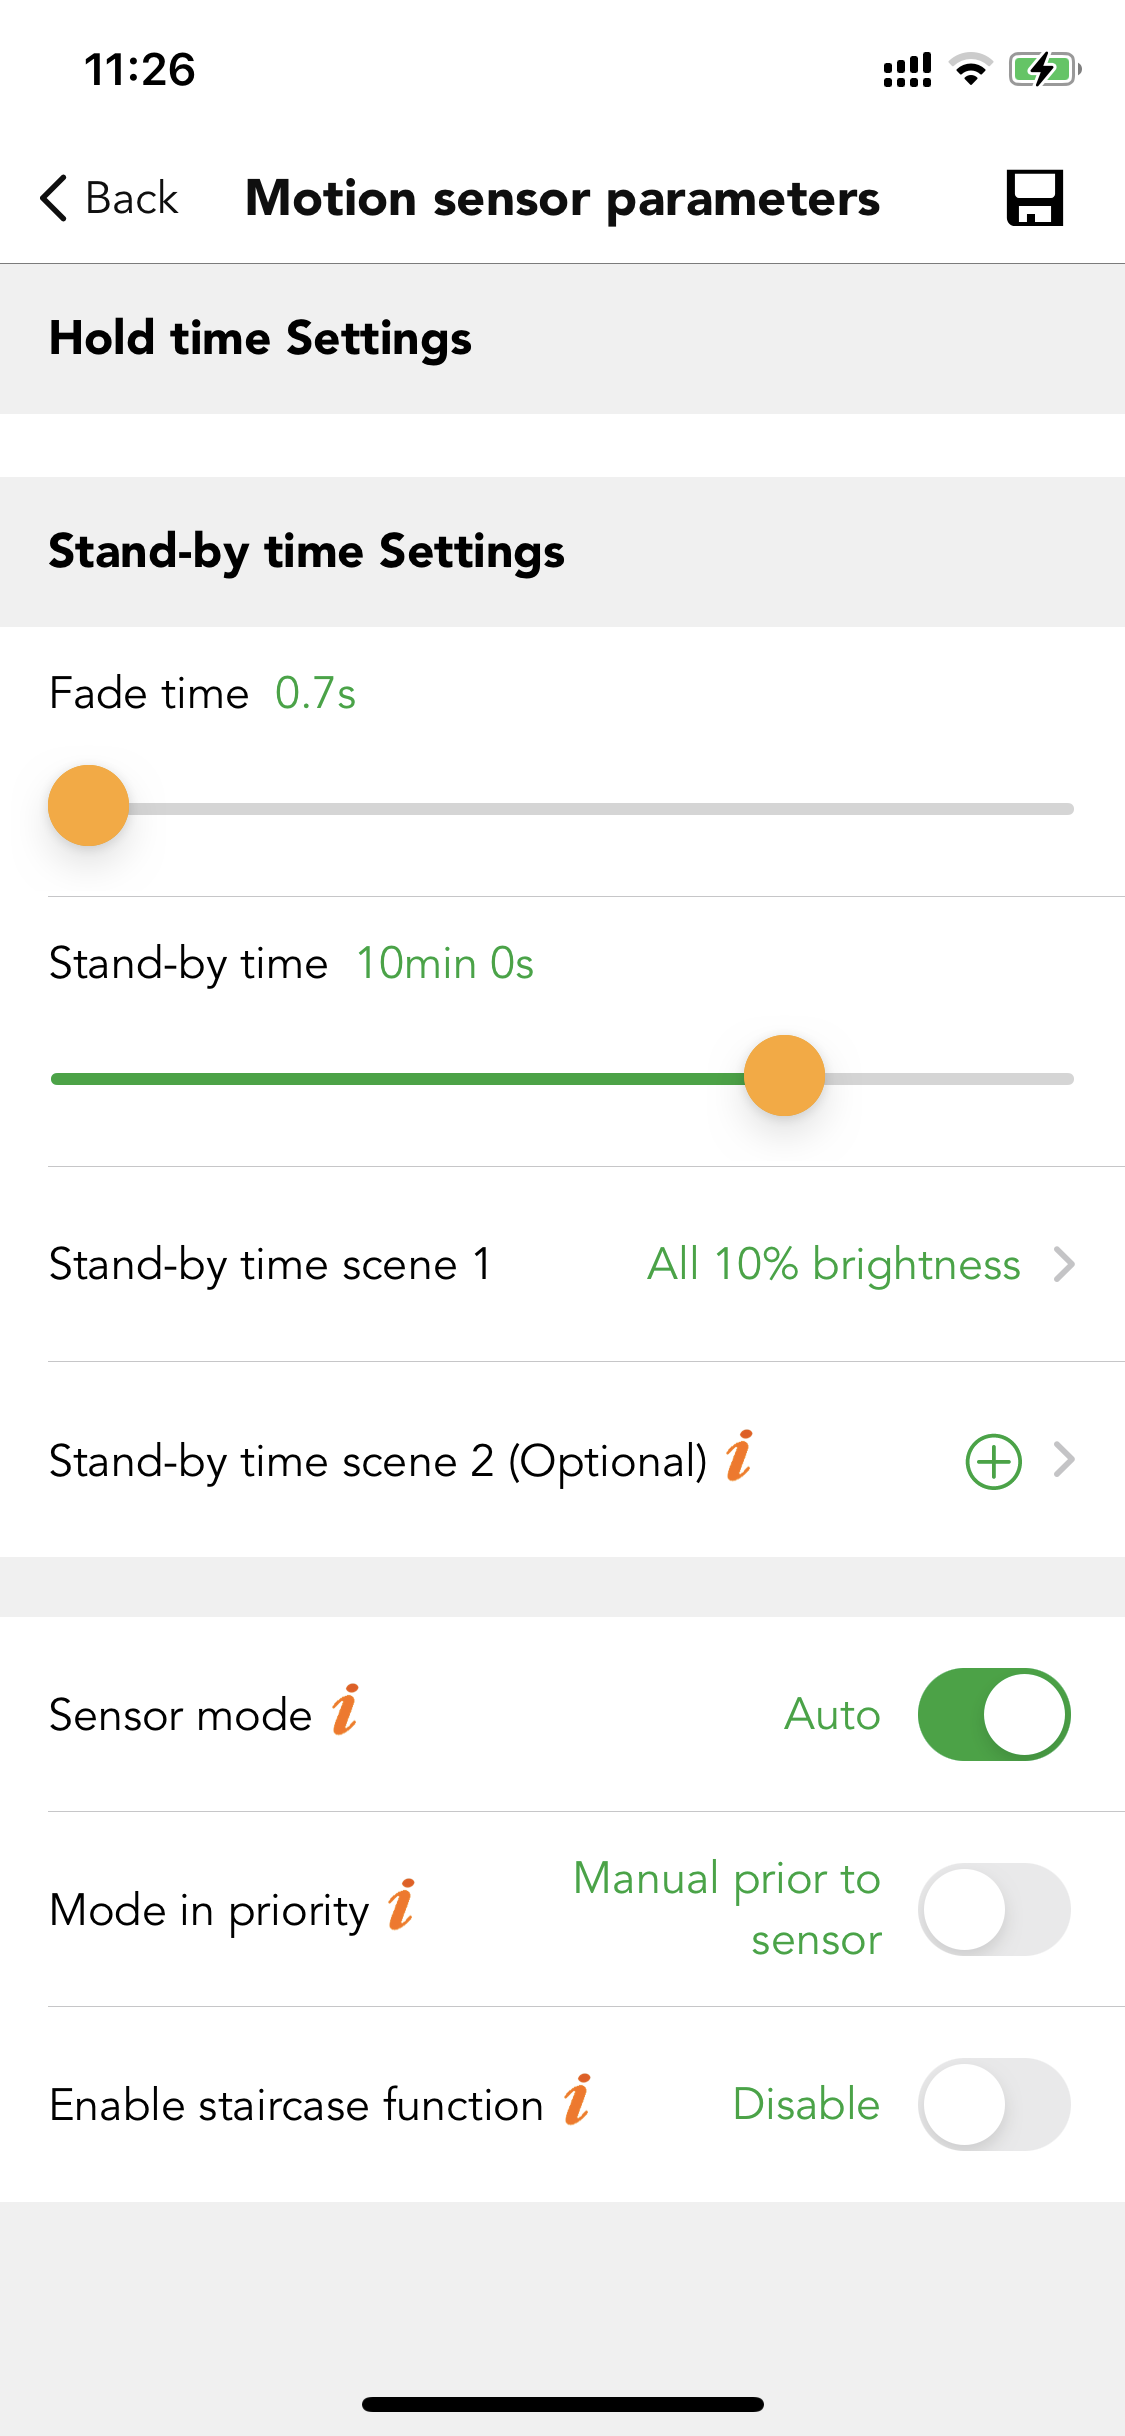
In an office application, users want to recall a daylight harvest scene (open loop) when the motion sensor detects the movements, if no movements were detected, then the luminaires will go into a 10% brightness stand-by status. They want the hold time of the daylight harvest scene to be about 1 hour, and stand-by time is around 10 minutes. To make the whole office luminaires' brightness be united, they want to use a dedicated daylight sensor as the main daylight sensor of the whole zone. The motion sensor auto control is a big requirement from the customers, they always want the motion sensor to control the luminaries at the first place, then they can interrupt the auto control by the push switch for a while, they prefer to switch back to auto control after the stand-by time (10 minutes).
For the daylight harvest scene, when the ambient lux level changes between 30 lux to 300 lux, the luminaries'dimming level will change from 100% to 30% accordingly. When the ambient lux level is less than 30 lux, the luminaries' dimming level is pinned to 100%. When the ambient lux level changes between 300 lux to 600 lux, the luminaire’s dimming level will stay at 30%. When the ambient lux level is more than 600 lux, the luminaries will remain off status. And they also want the daylight sensor to turn on the light when ambient lux continuously less than 300 lux for 10s, turn off the light when ambient lux continuously more than 600 lux for 5 minutes. Which means even there is movement is detected, the motion sensor triggers the daylight harvest scene but when the ambient lux level is sufficient to 600 lux for more than 5 minutes, then the luminaires will be turned off by the daylight sensor,and no matter if the movements are keeping detected, unless the ambient lux level is less than 600 lux again, then the luminaires will turn on again. This is called "daylight sensor prior to motion sensor (lux off)" in the Koolmesh system. Because the whole zone is using the same settings, the client prefers to use the bulk commissioning function to batch set the motion sensor parameters and luminaires settings.
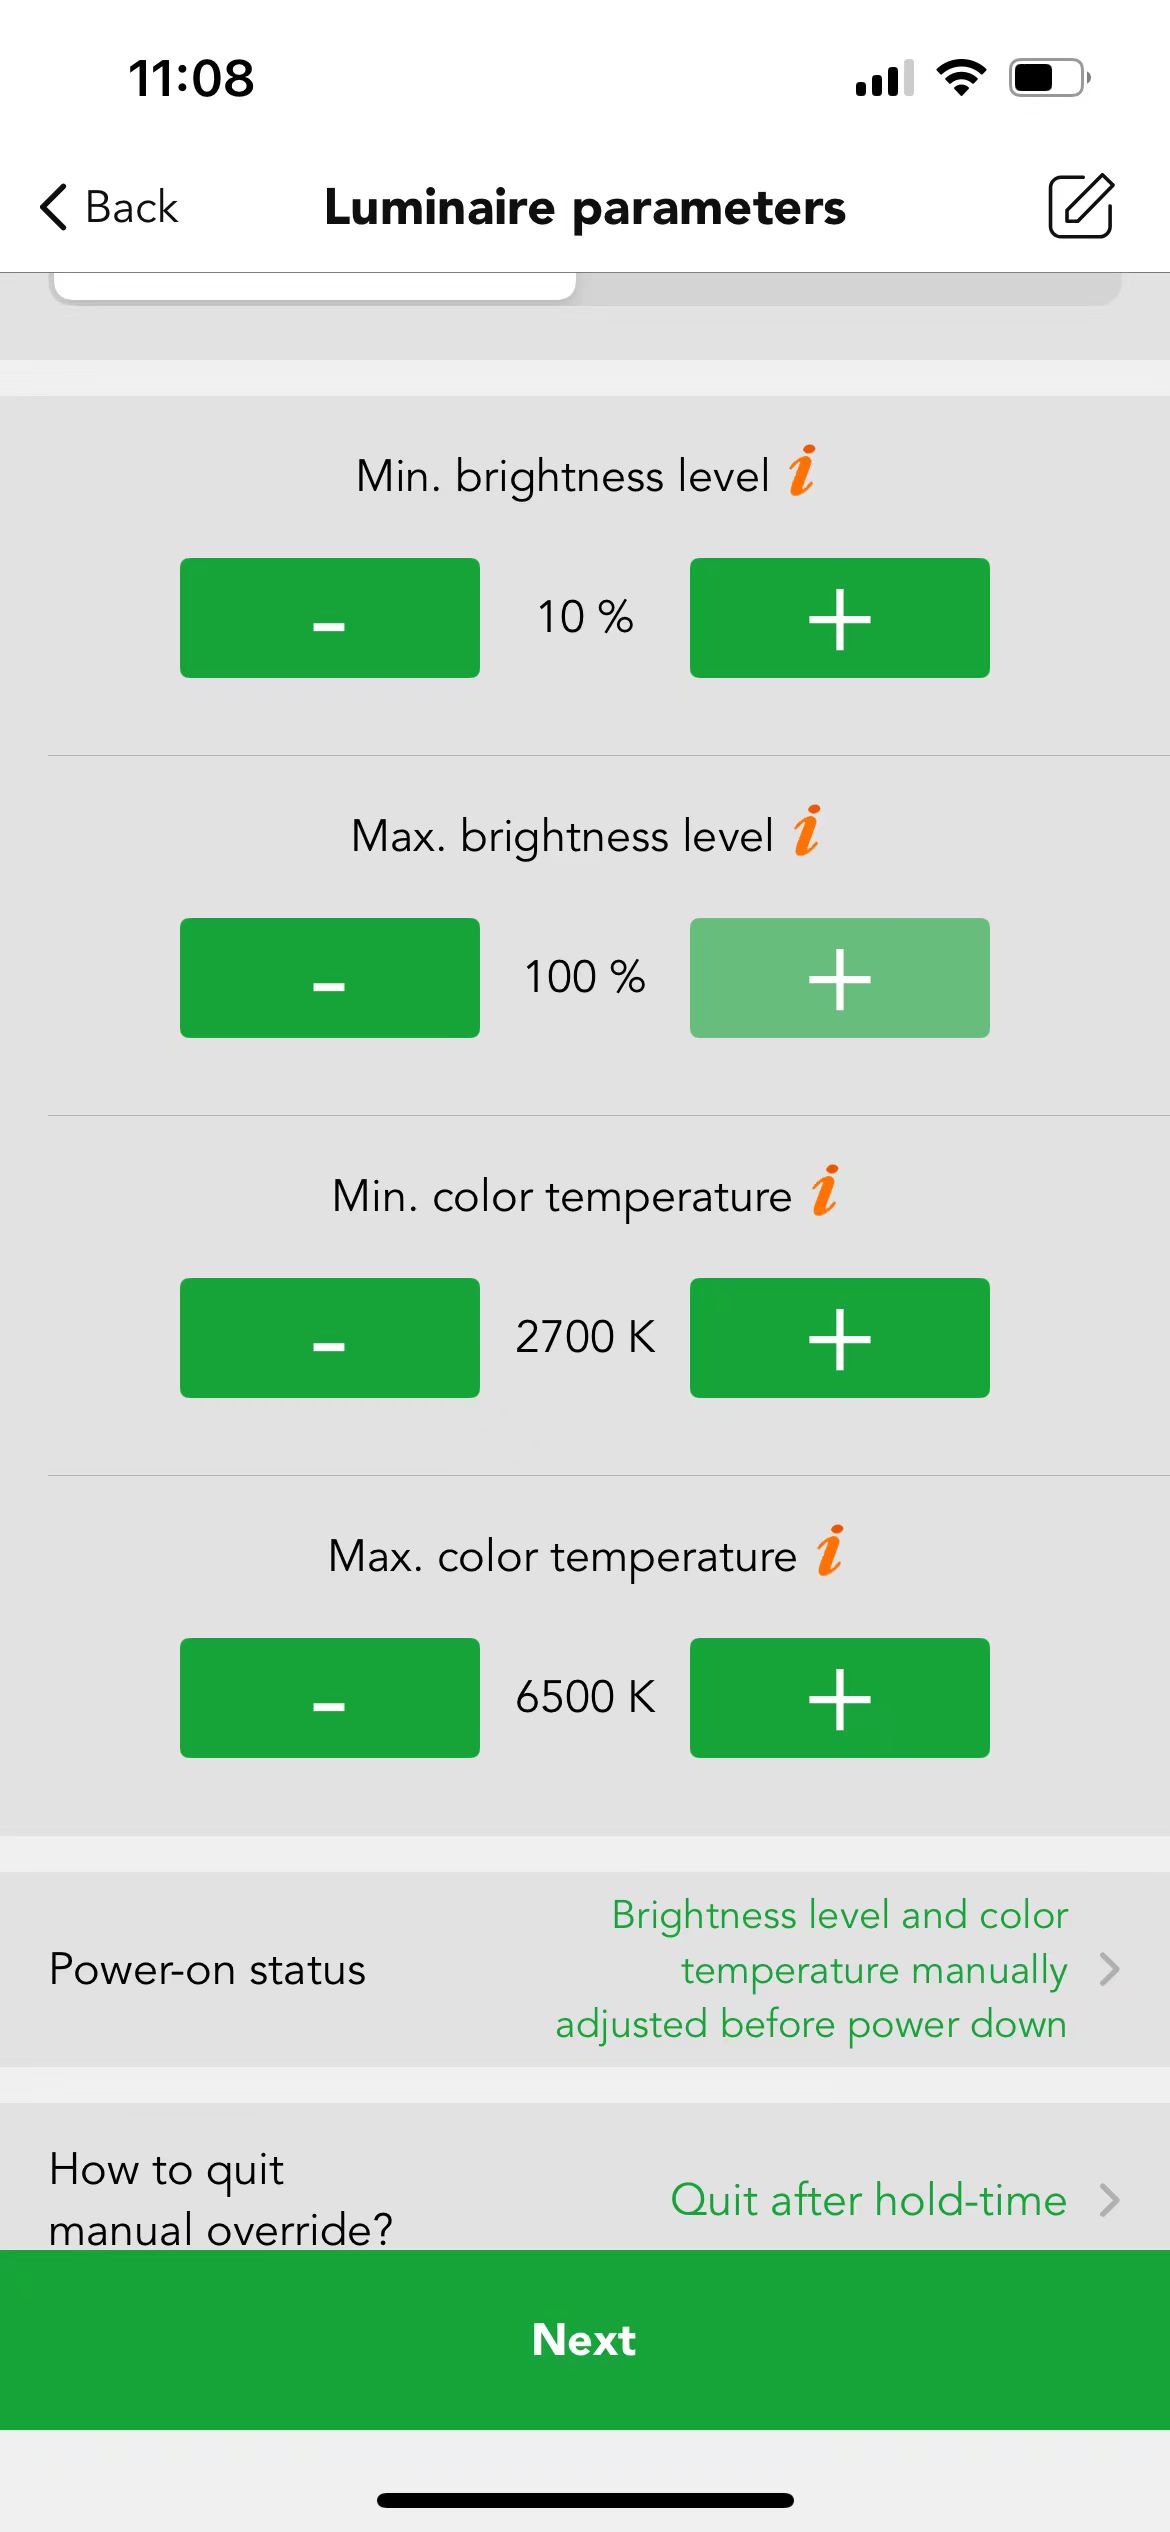
Step 1. Create a daylight harvest scene (open loop). The scene setting please refer to below pictures. Do not need to create a 10% brightness generic scene. We have a default one in the scene tab.

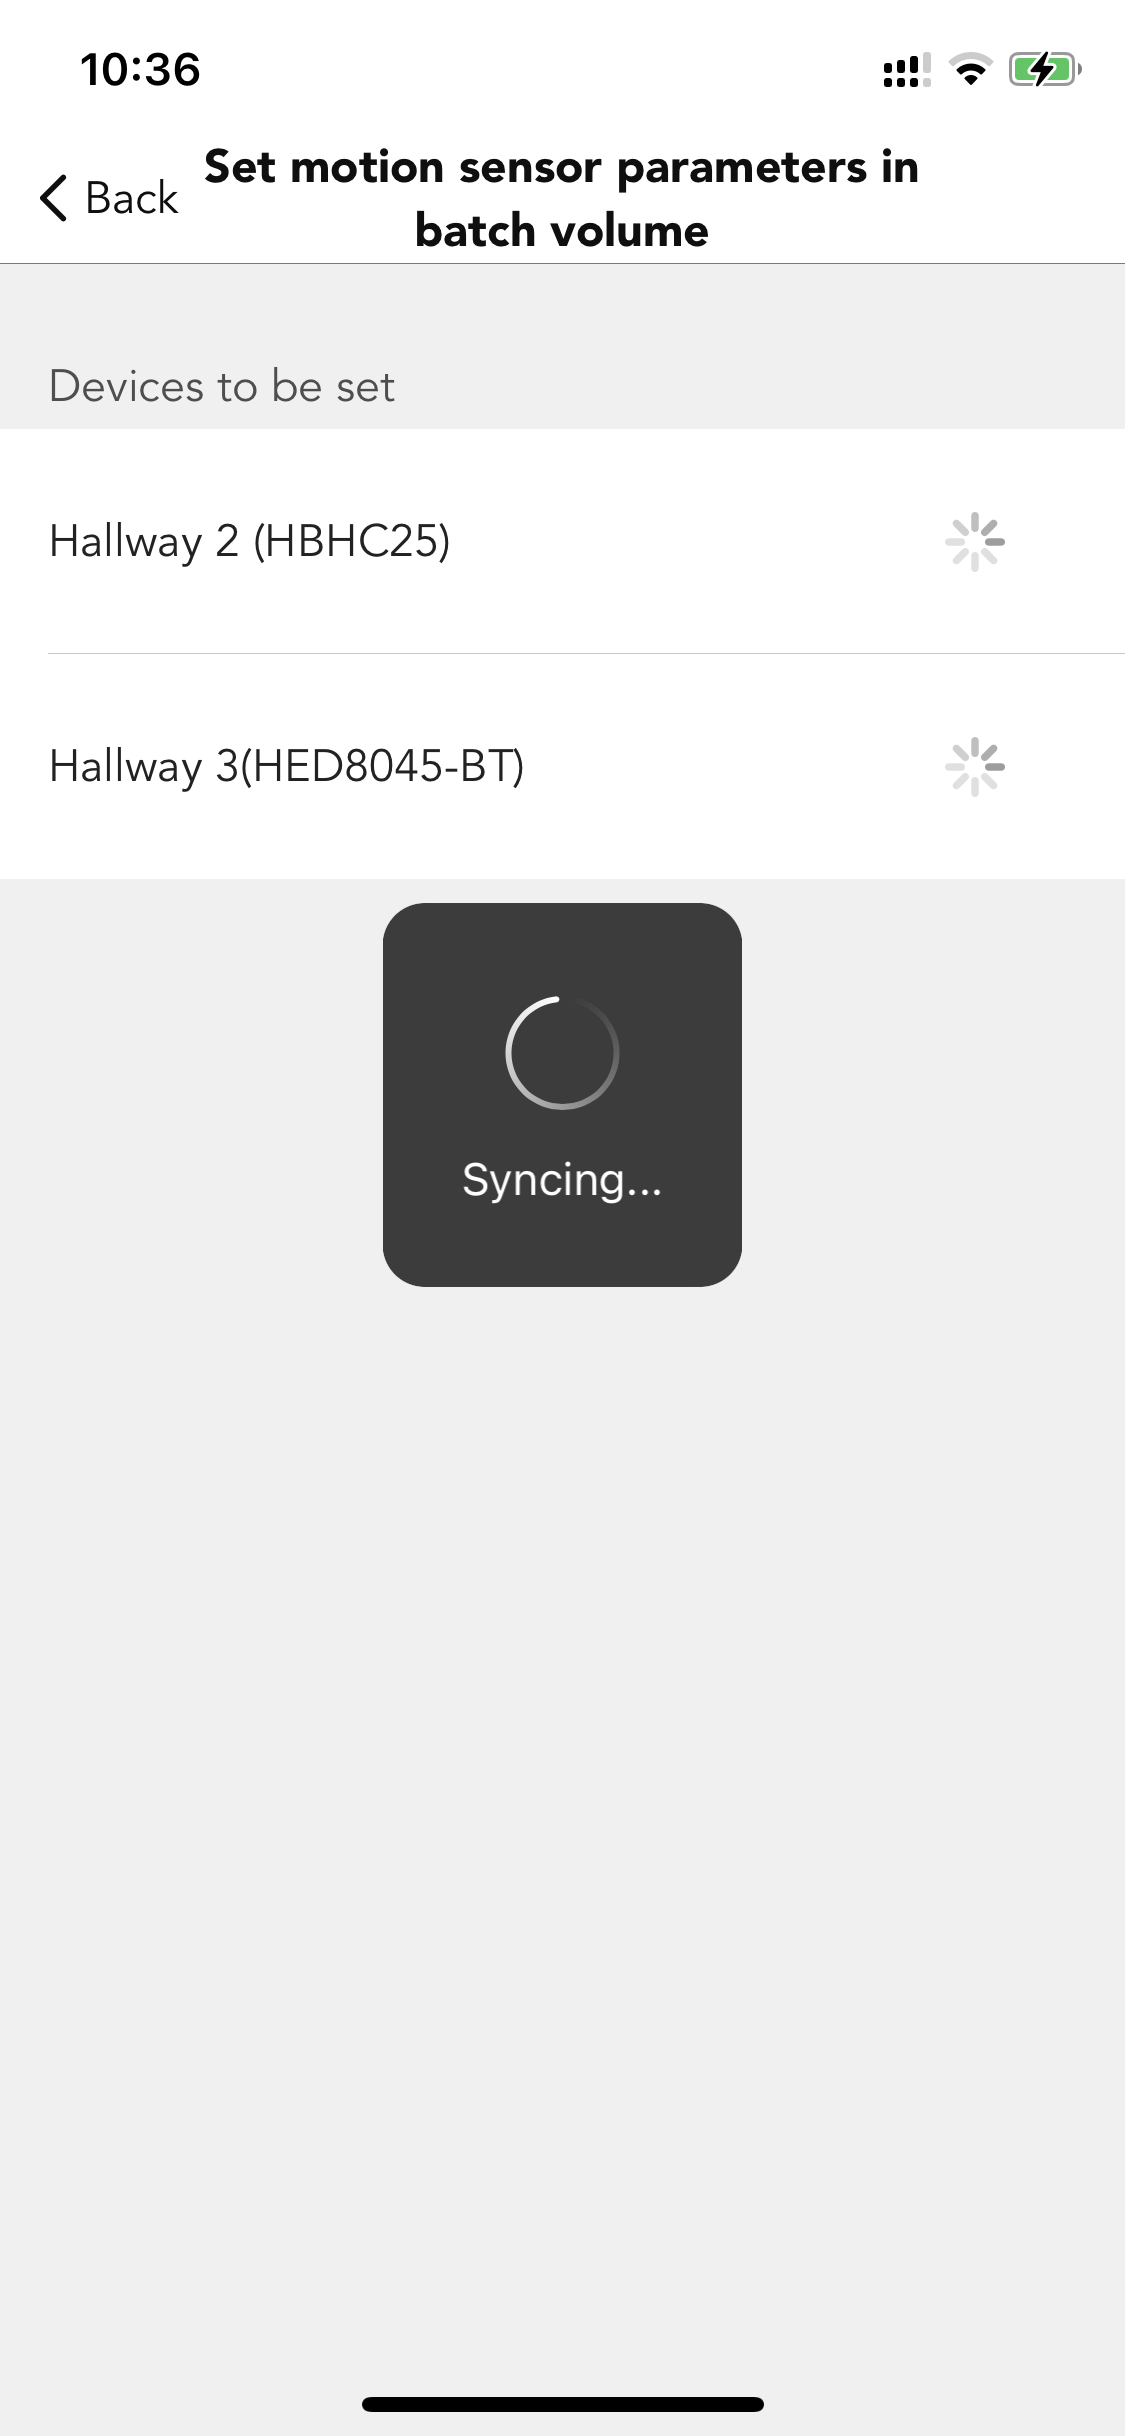
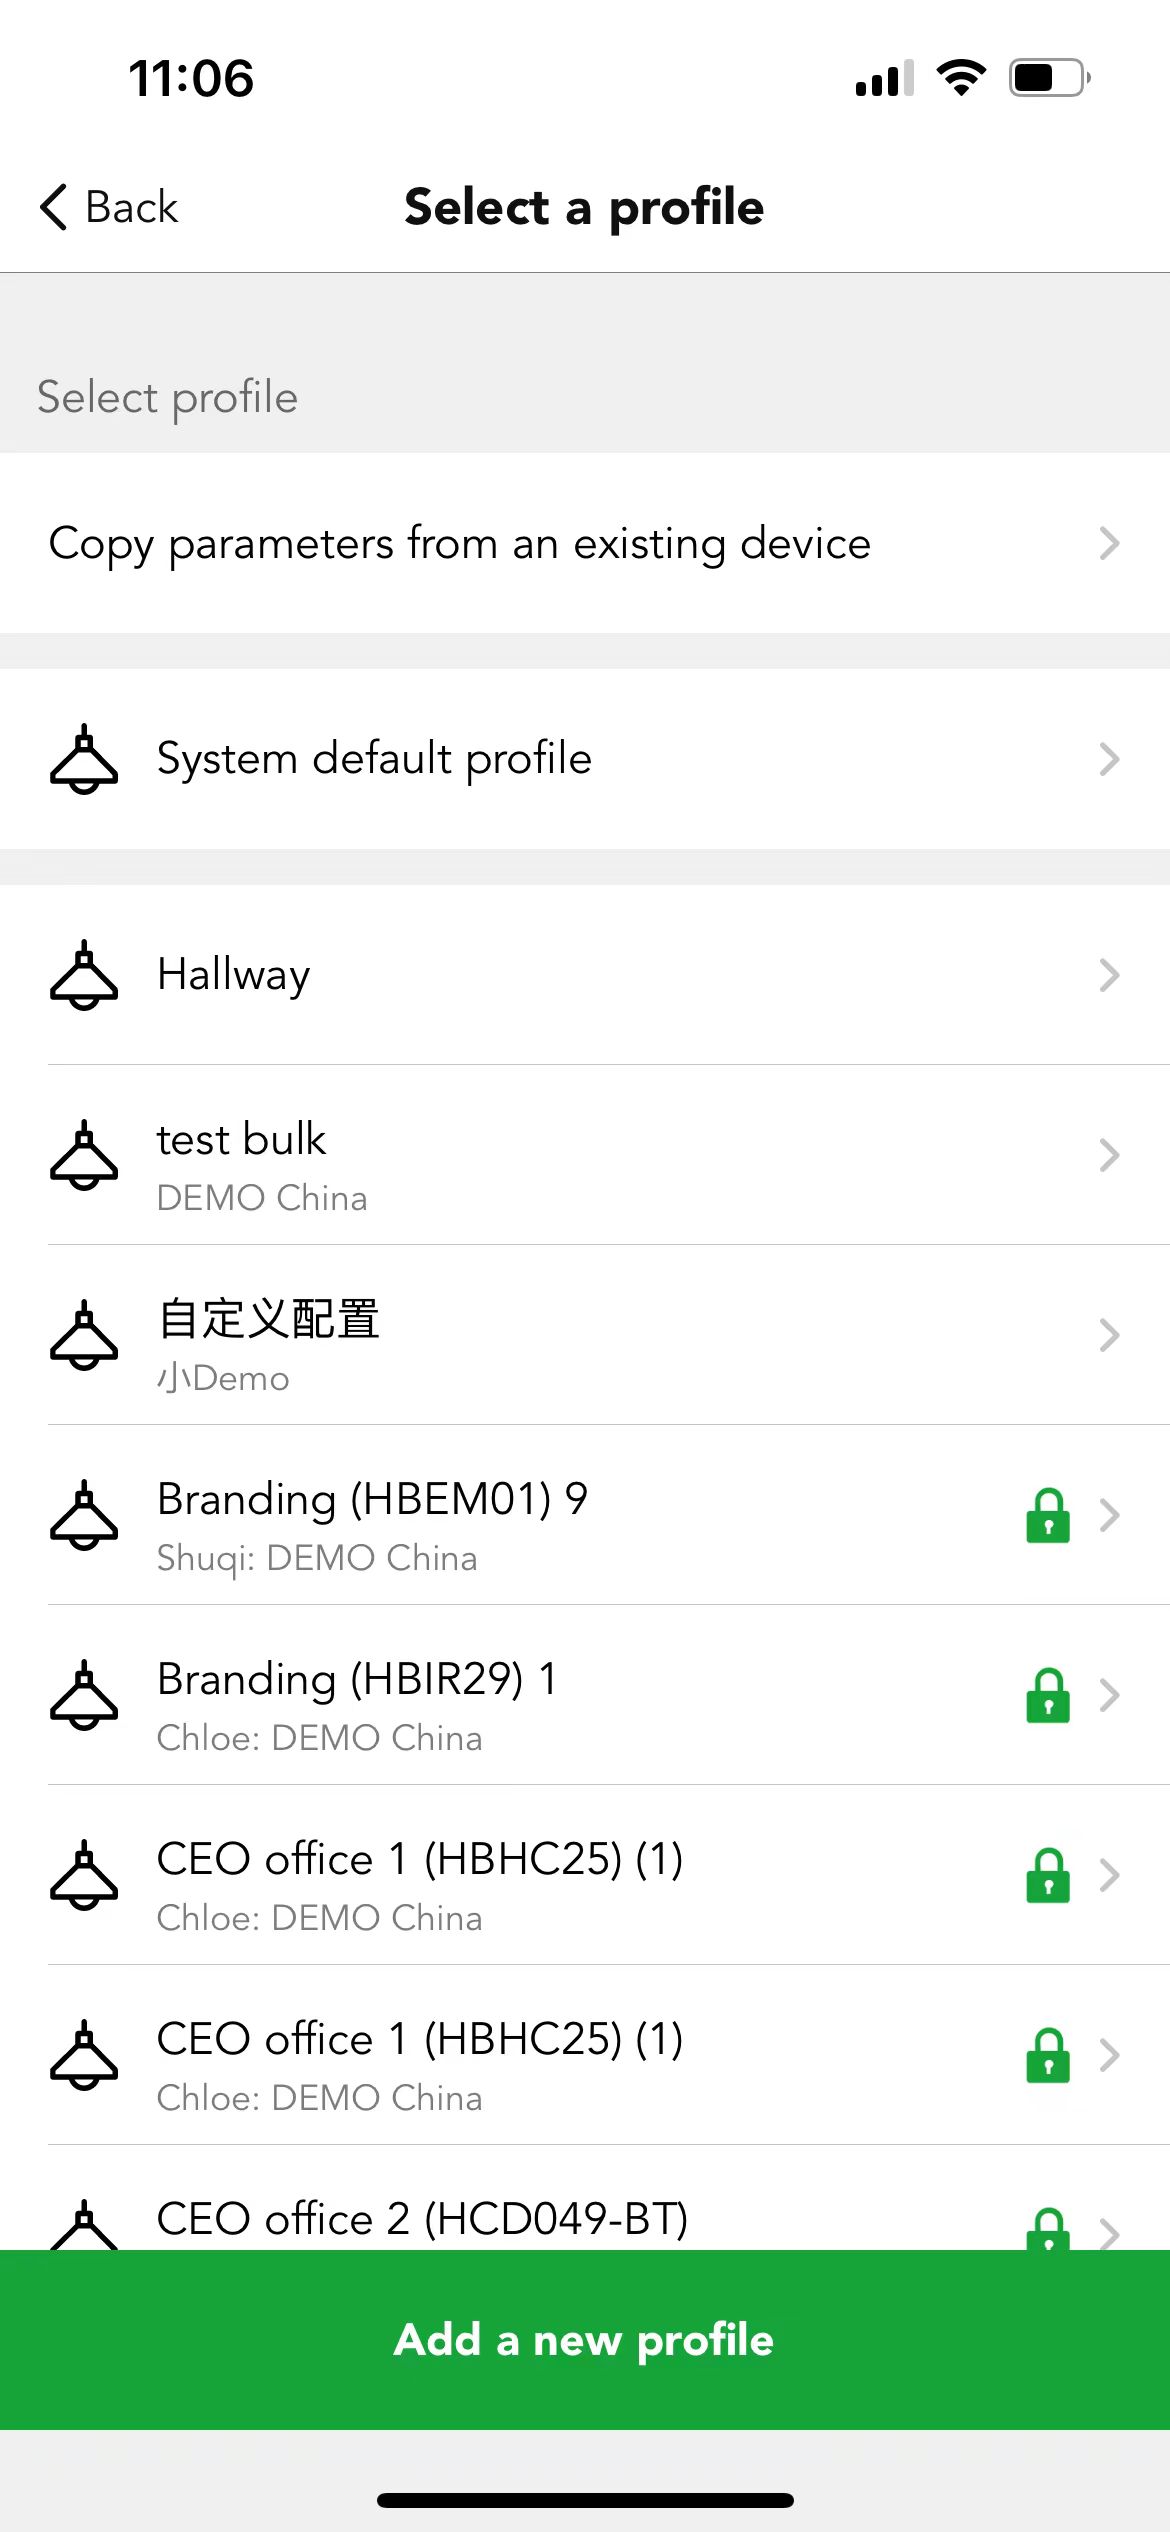
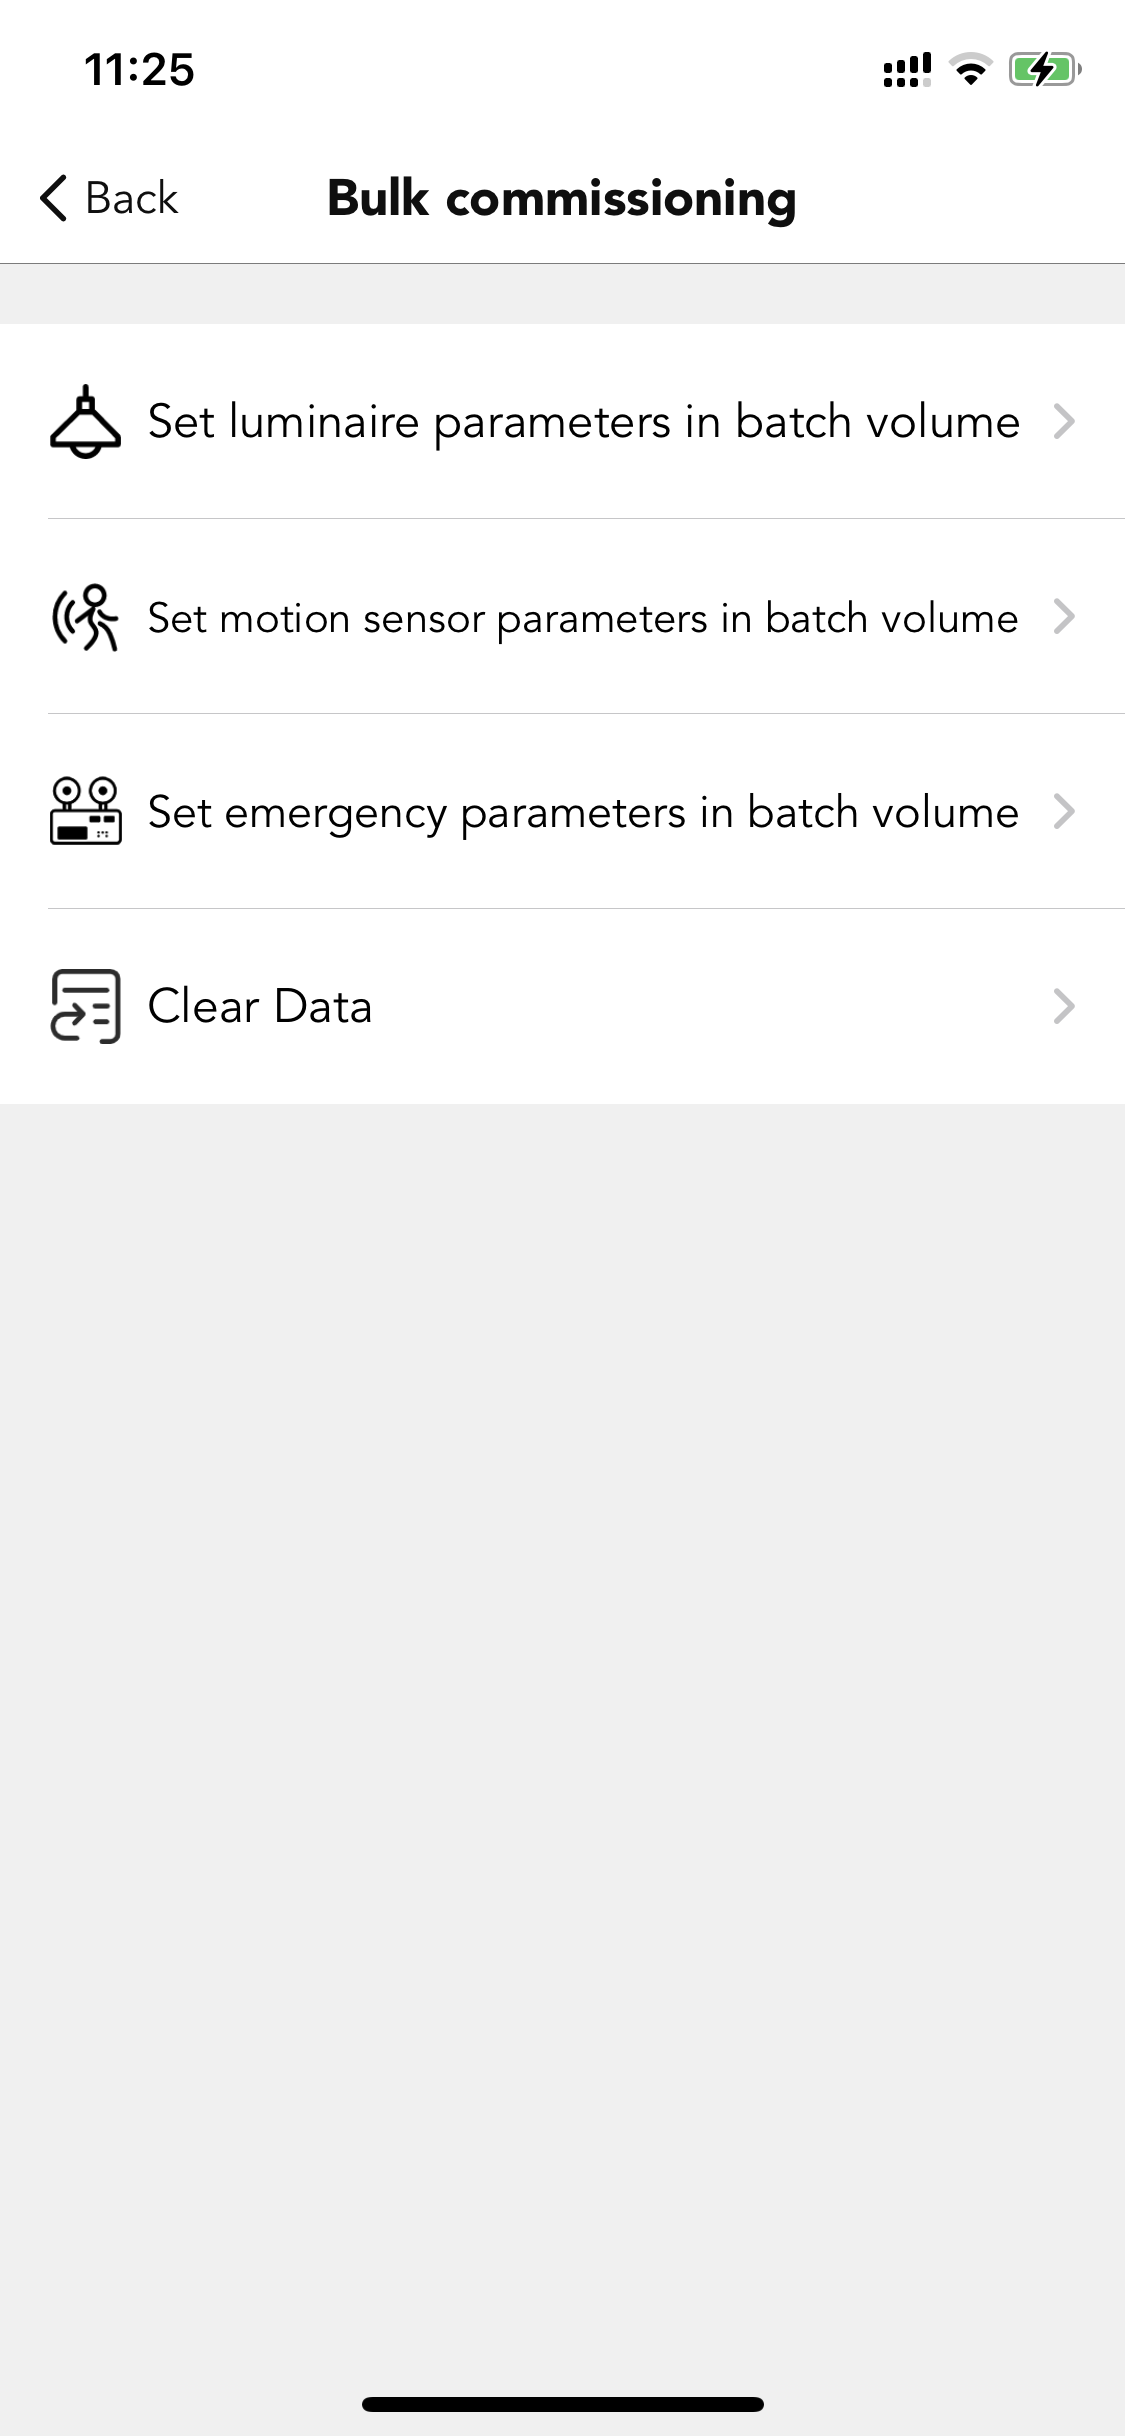
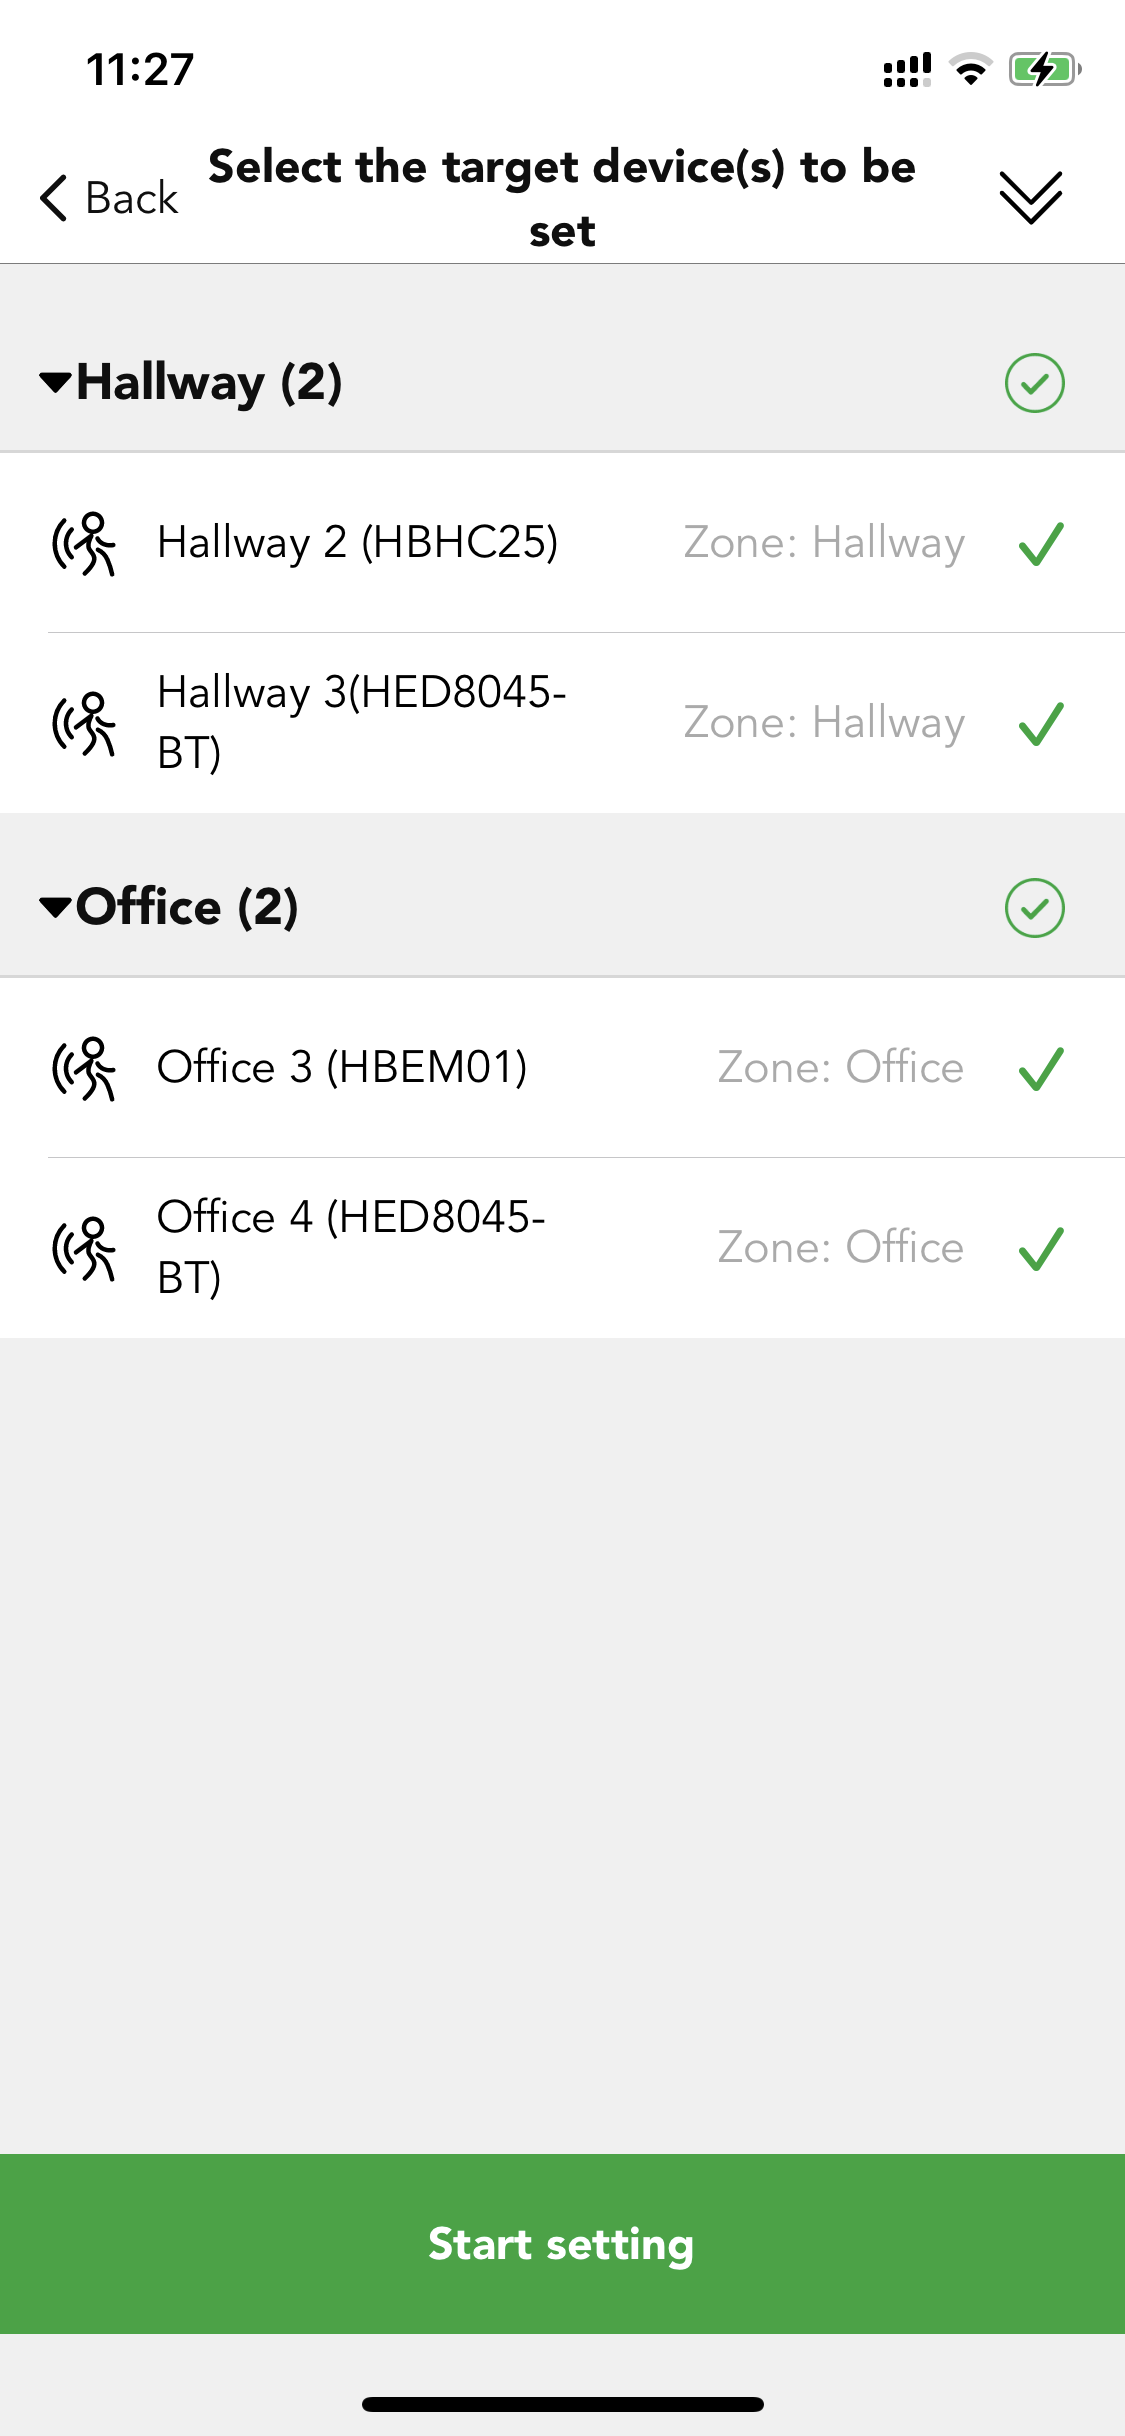
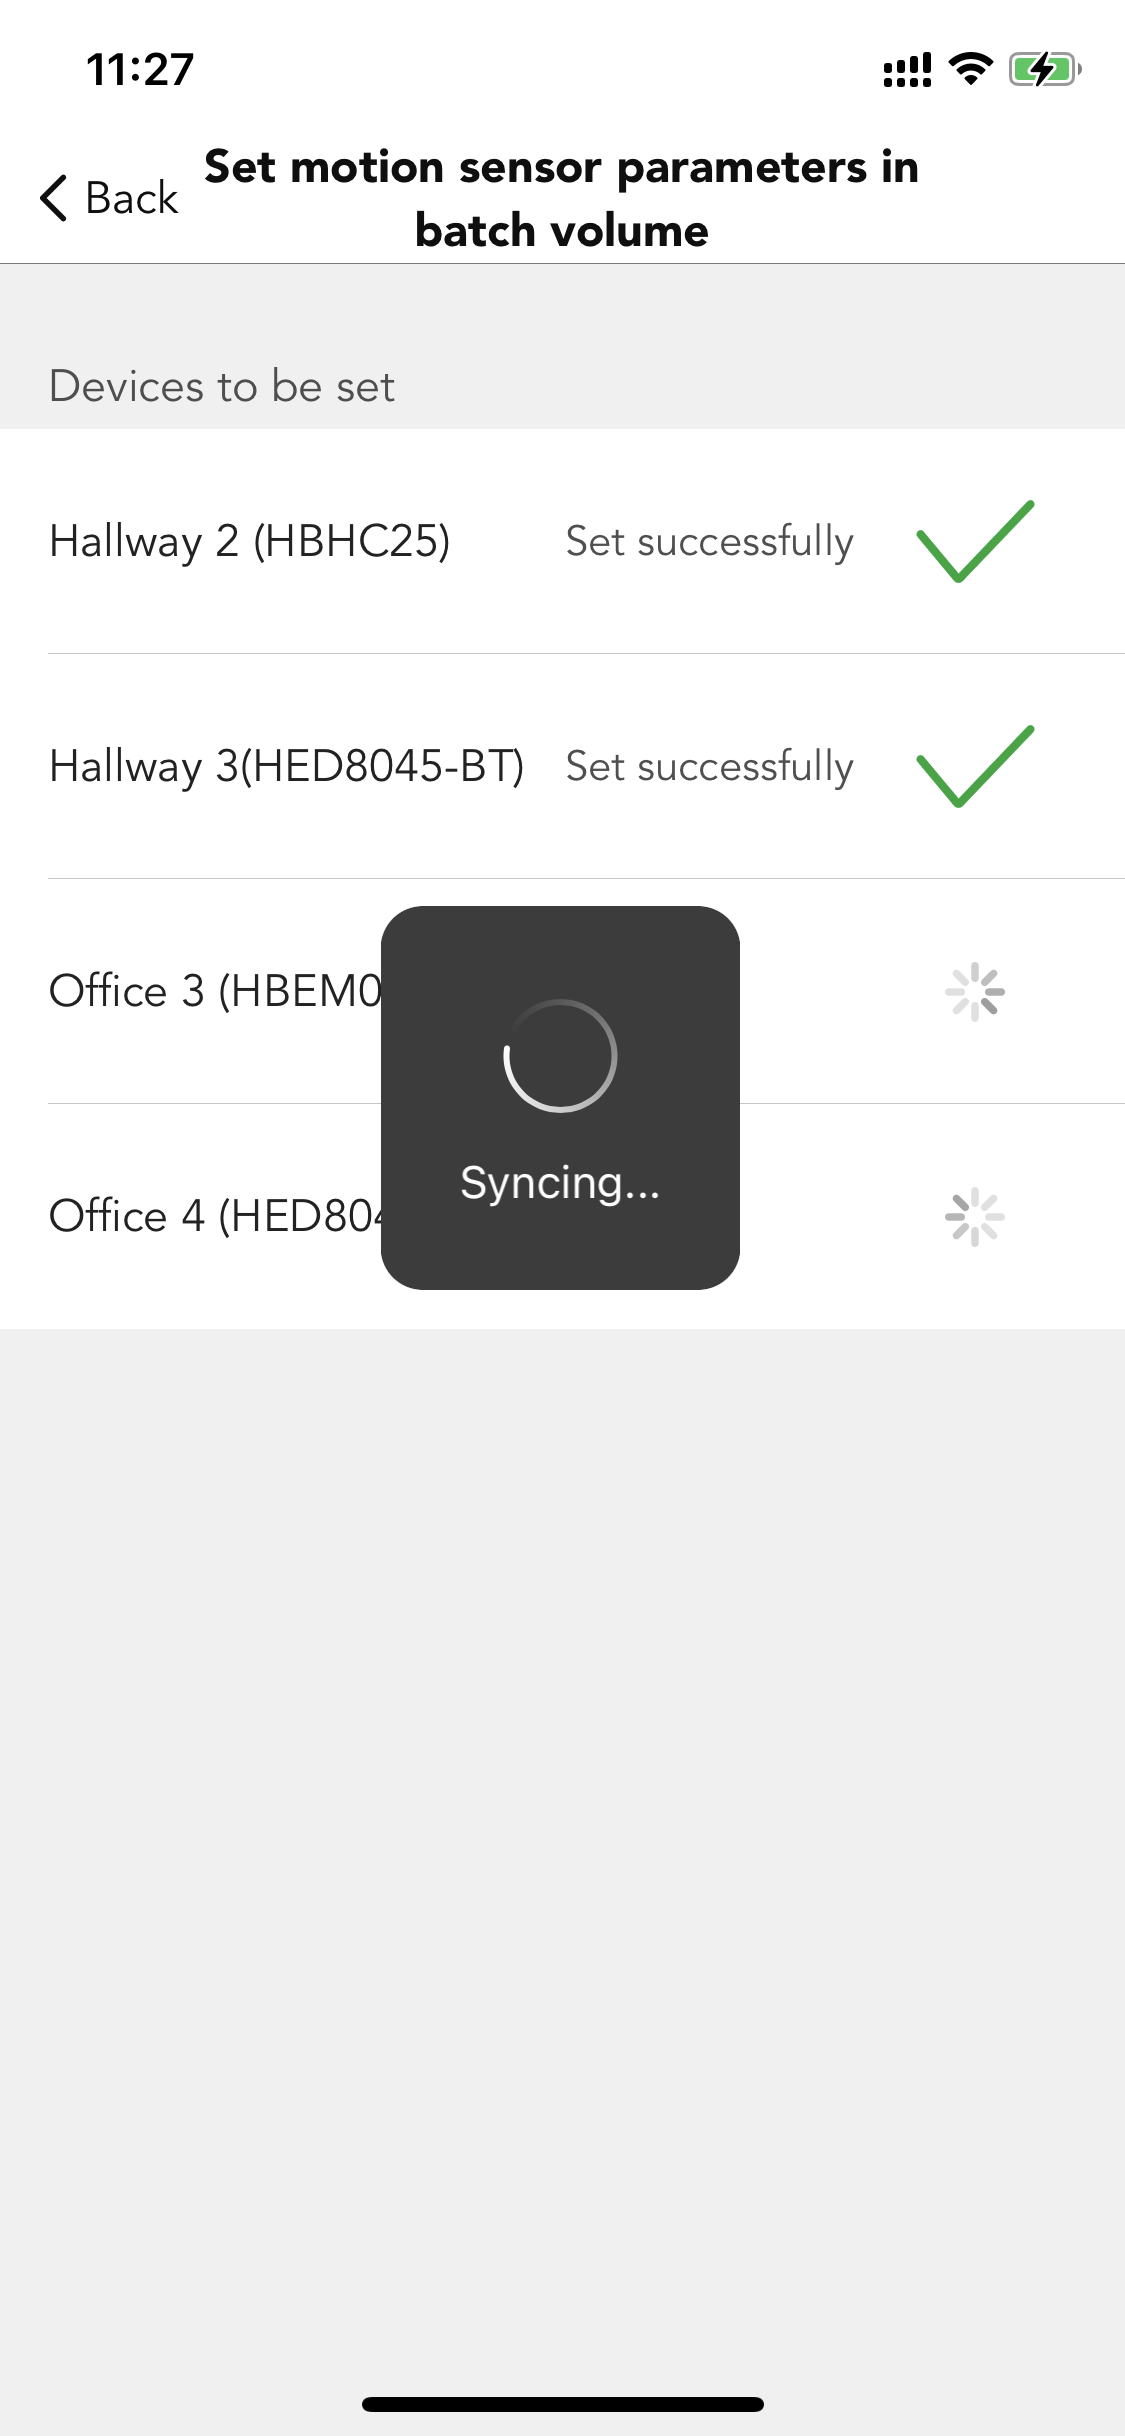
Step 2. Go to bulk commissioning, select "set motion sensor parameters in batch volume". Create a new profile and change the settings. Sync to all the relevant sensors.
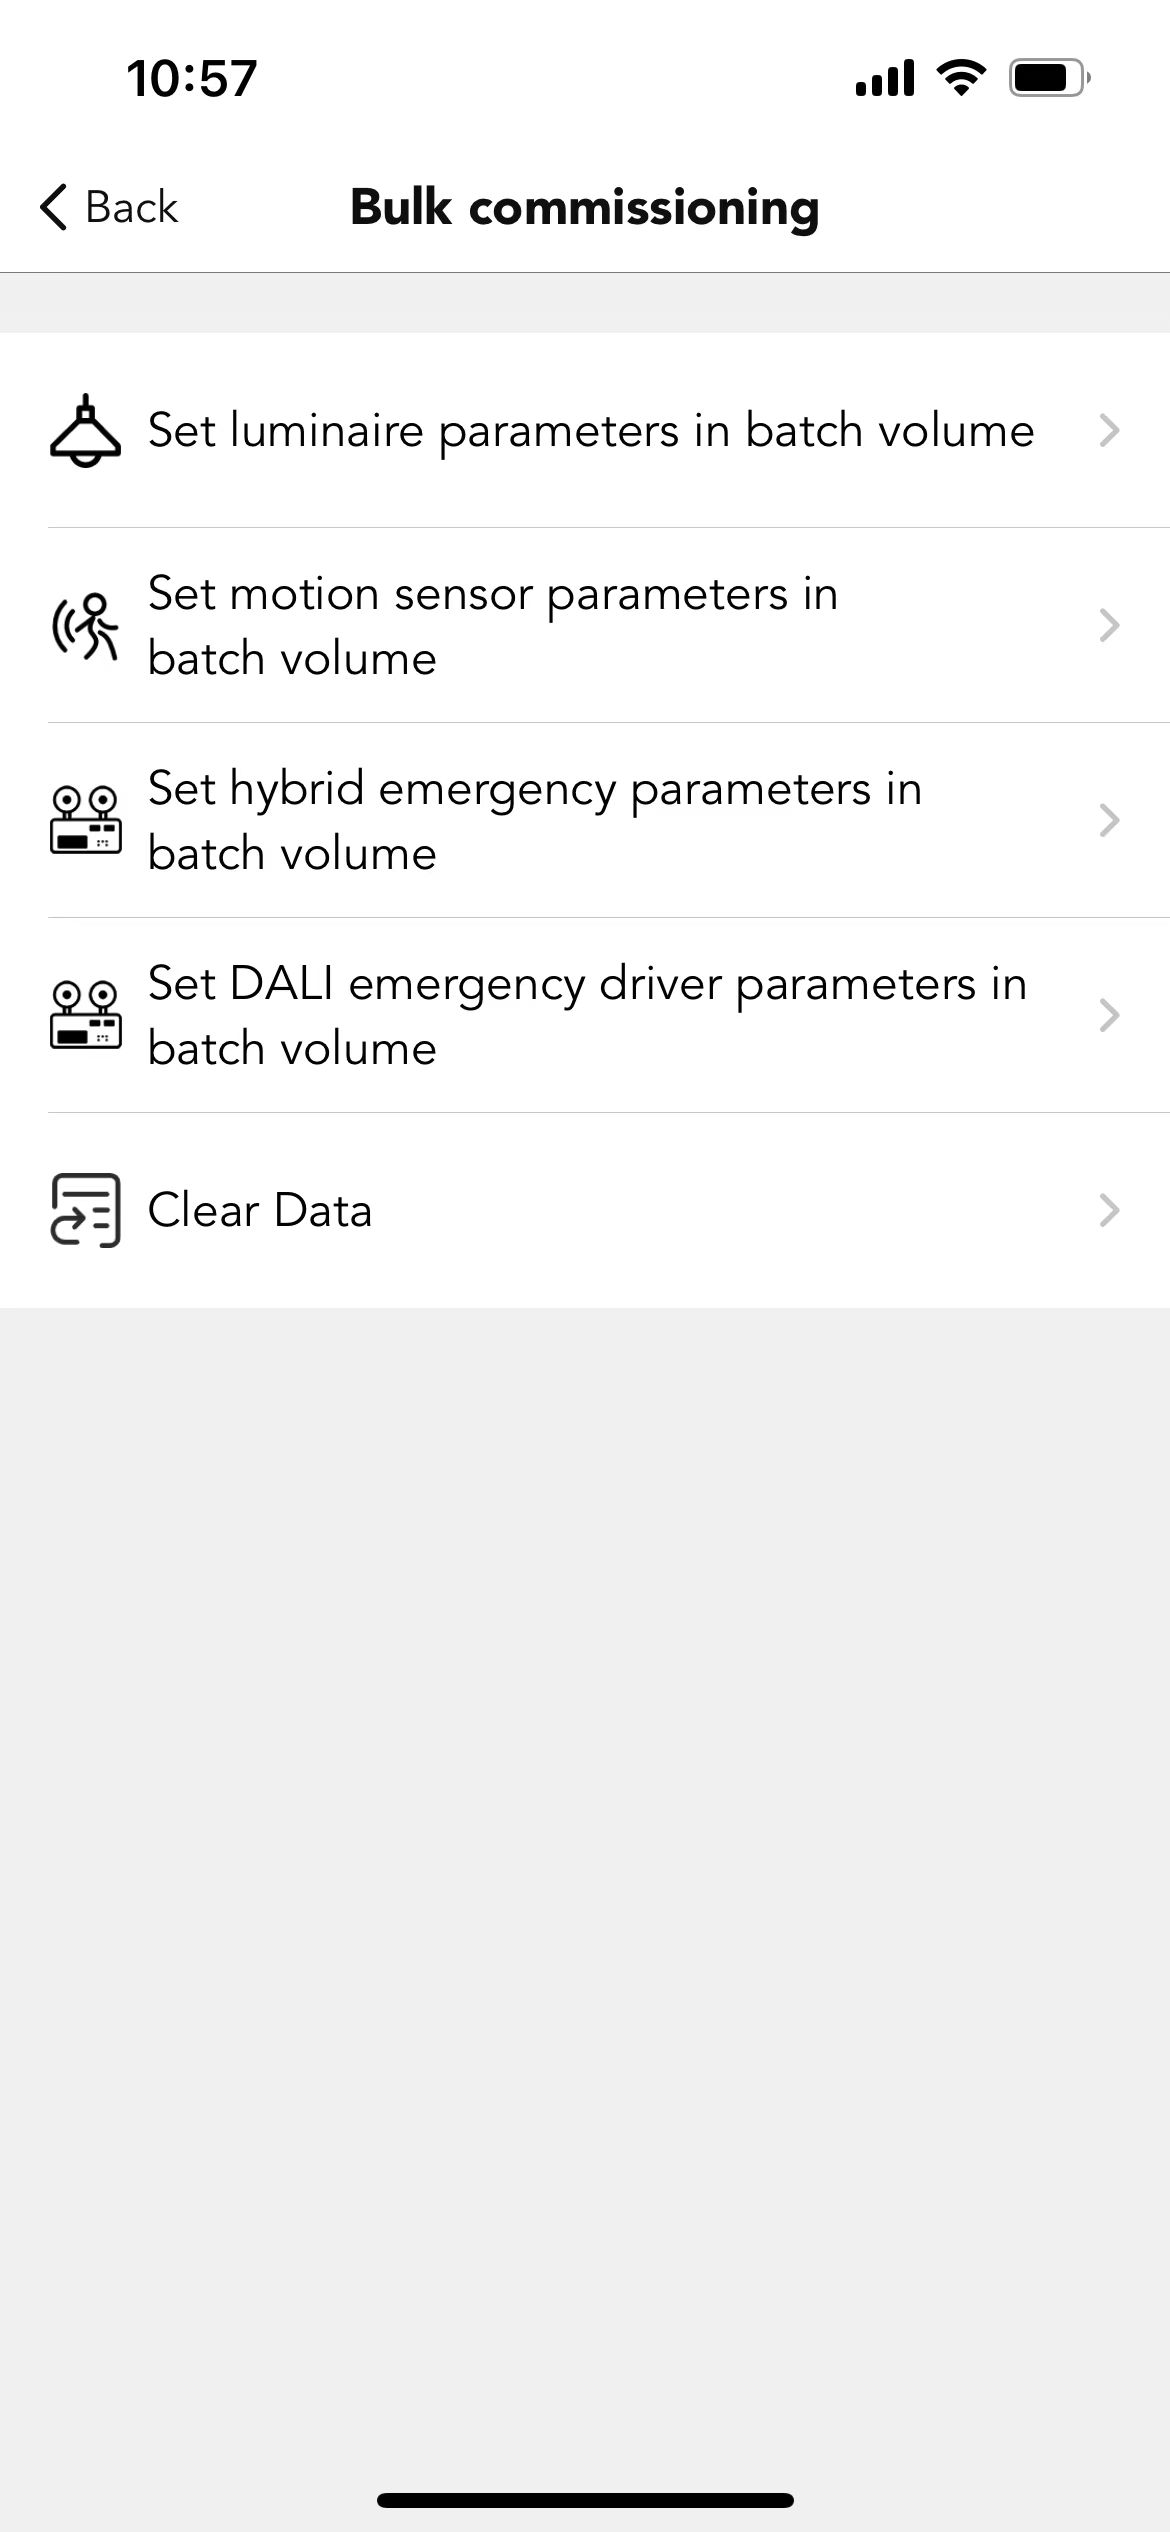
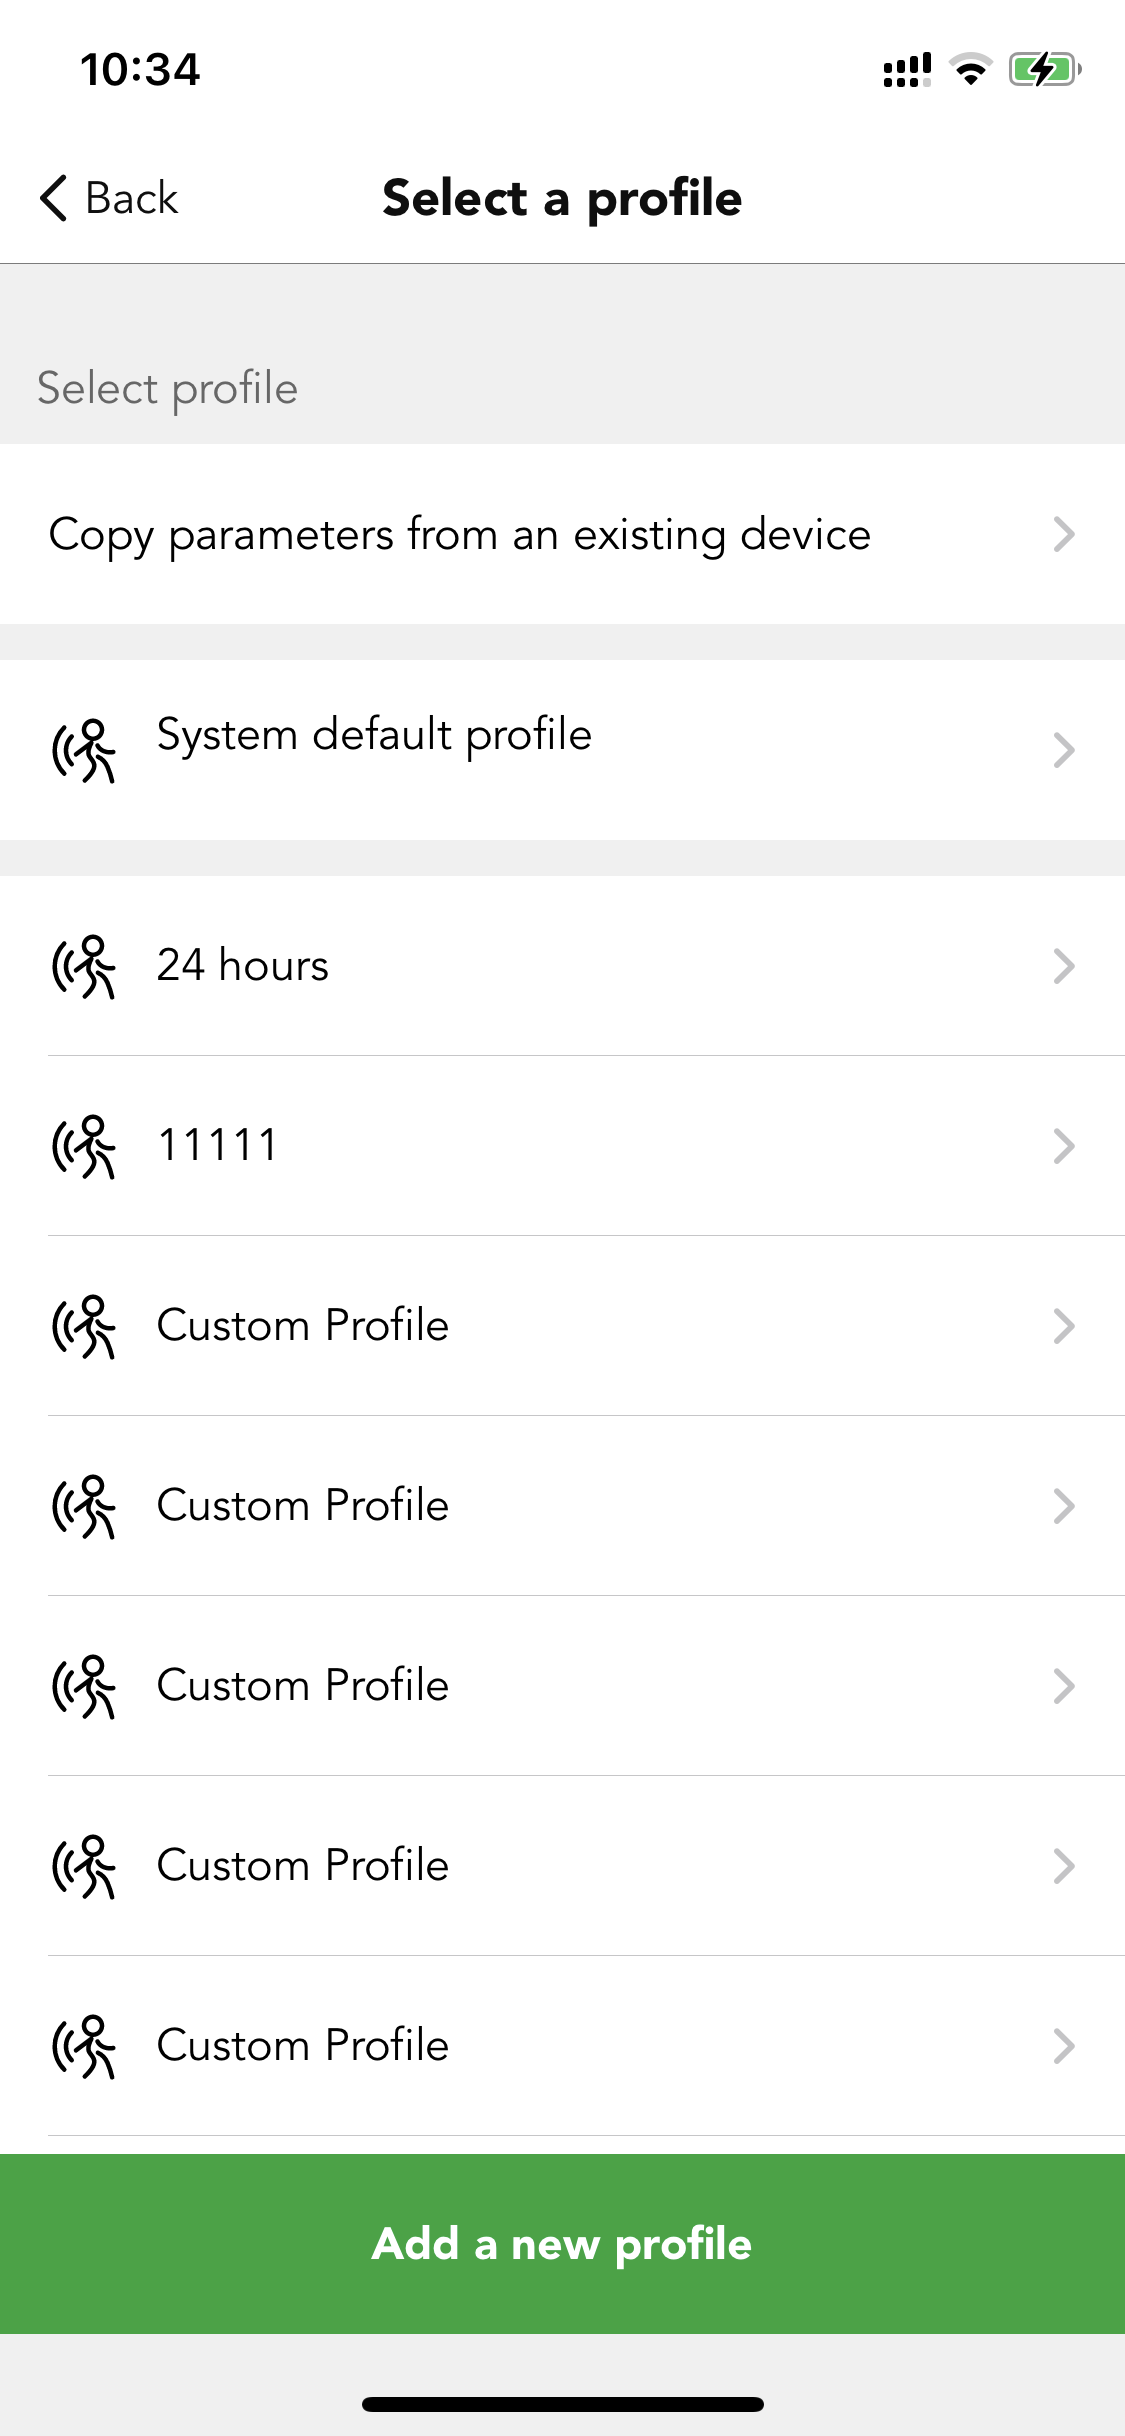
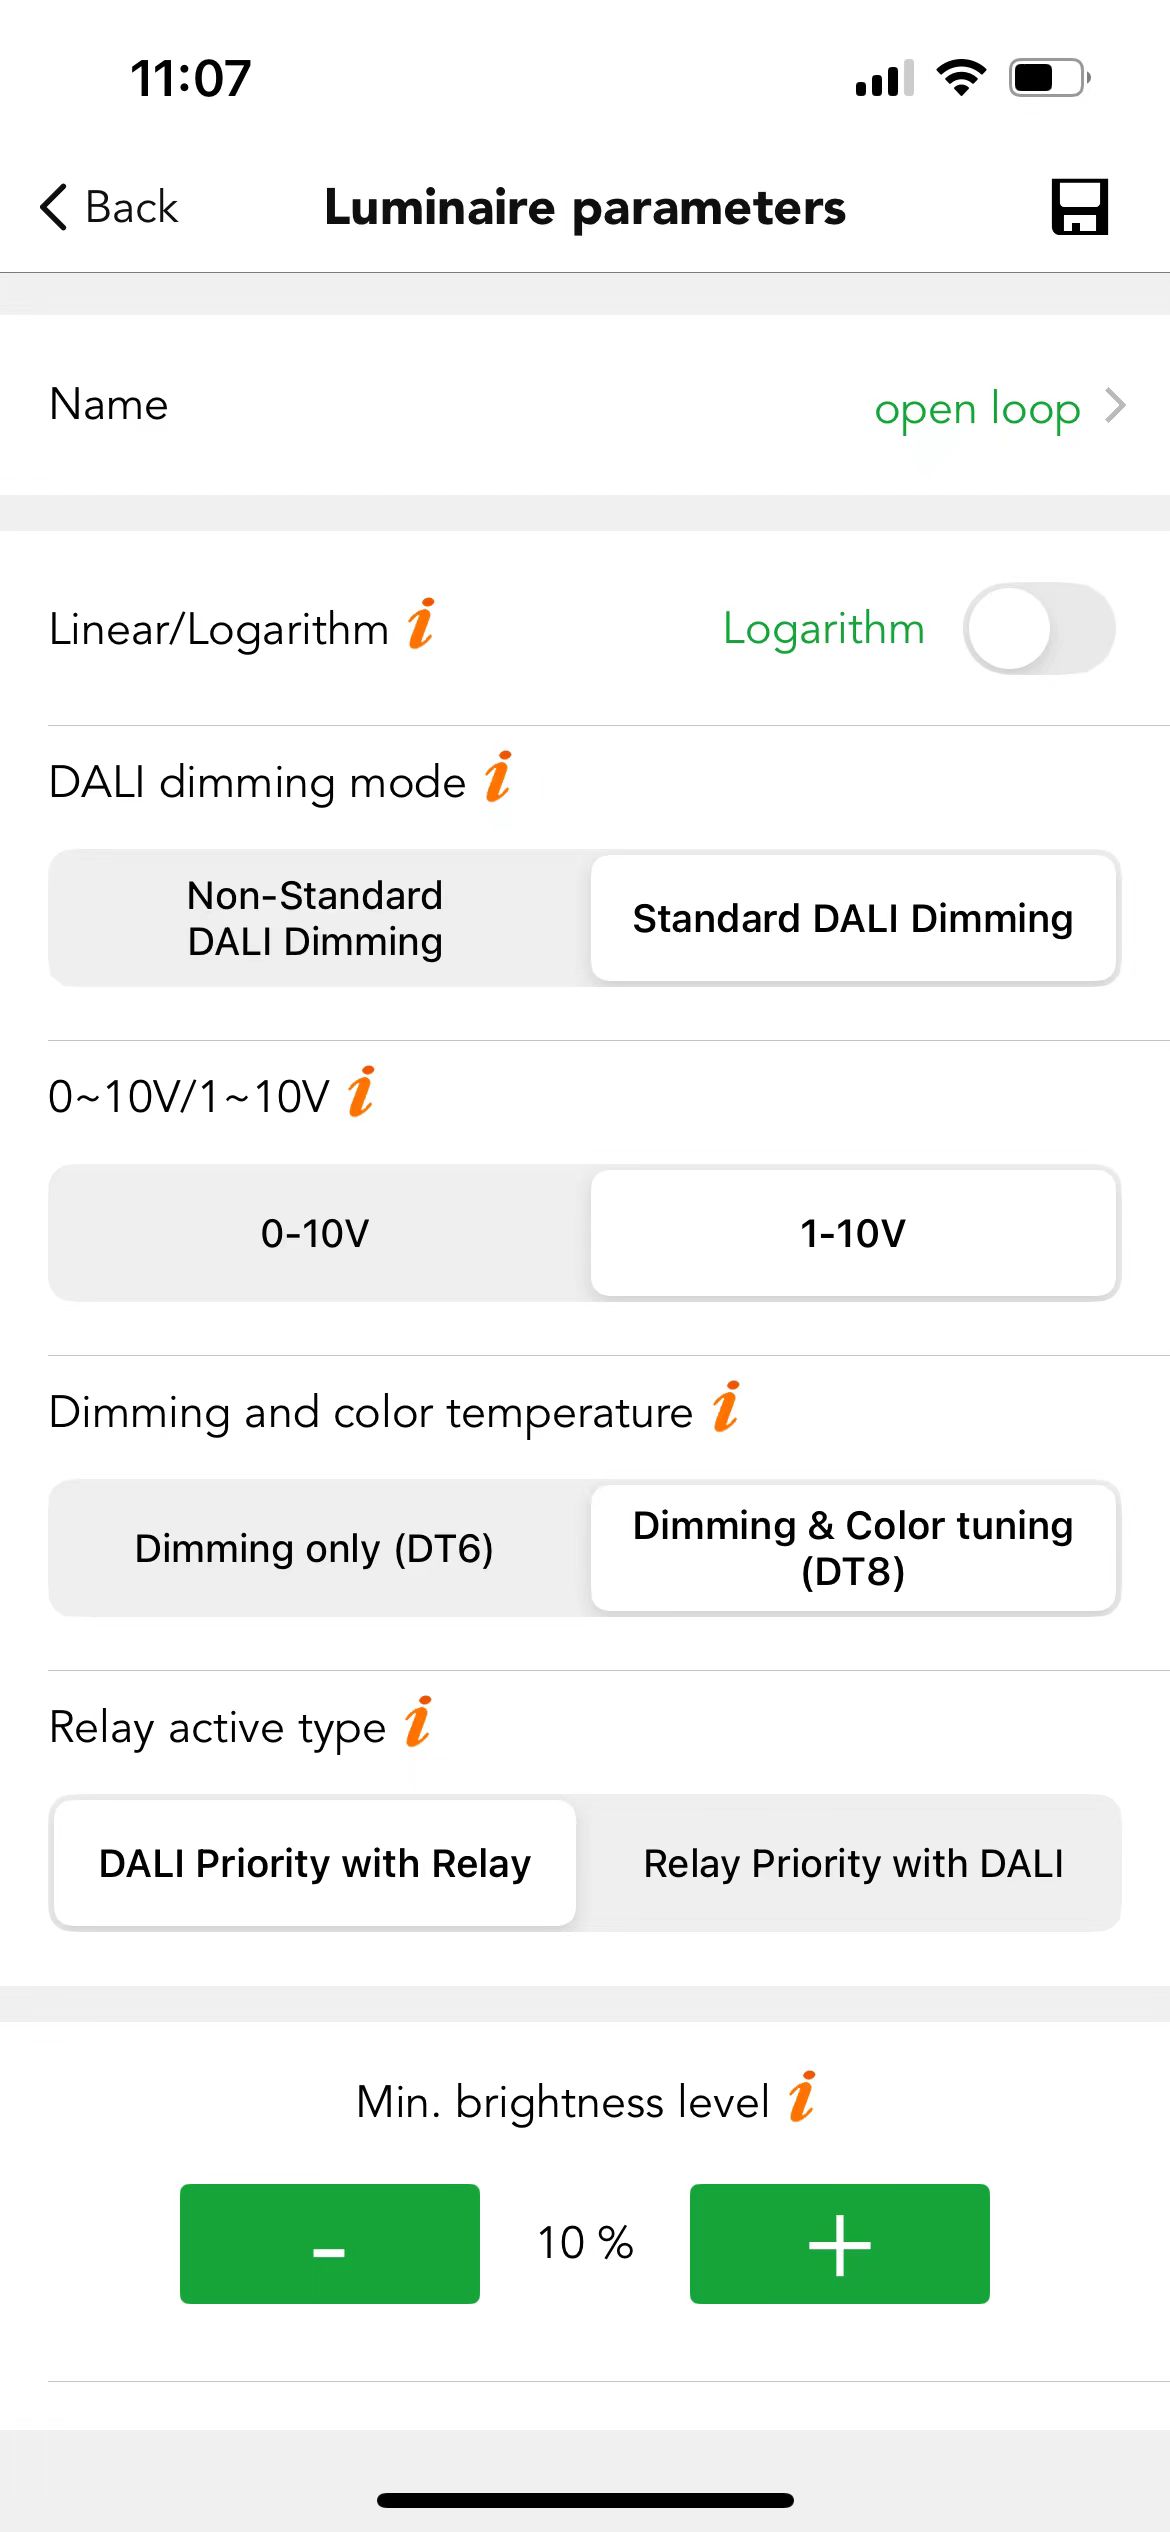
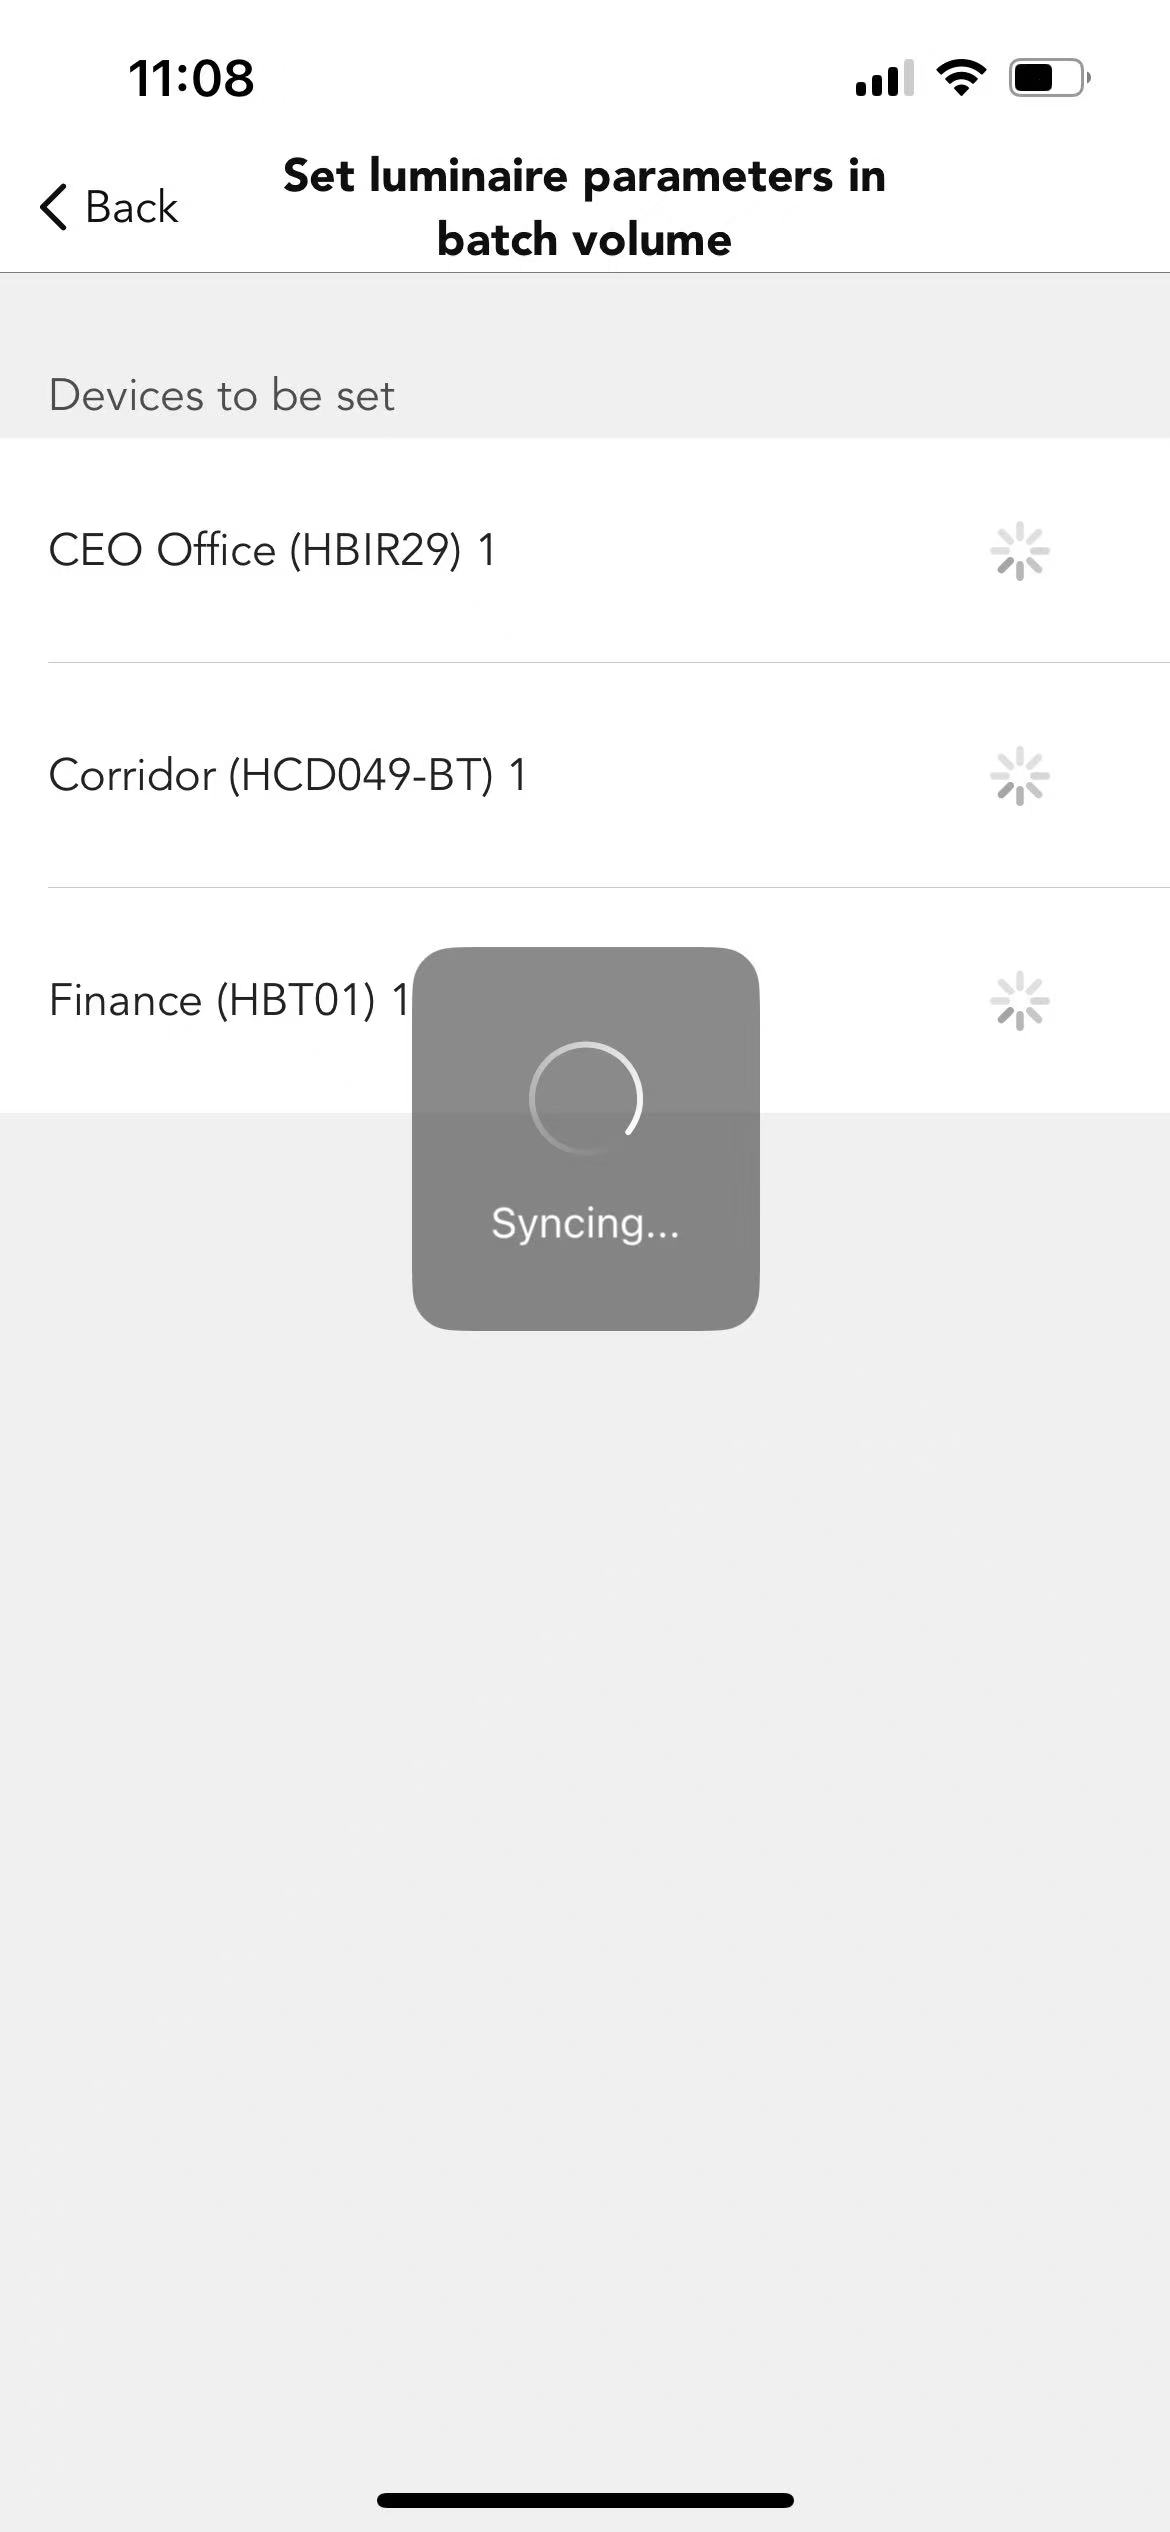
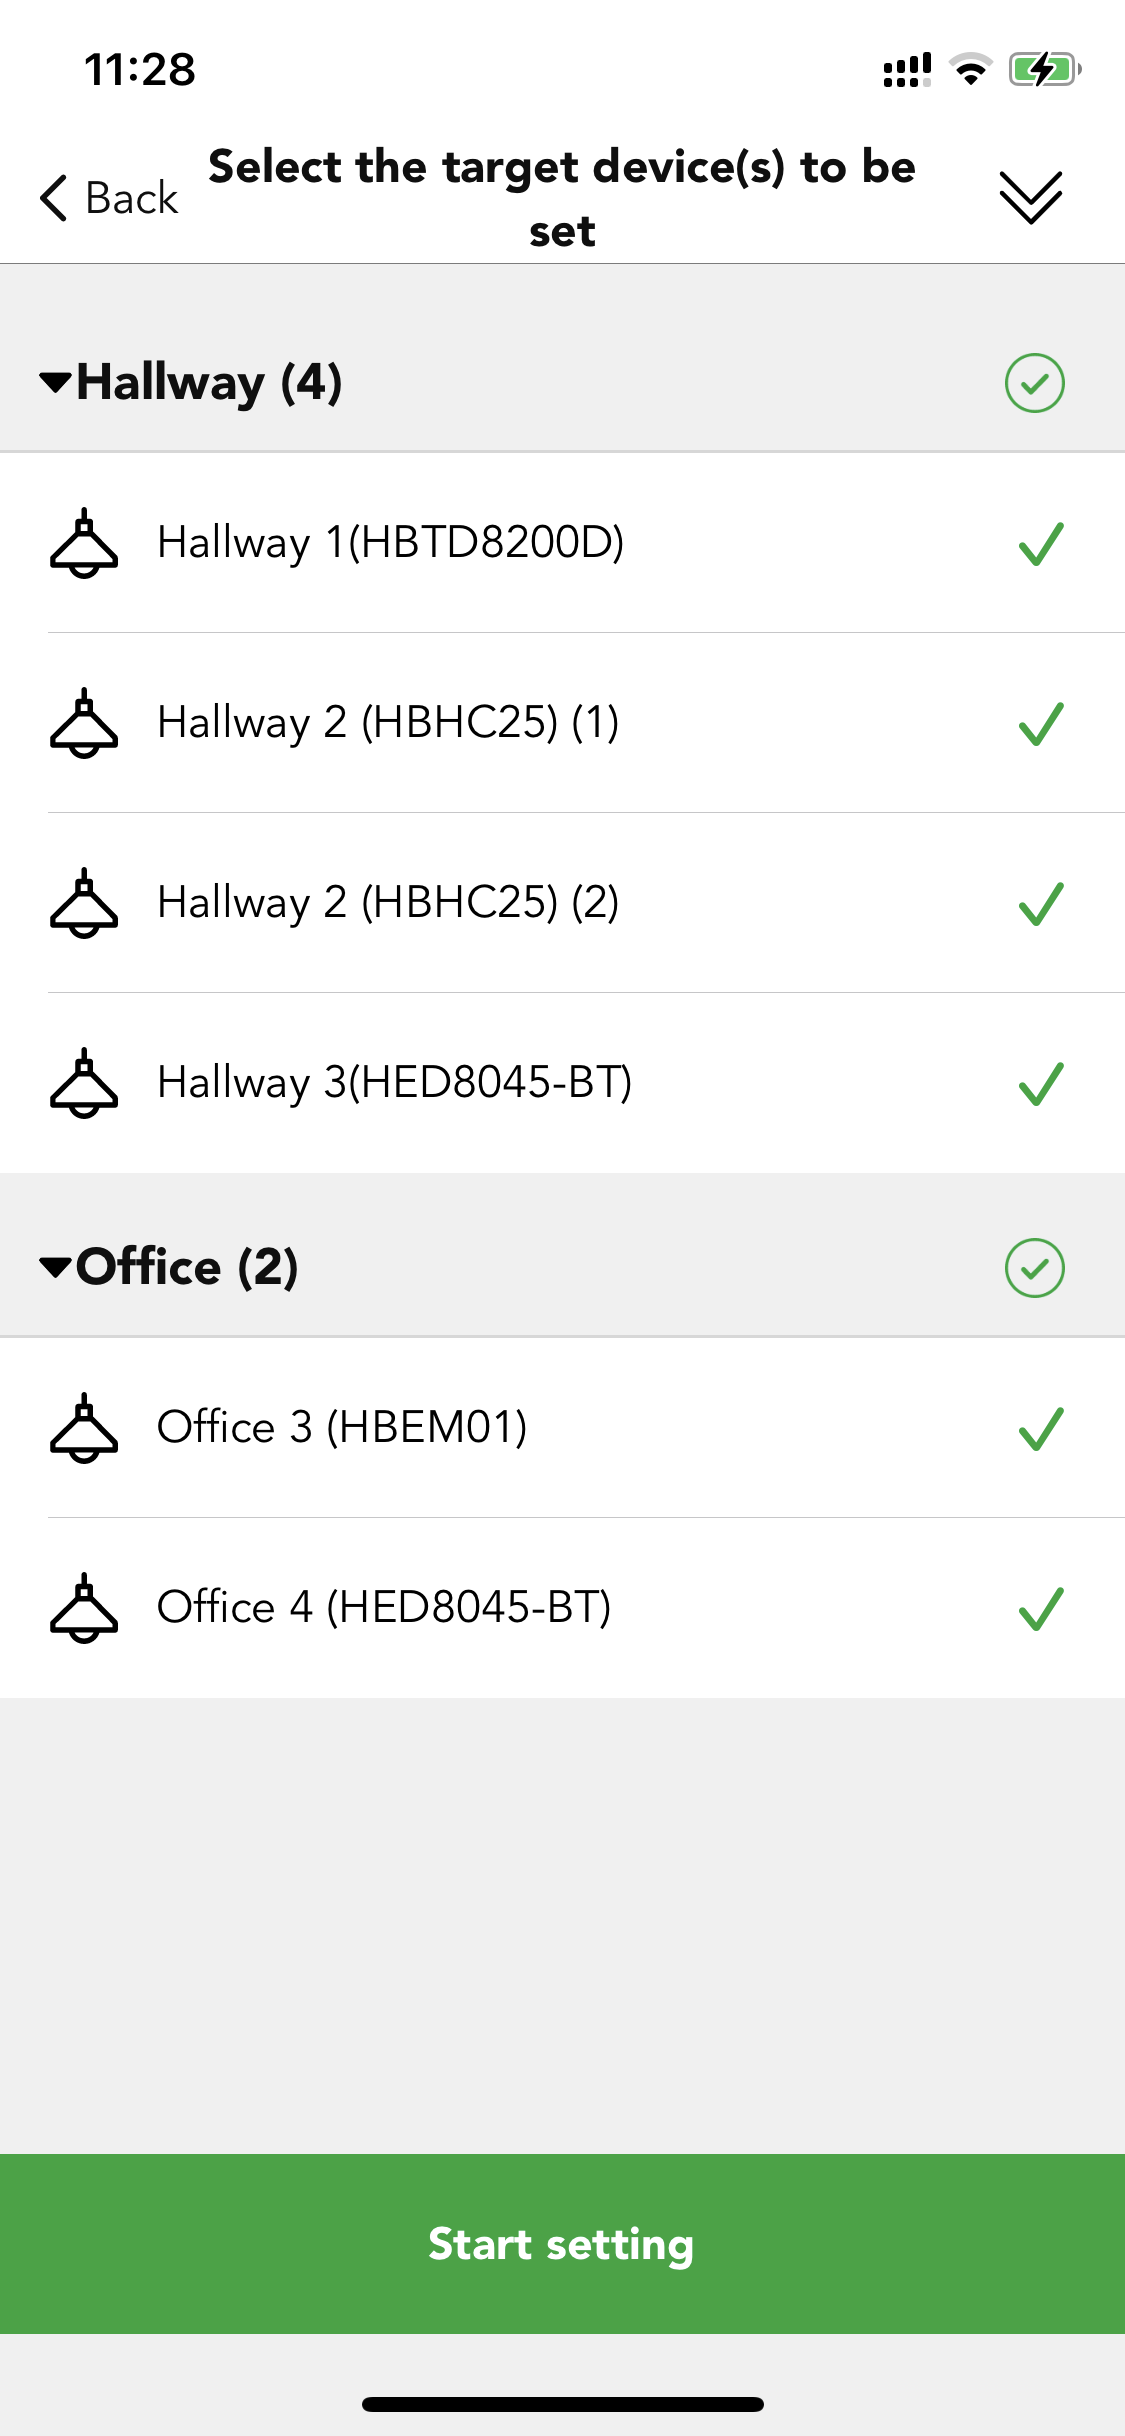
Step 3. Select "set luminaire parameters in batch volume". Create a new profile and change the settings accordingly. Sync to all the relevant luminaires.

Closed loop
The combination of luminaire's brightness output and ambient lux level will be approximately equal to the pre-set target lux value,target lux level is specified. The sensor actively adjusts the luminaires in the active scene to try to reach and maintain that lux level via a feedback loop (by observing the results of its own changes). Sensors are affected by light from the luminaires in the scene.
● Daylight sensor usage strategy
If a dedicated sensor is selected and a daylight sensor is in the luminaire. The scene will run based on the lux reading from this dedicated sensor instead of using the external daylight sensor. If the dedicated daylight sensor is disabled, the scene will run based on lux reading from the external daylight sensor instead. (Need to choose the control object of this daylight sensor).
● Enable Daylight Threshold(Lux ON)
You can toggle the switch to enable or disable the Daylight Threshold function. When enabled, the light will not turn on if the ambient light level is above the set threshold, and will only activate when the ambient light level falls below the threshold. When disabled, the light will turn on regardless of the ambient light level, and the Lux OFF function must be deactivated. In constant light mode, the light will only dim to the minimum brightness and will not turn off completely. This function is enabled by default.
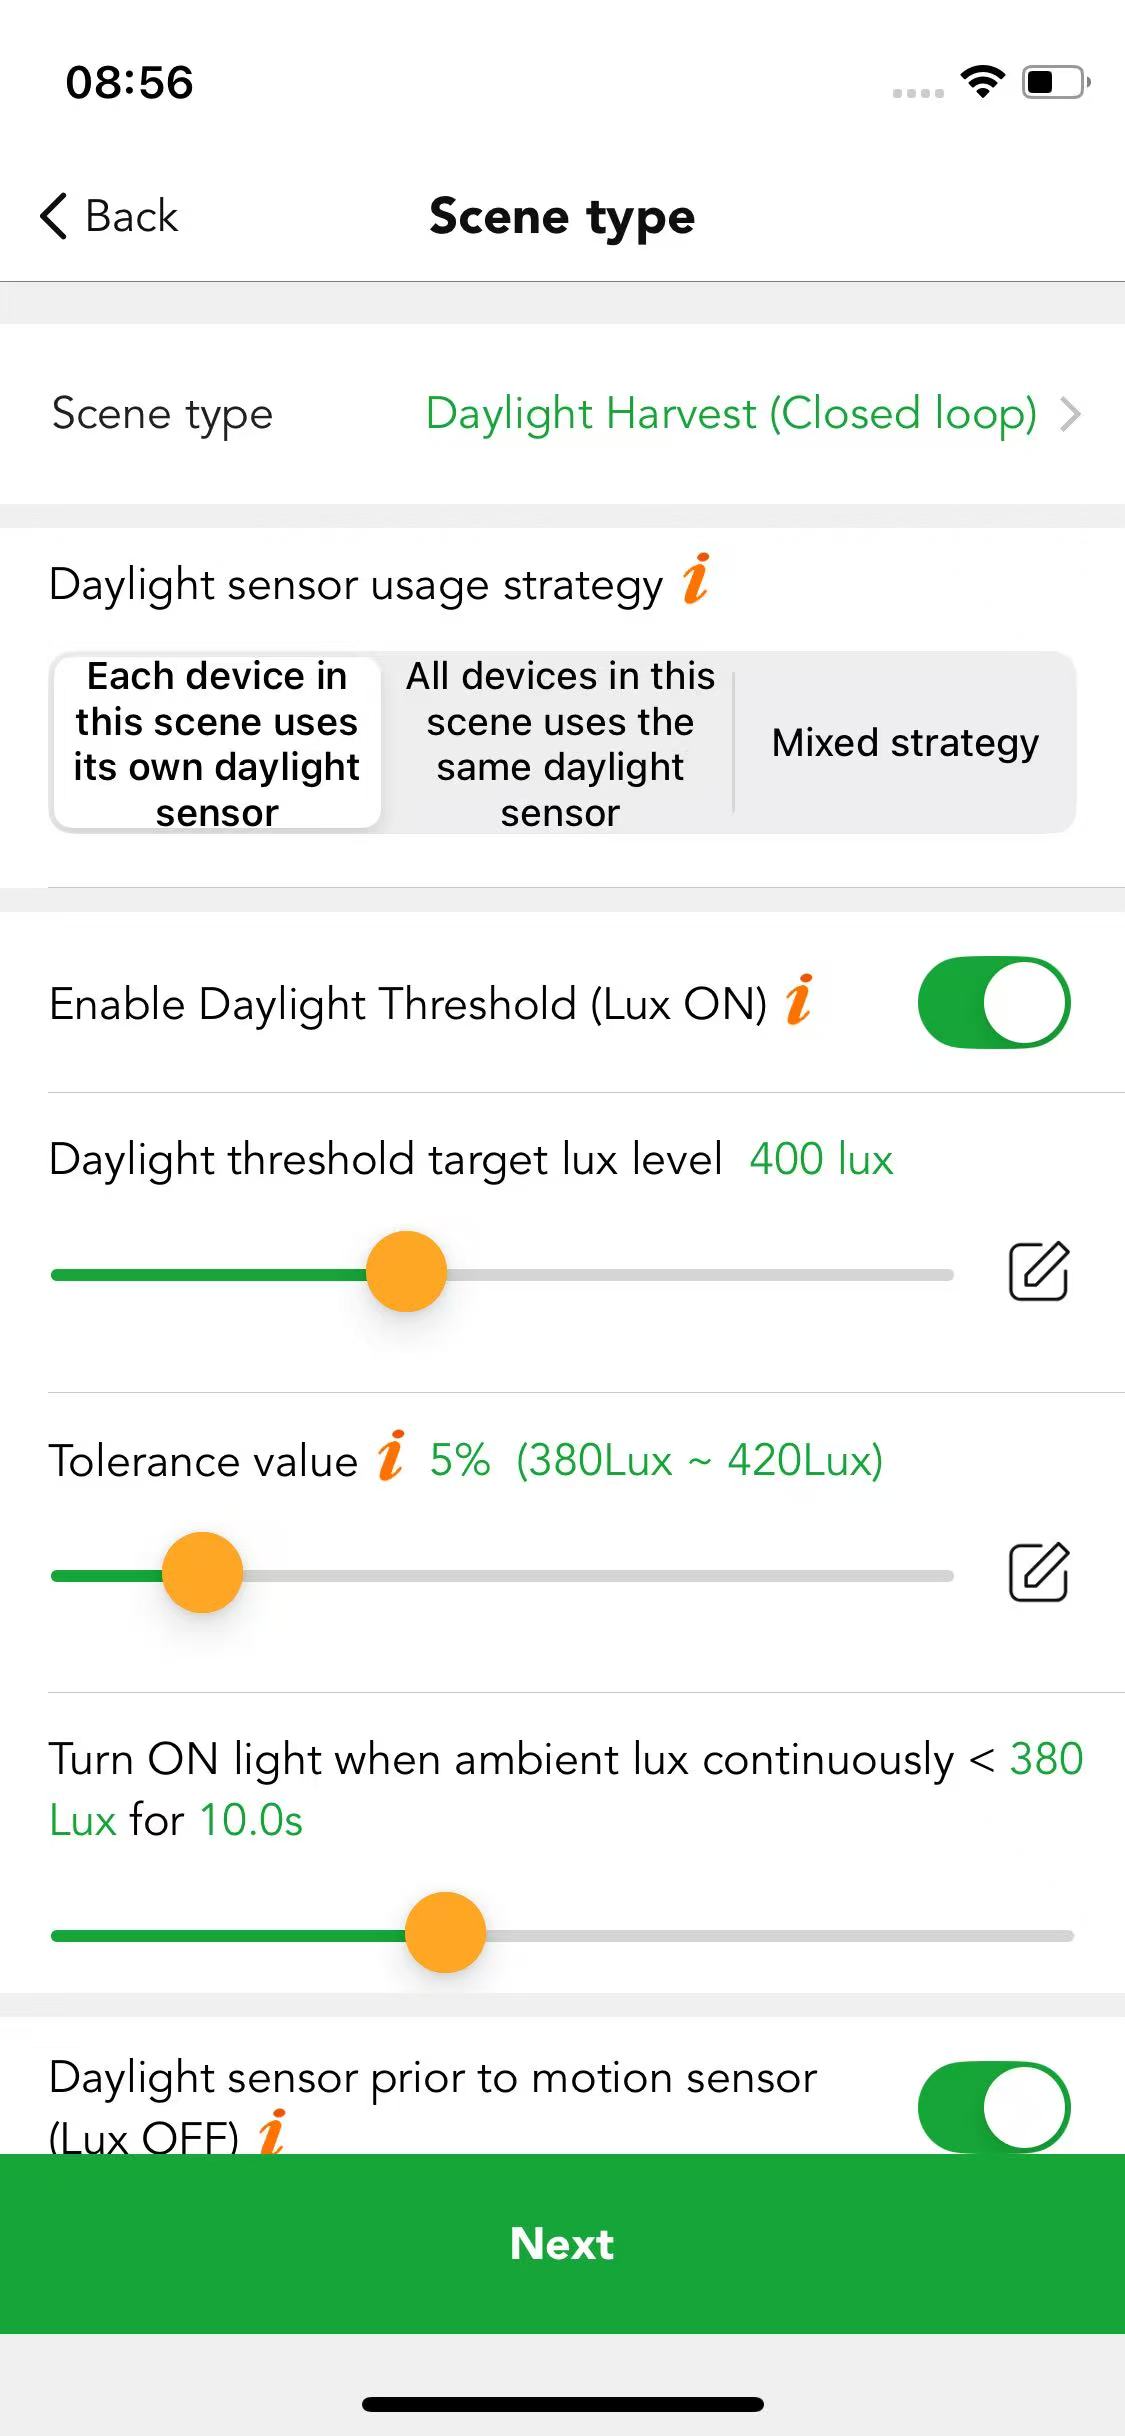
● Daylight threshold target lux level
The combination of luminaire's brightness output and ambient lux level will be approximately equal to the pre-set target lux value. For example, if the target lux level is 400 lux, then the luminaires brightness output plus the ambient lux needs to be 400 lux.
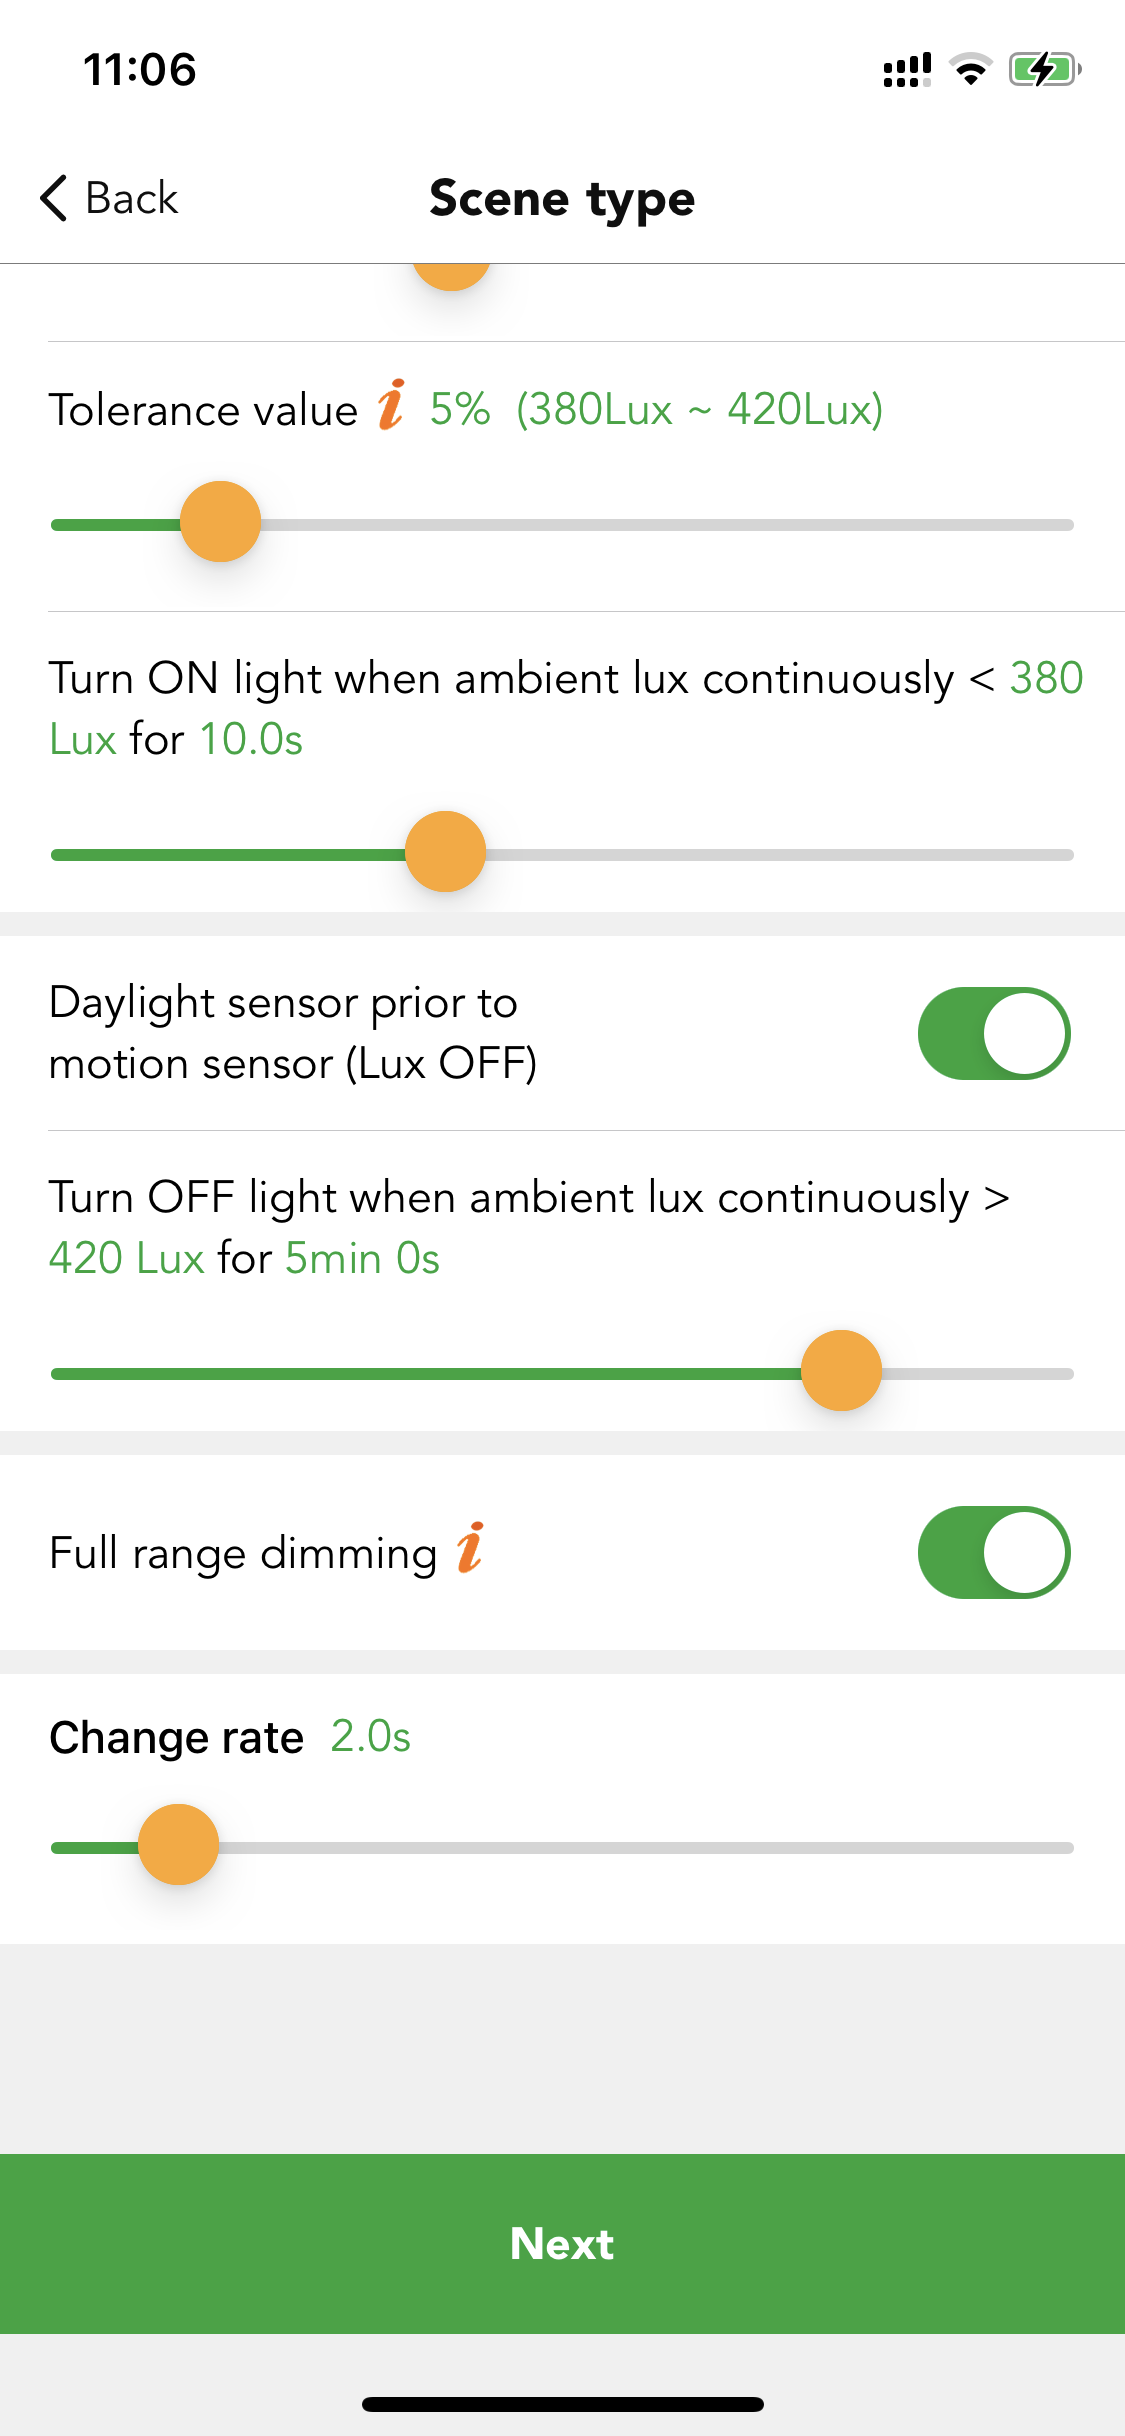
● Tolerance value
e.g., if the daylight sensor setting is set as 500 lux, and the tolerance lux is set to 50 lux, the valid range will be from 450 lux to 550 lux.
● Measuring time
Users can define the measuring time. For how late luminaries will turn on/off before ambient lux continuously detected lower/higher than daylight threshold value.
● Daylight sensor prior to motion sensor (Lux off)
When the ambient lux is strong enough and exceeds the "Lux off value", then the luminaires will be turned off by the daylight sensor. If this function is disabled, when the daylight threshold scene is activated, then the luminaires will not be turned off by the daylight sensor but will dim down to a small low level.
● Full range dimming
This is the valid dimming range when the device is running this scene.
On: range from device min. Brightness level to device max. brightness level.
Off: range from device min. brightness level to scene brightness level.
● Change rate
When the detected lux value does not meet the target level, the system will adjust the luminaires' output to bring the ambient lux level in line with the target. Slide the dimming rate slider to set the desired dimming change rate as needed. Three adjustment options are available – Fast, Medium, and Slow – for users to select according to actual requirements.
● Start and stop target lux auto-config
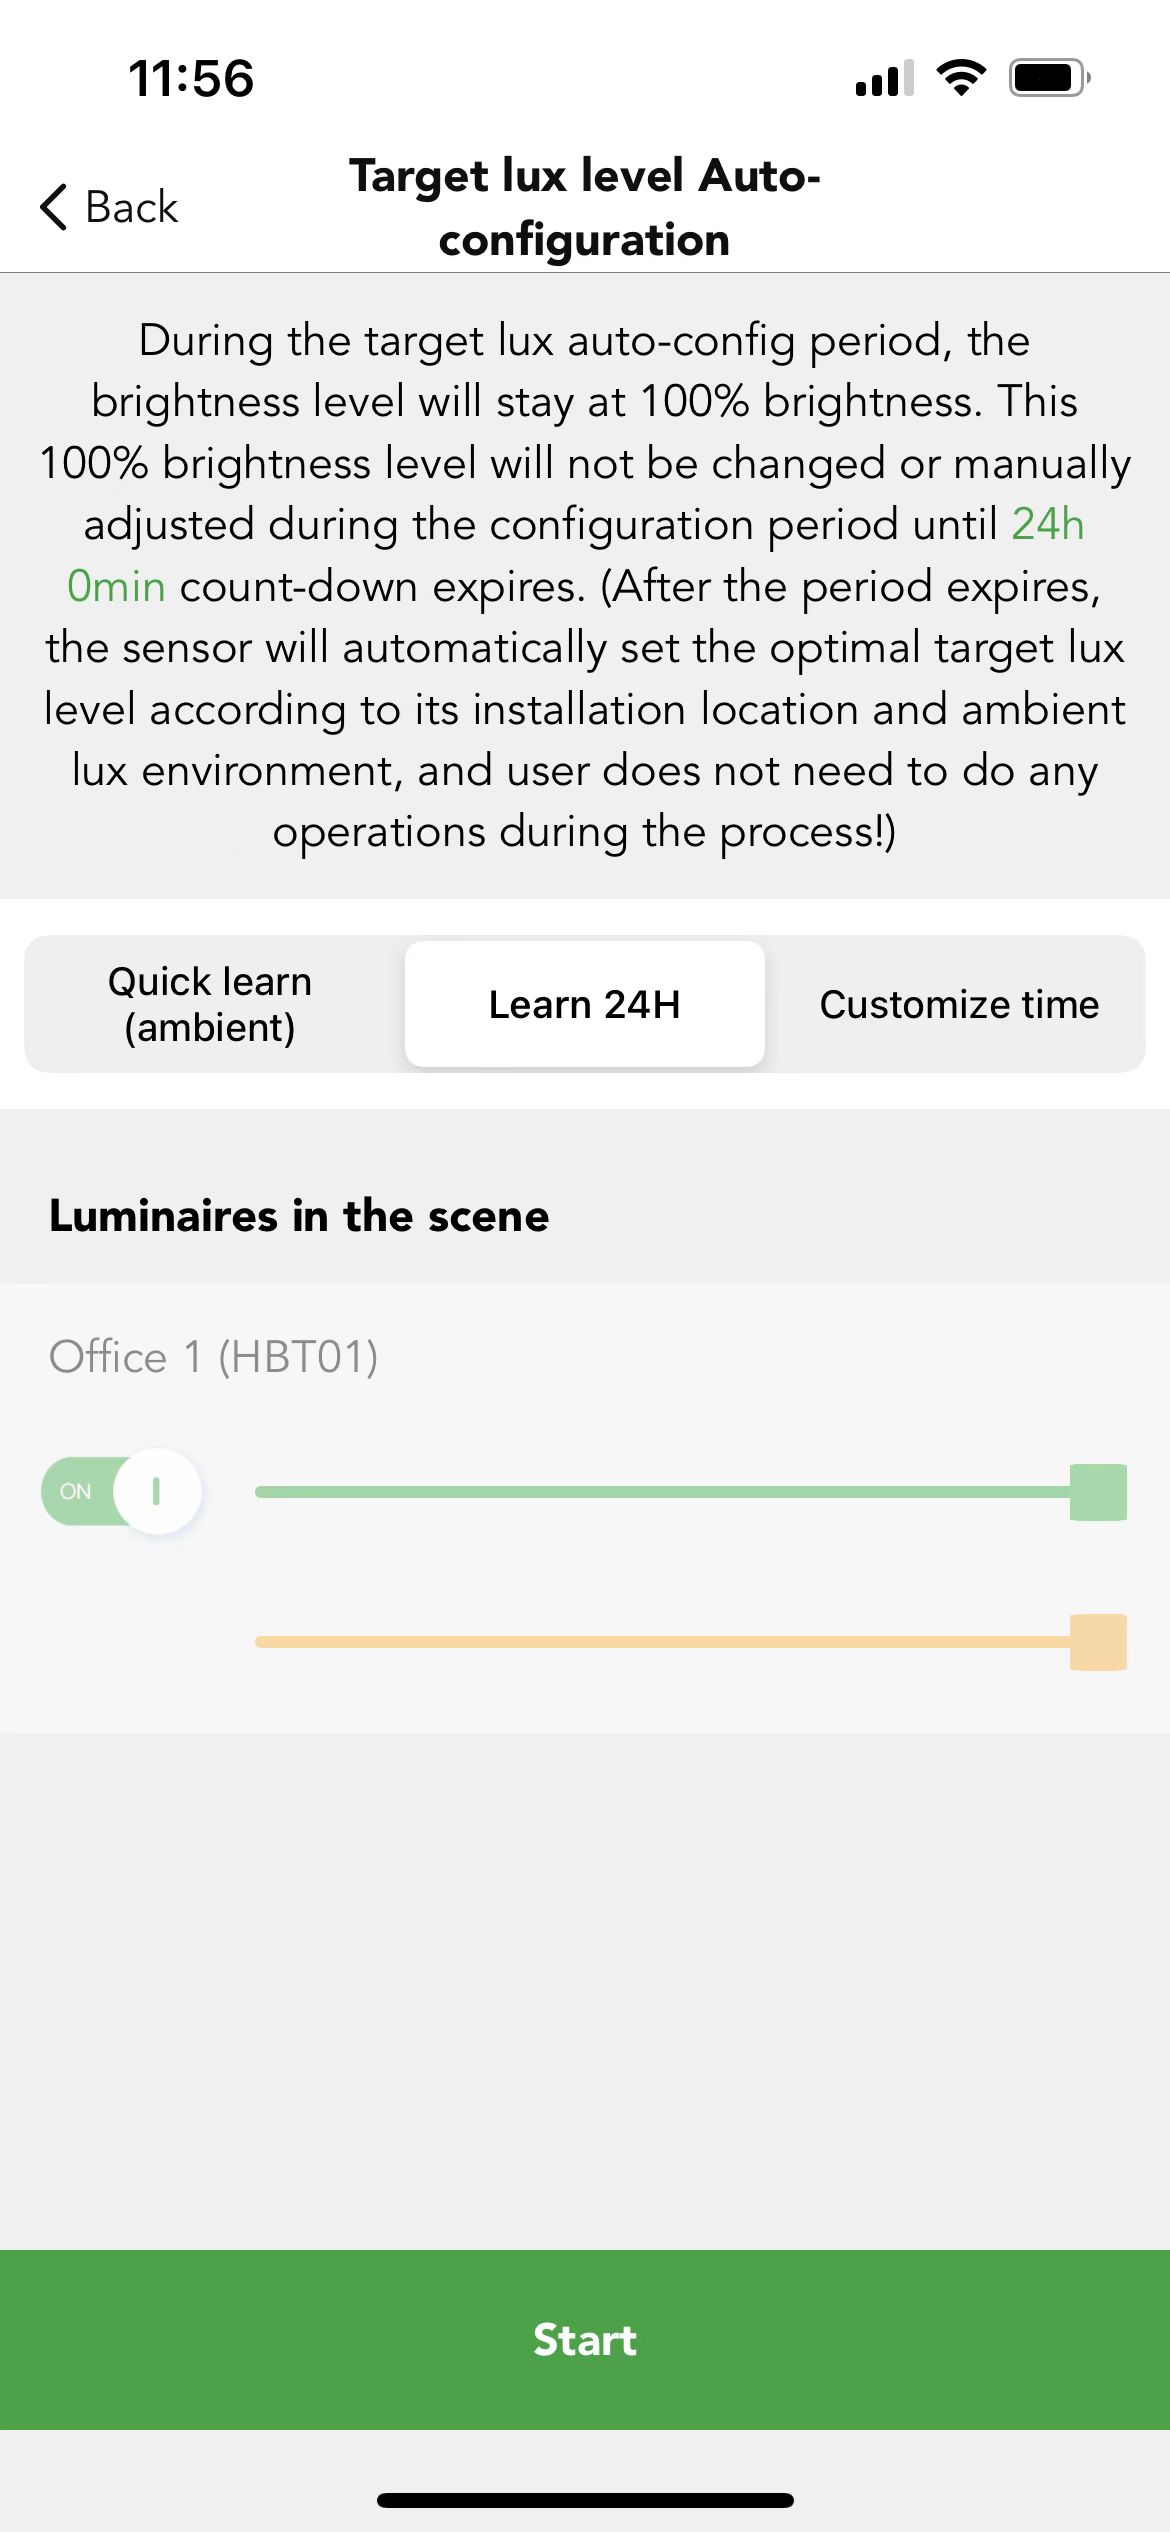
When users finish the creation of Daylight harvest (closed loop), then this daylight harvest scene will be listed out on the Scene page where users can long press the cover of this scene to "Start target lux auto-config" or "Stop target lux auto-config". There are "quick learn (ambient)", "learn 24H" and "customize time".
Start target lux auto config: above have mentioned the combination of luminaire's brightness output and ambient lux level will be approximately equal to the pre-set target lux value (luminaire's brightness output + ambient lux level ≈ Daylight threshold target lux level). Therefore, the logic of "start lux auto-config" is when the ambient lux level is lowest / darkest(≈0), then the luminaire’s brightness will be brightest to achieve the target lux level, which means when user "start lux auto-config" (let us take "learn 24H" as an example), then the system will learn the brightest of luminaire within following 24H, after finish the learning, then system will set this lux level as Daylight threshold target lux (Daylight threshold target lux level≈luminaire's brightness output when the ambient lux level is
darkest).
Please be aware that if users implement "Start target lux auto-config" function, then the "Daylight threshold target lux level" user set in the daylight harvest (closed loop) scene will be no more valid, the system will take the learning value as "Daylight threshold target lux level". Koolmesh team recommends users to "learn 24H" when using the "Start target lux auto-config" function.
Case 3:How to trigger a daylight harvest scene (closed loop) with a manual push switch?
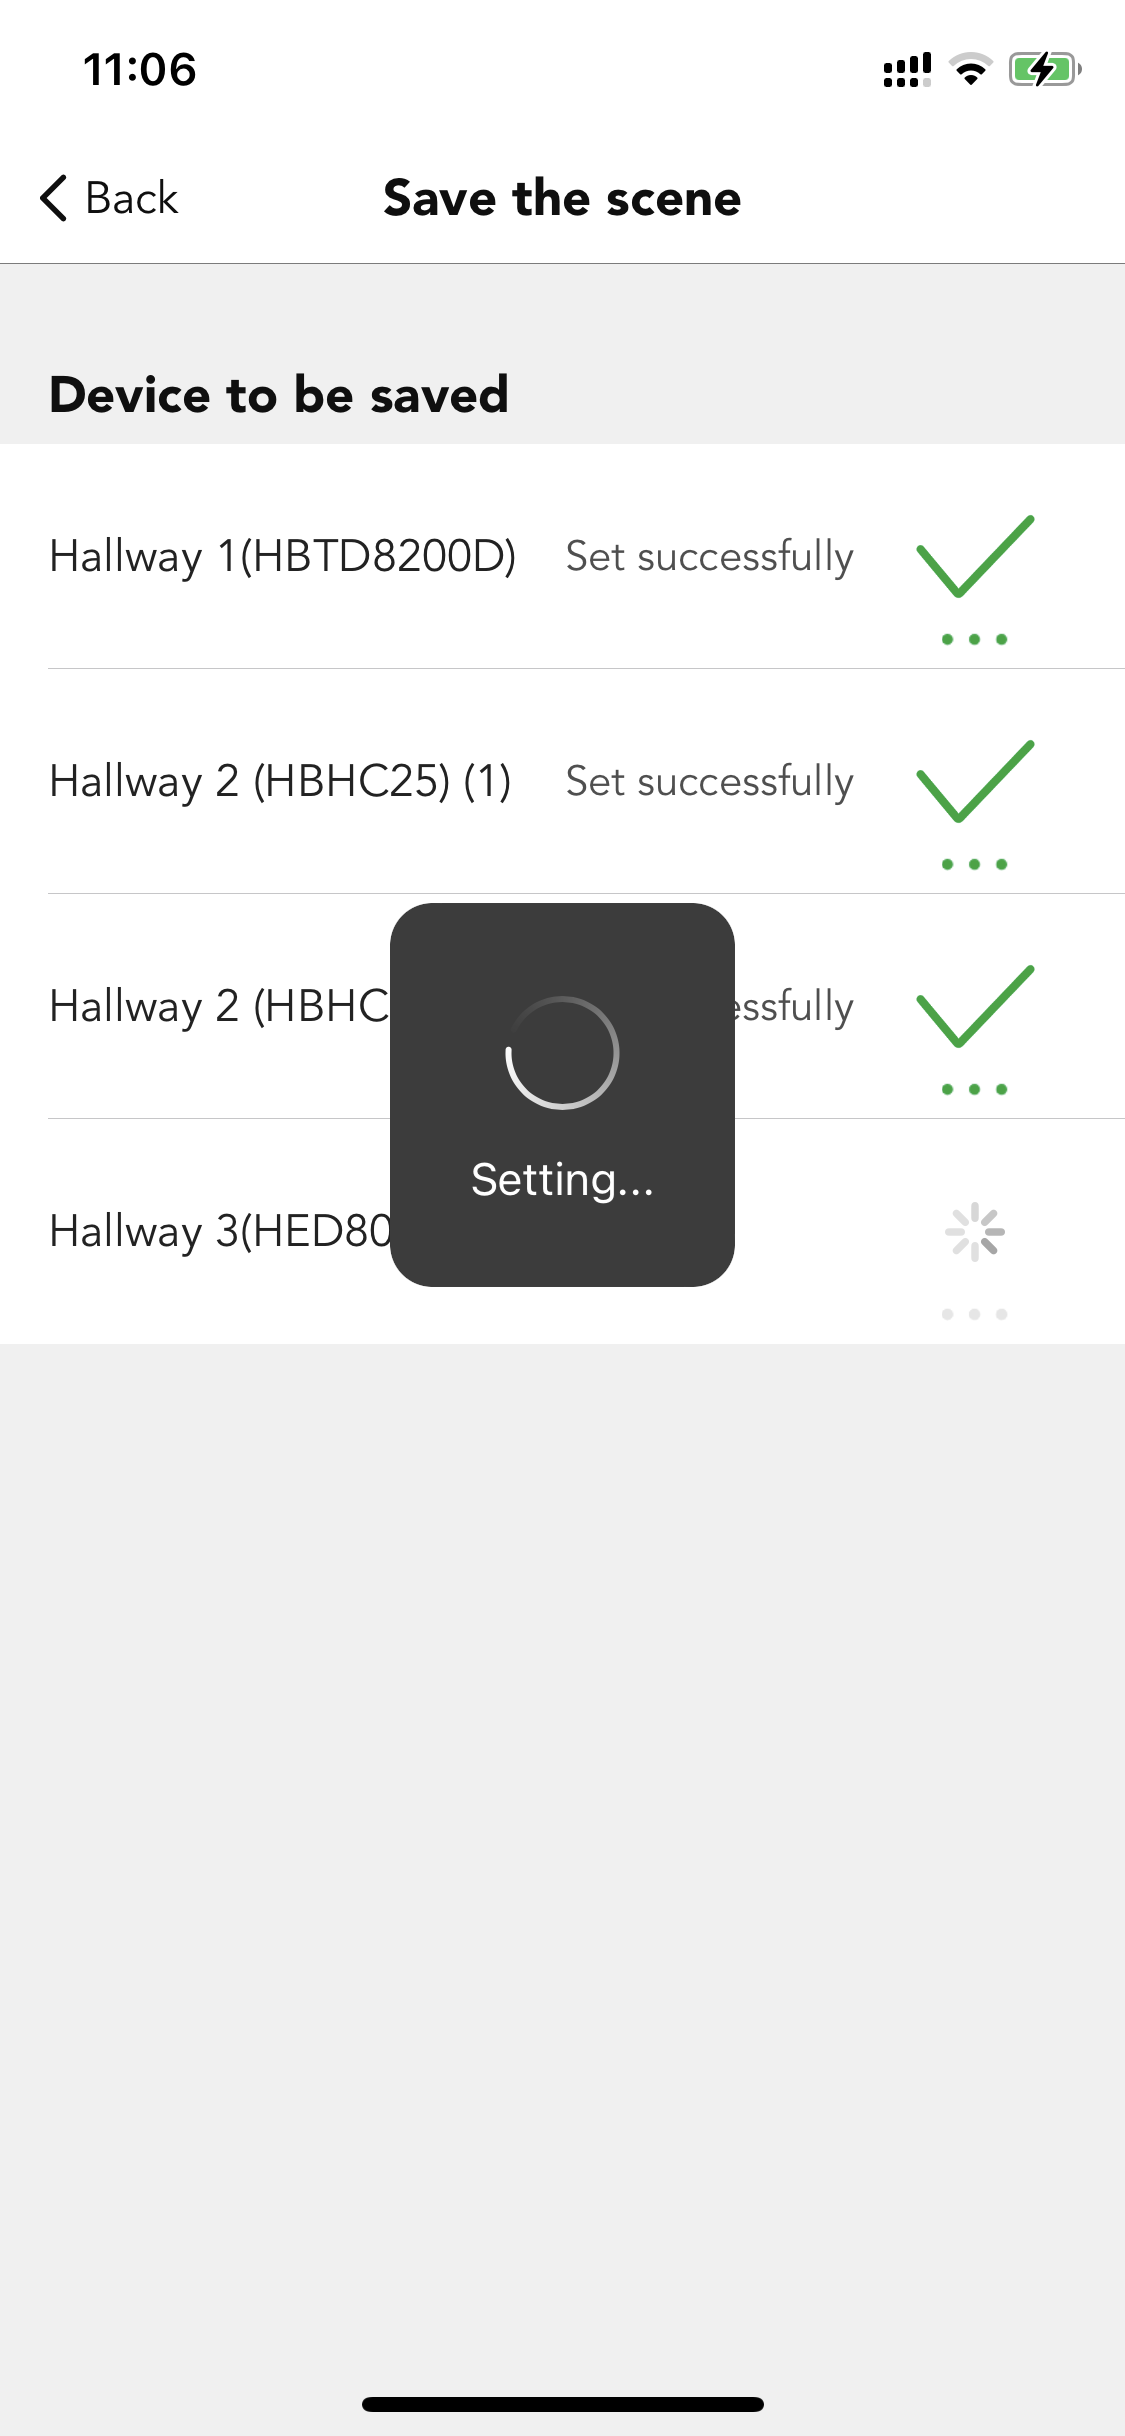
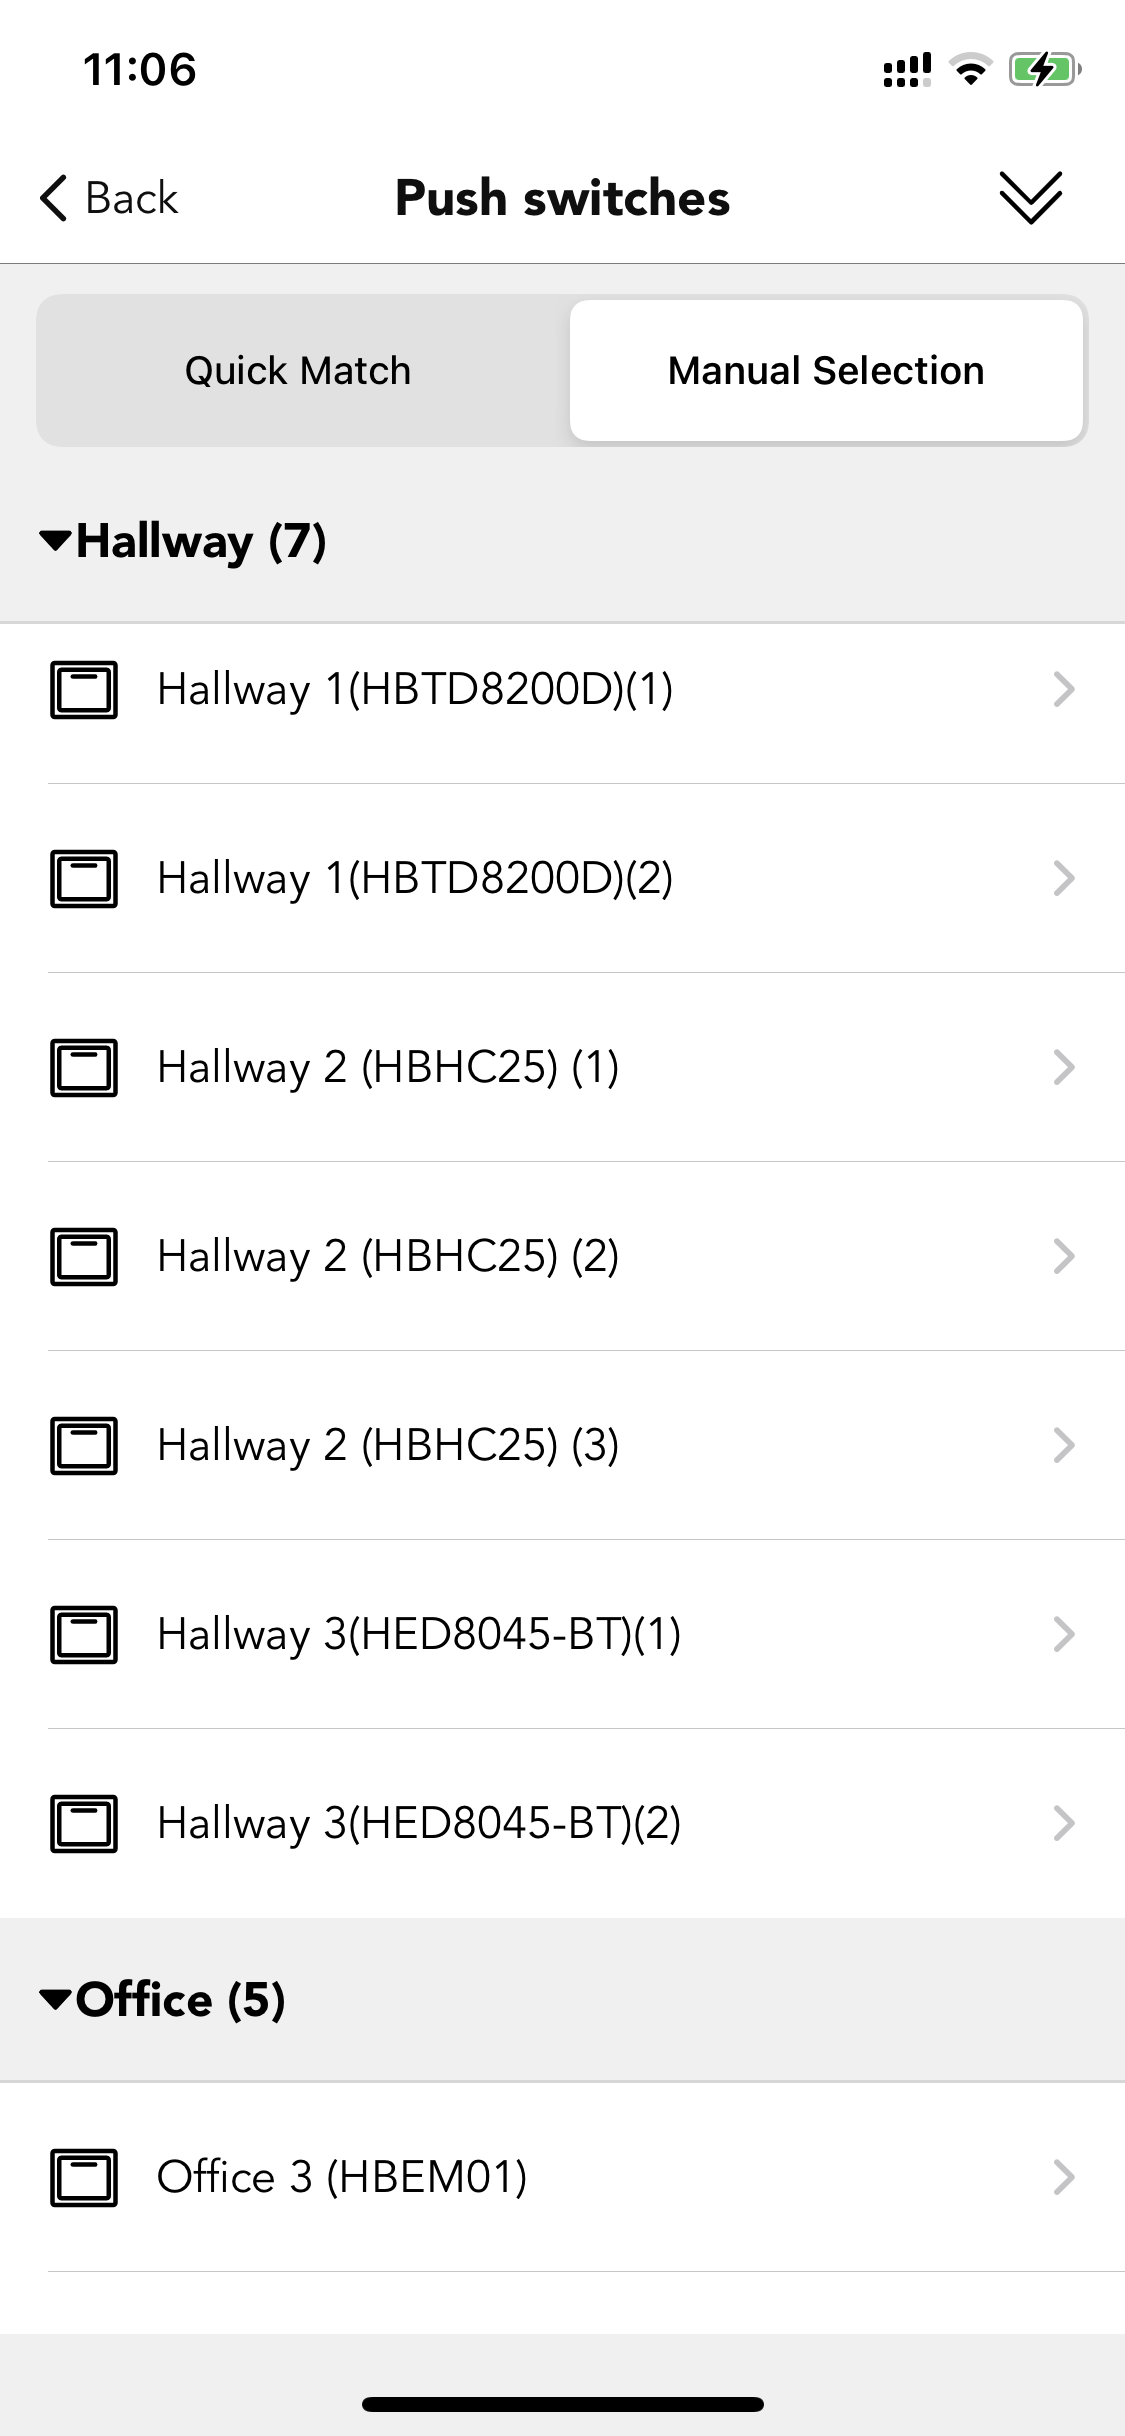
In real life applications, some clients do not want to use the motion sensor function but will use the daylight sensor as the main control. So, they prefer to trigger or recall the scene through the manual Push switch. For example, the client had 2 stand-alone sensors HBHC25 to work with 2 dimmers HBTD8200D to achieve the daylight harvest (closed loop) function. They want the daylight threshold target level to be set at 400 lux, if the ambient lux is less than 400 lux for more than 1 minute, then the luminaires need to be turned on, if the ambient lux level is more than 400 lux for 5 minutes, then the luminaries will be turned off by the daylight sensor. They want to manually trigger the scene through the Push switch. Although in the same zone, they want the HBHC25 daylight sensor that next to the window to control 2 dimmers. another HBHC25 will only control its own luminaries.
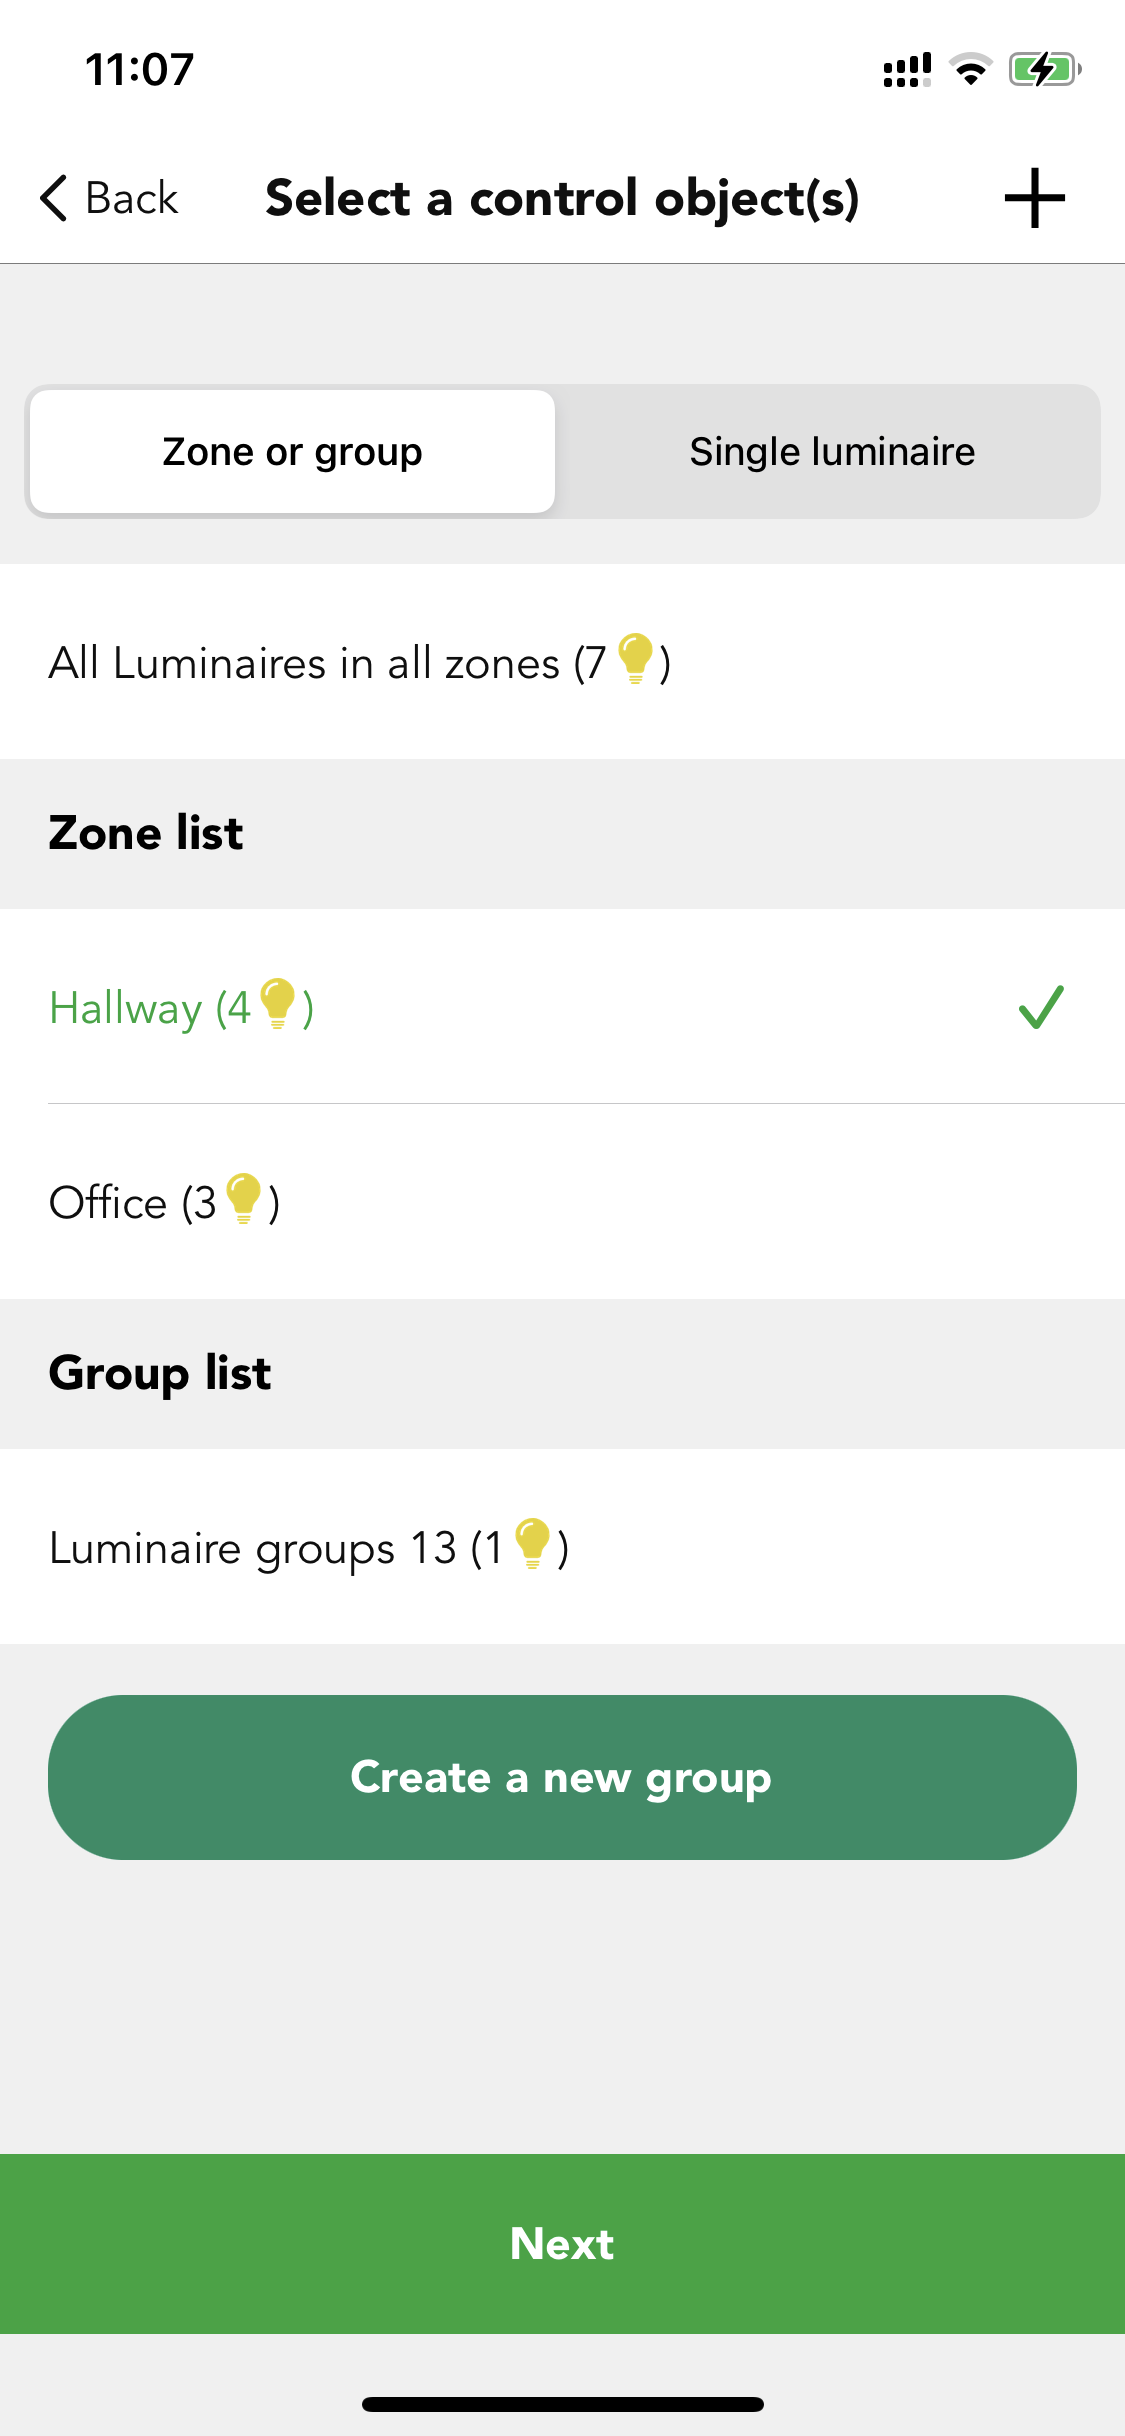
Step 1. Create a daylight harvest scene (closed loop). Set the daylight sensor usage strategy to "Mix strategy". Then choose the HBHC25 that is next to the window and then set the control object to the whole zone. The other HBHC25 will only follow its own daylight data. Then set the daylight threshold target level to 400 lux.
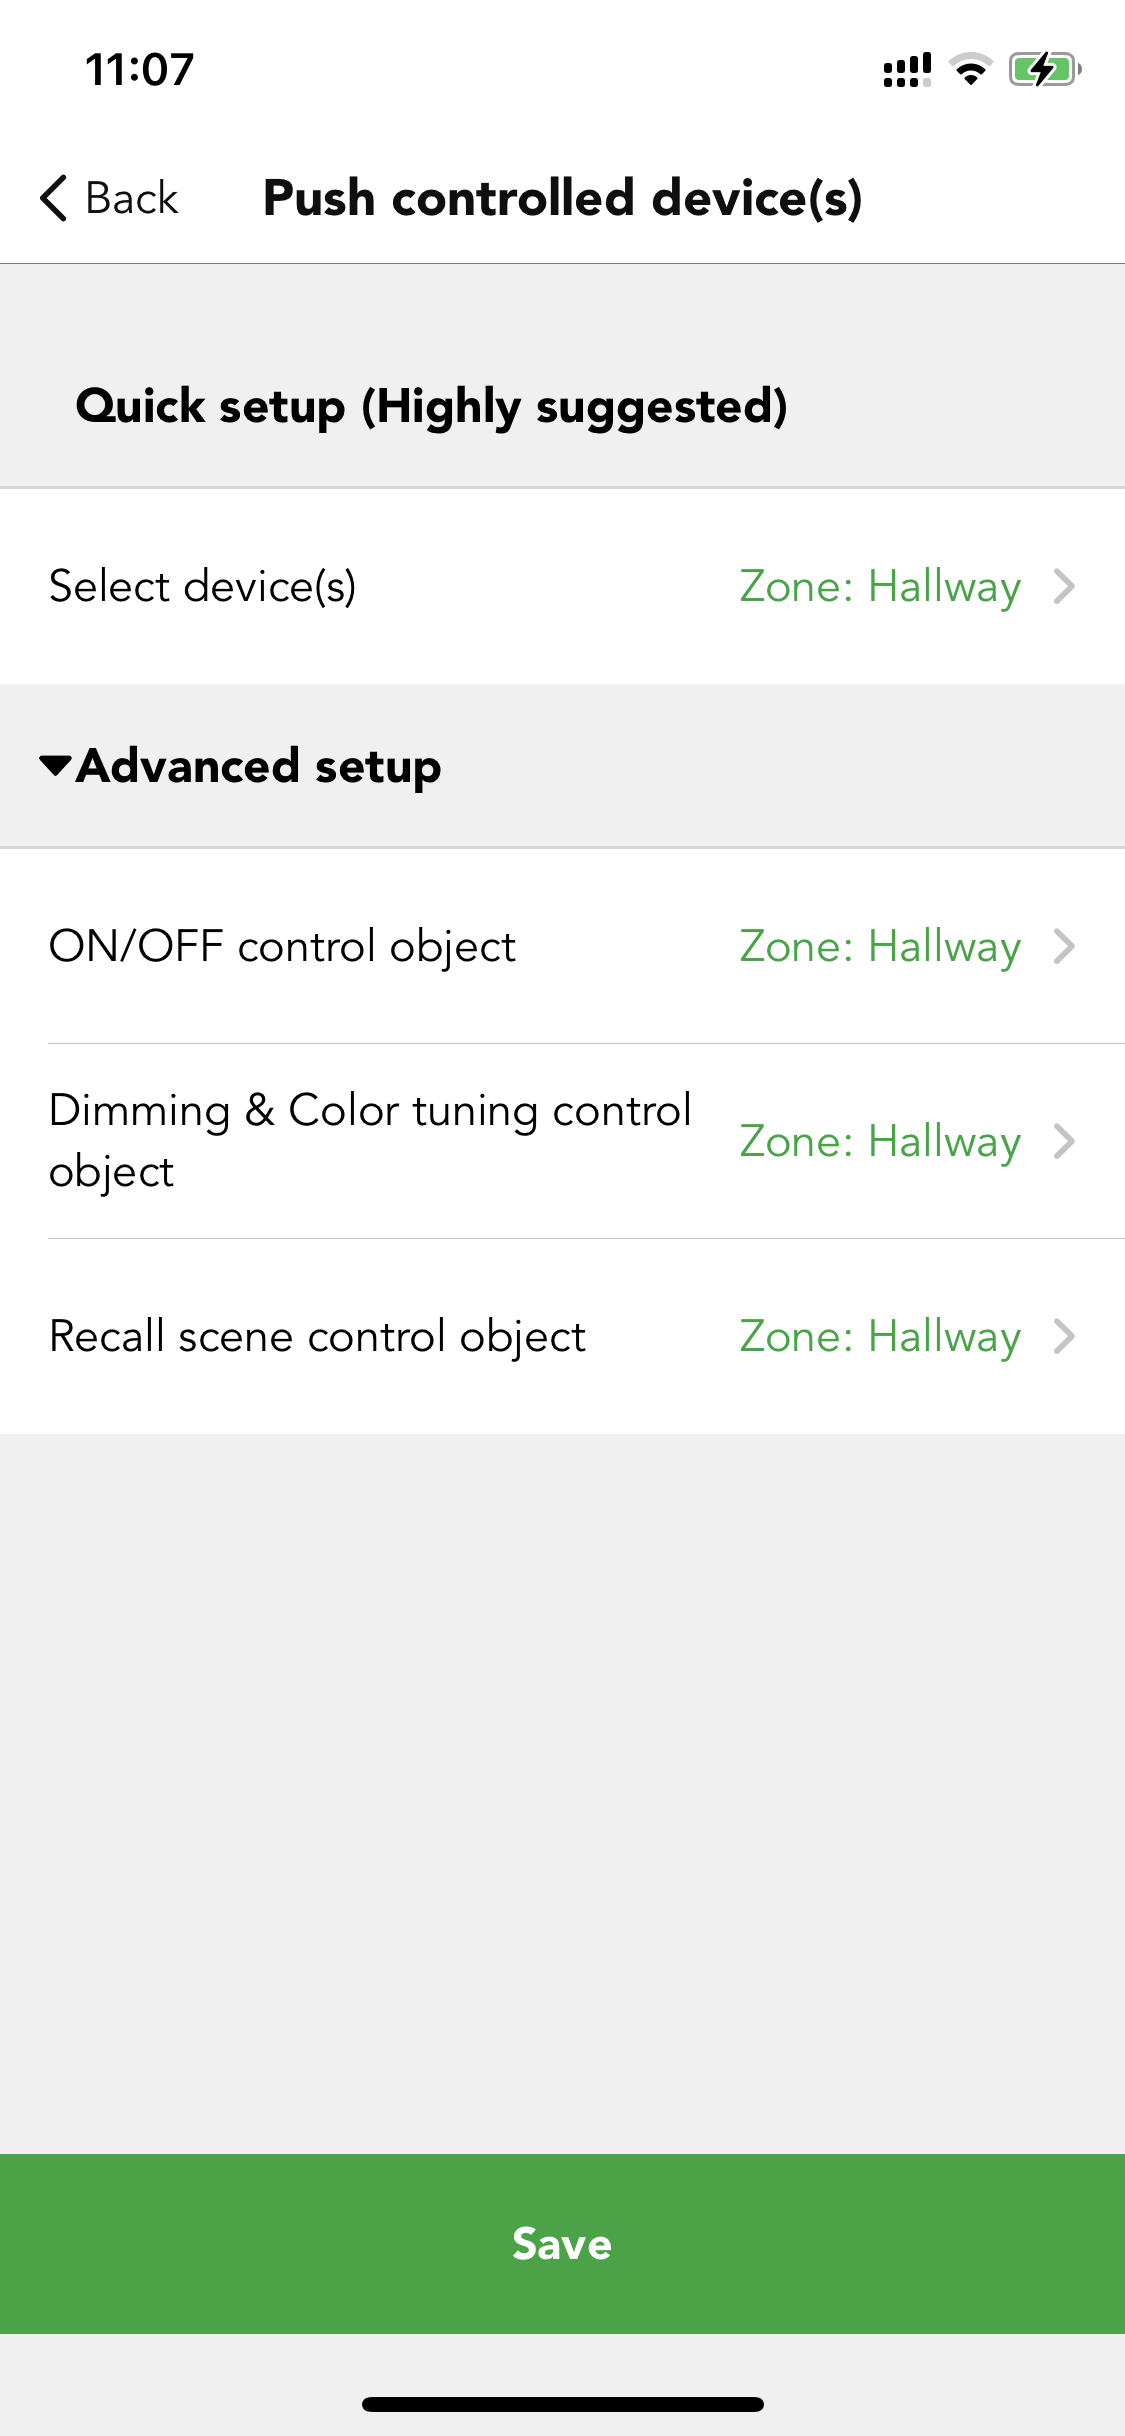
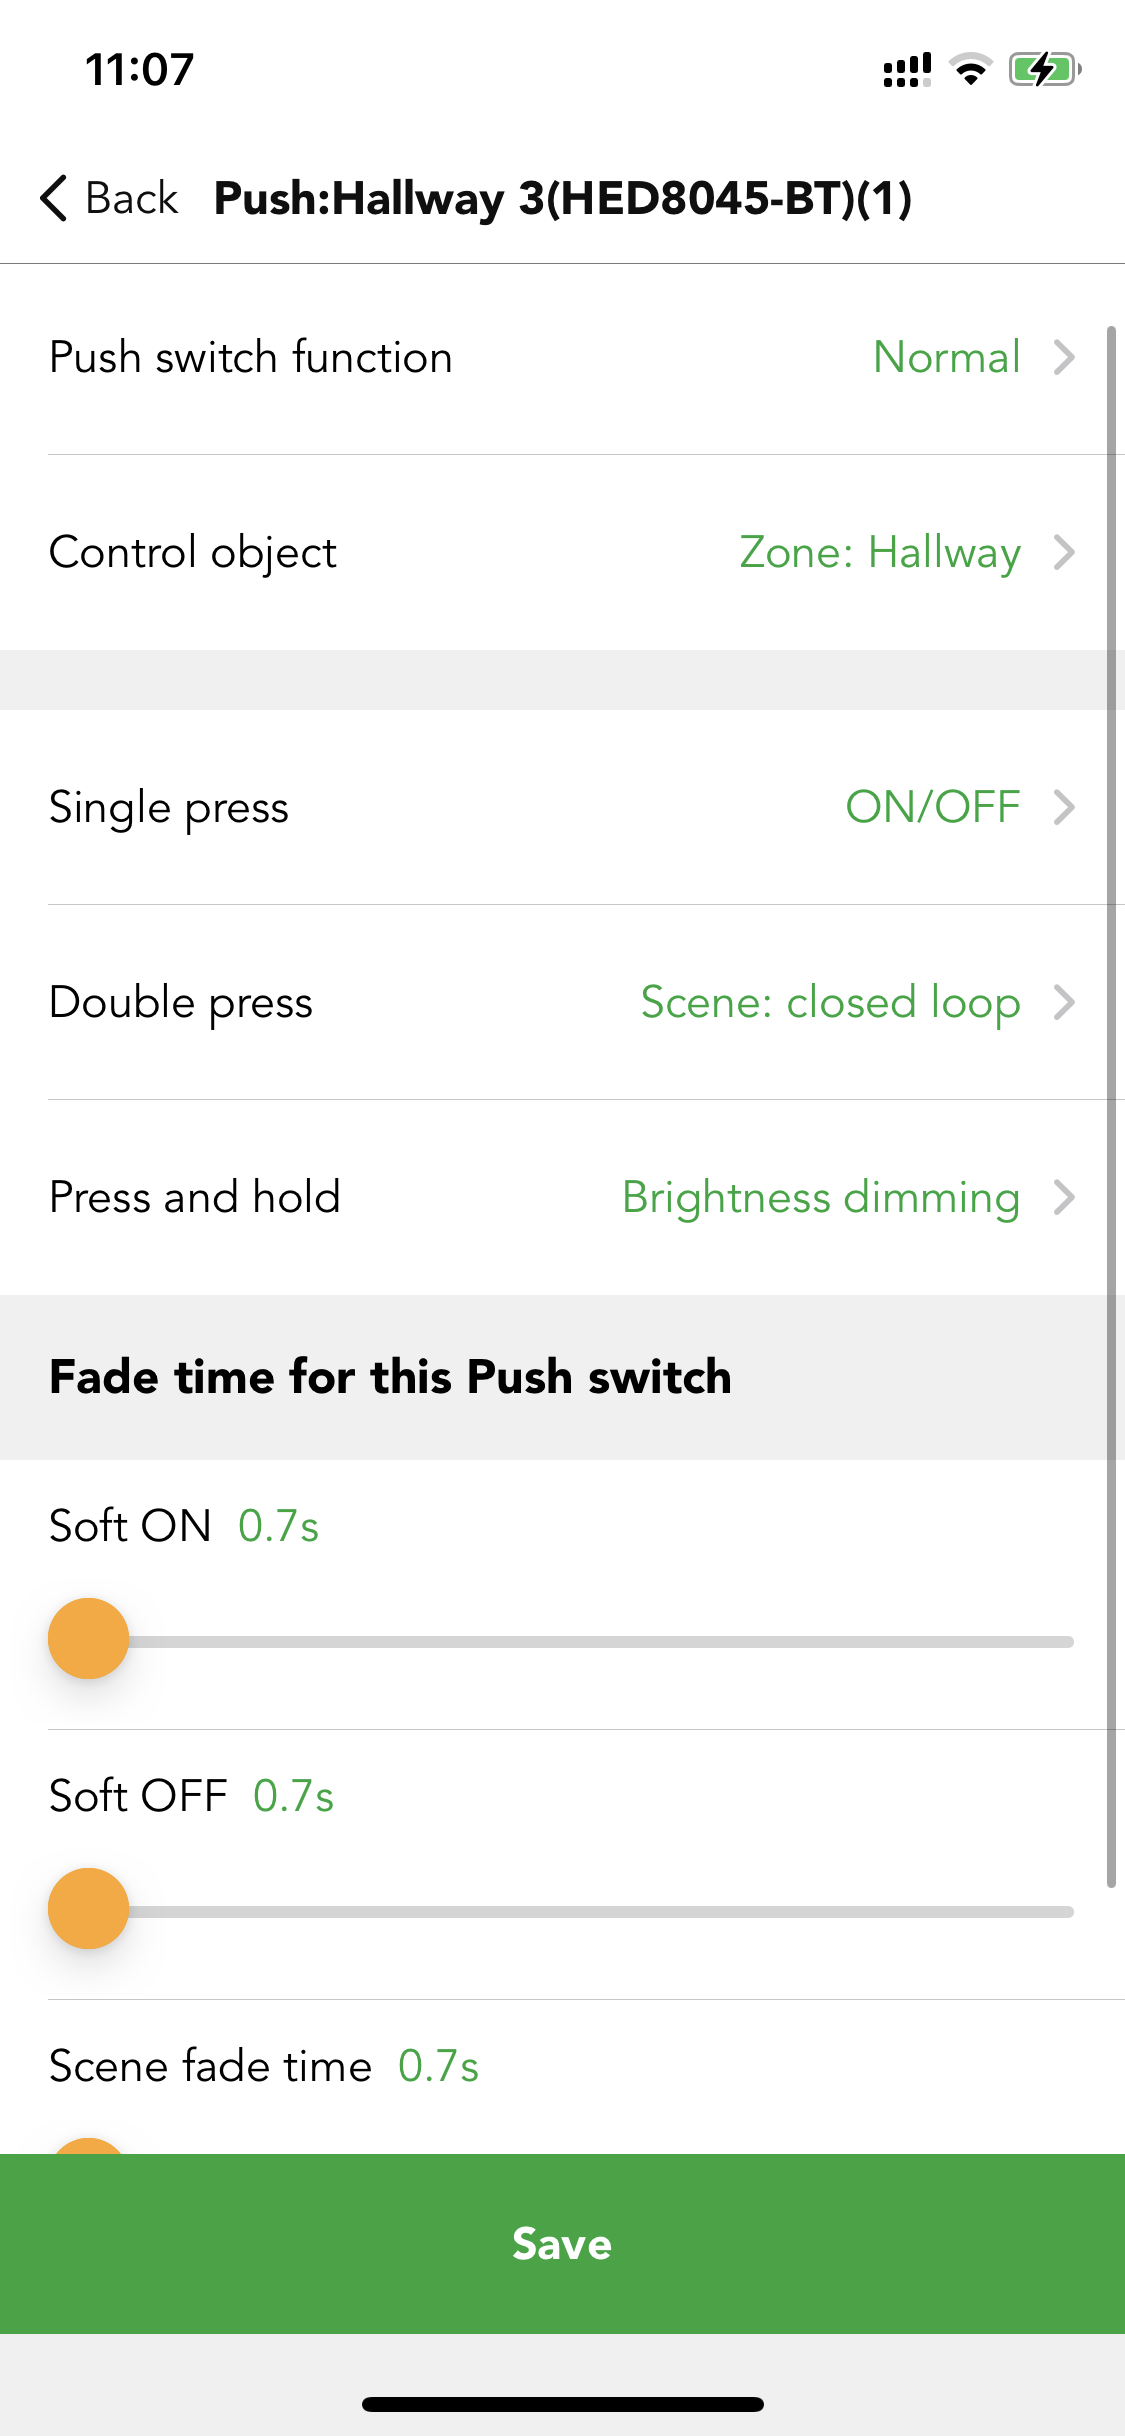
Step 2. In any of the 4 devices Push switch settings, set the control object to the whole zone. Set the "double press" function to trigger the scene.
24 hours Circadian Rhythm Scene
Automatically adjust luminaires' output base on the pre-set target lux level or dimming level and color temperature over the course of the day or from the sunrise to sunset. So apparently there are two factors that can distinguish the circadian rhythm scene: daylight sensor involved or not and time.
There are four types of circadian rhythm scenes in the Koolmesh system: 24 hours circadian rhythm (with daylight sensor), 24 hours circadian rhythm (without daylight sensor), Astro-time circadian rhythm (with daylight sensor),Astro-time circadian rhythm (without daylight sensor). All the circadian rhythm scene needs to have the correct time setting unless the curve will not execute correctly. Which means in the mesh network, at least to have one device that has the real time clock integrated inside to provide the real time for the whole network. So, after power failure,the circadian rhythm scene can perform normally.
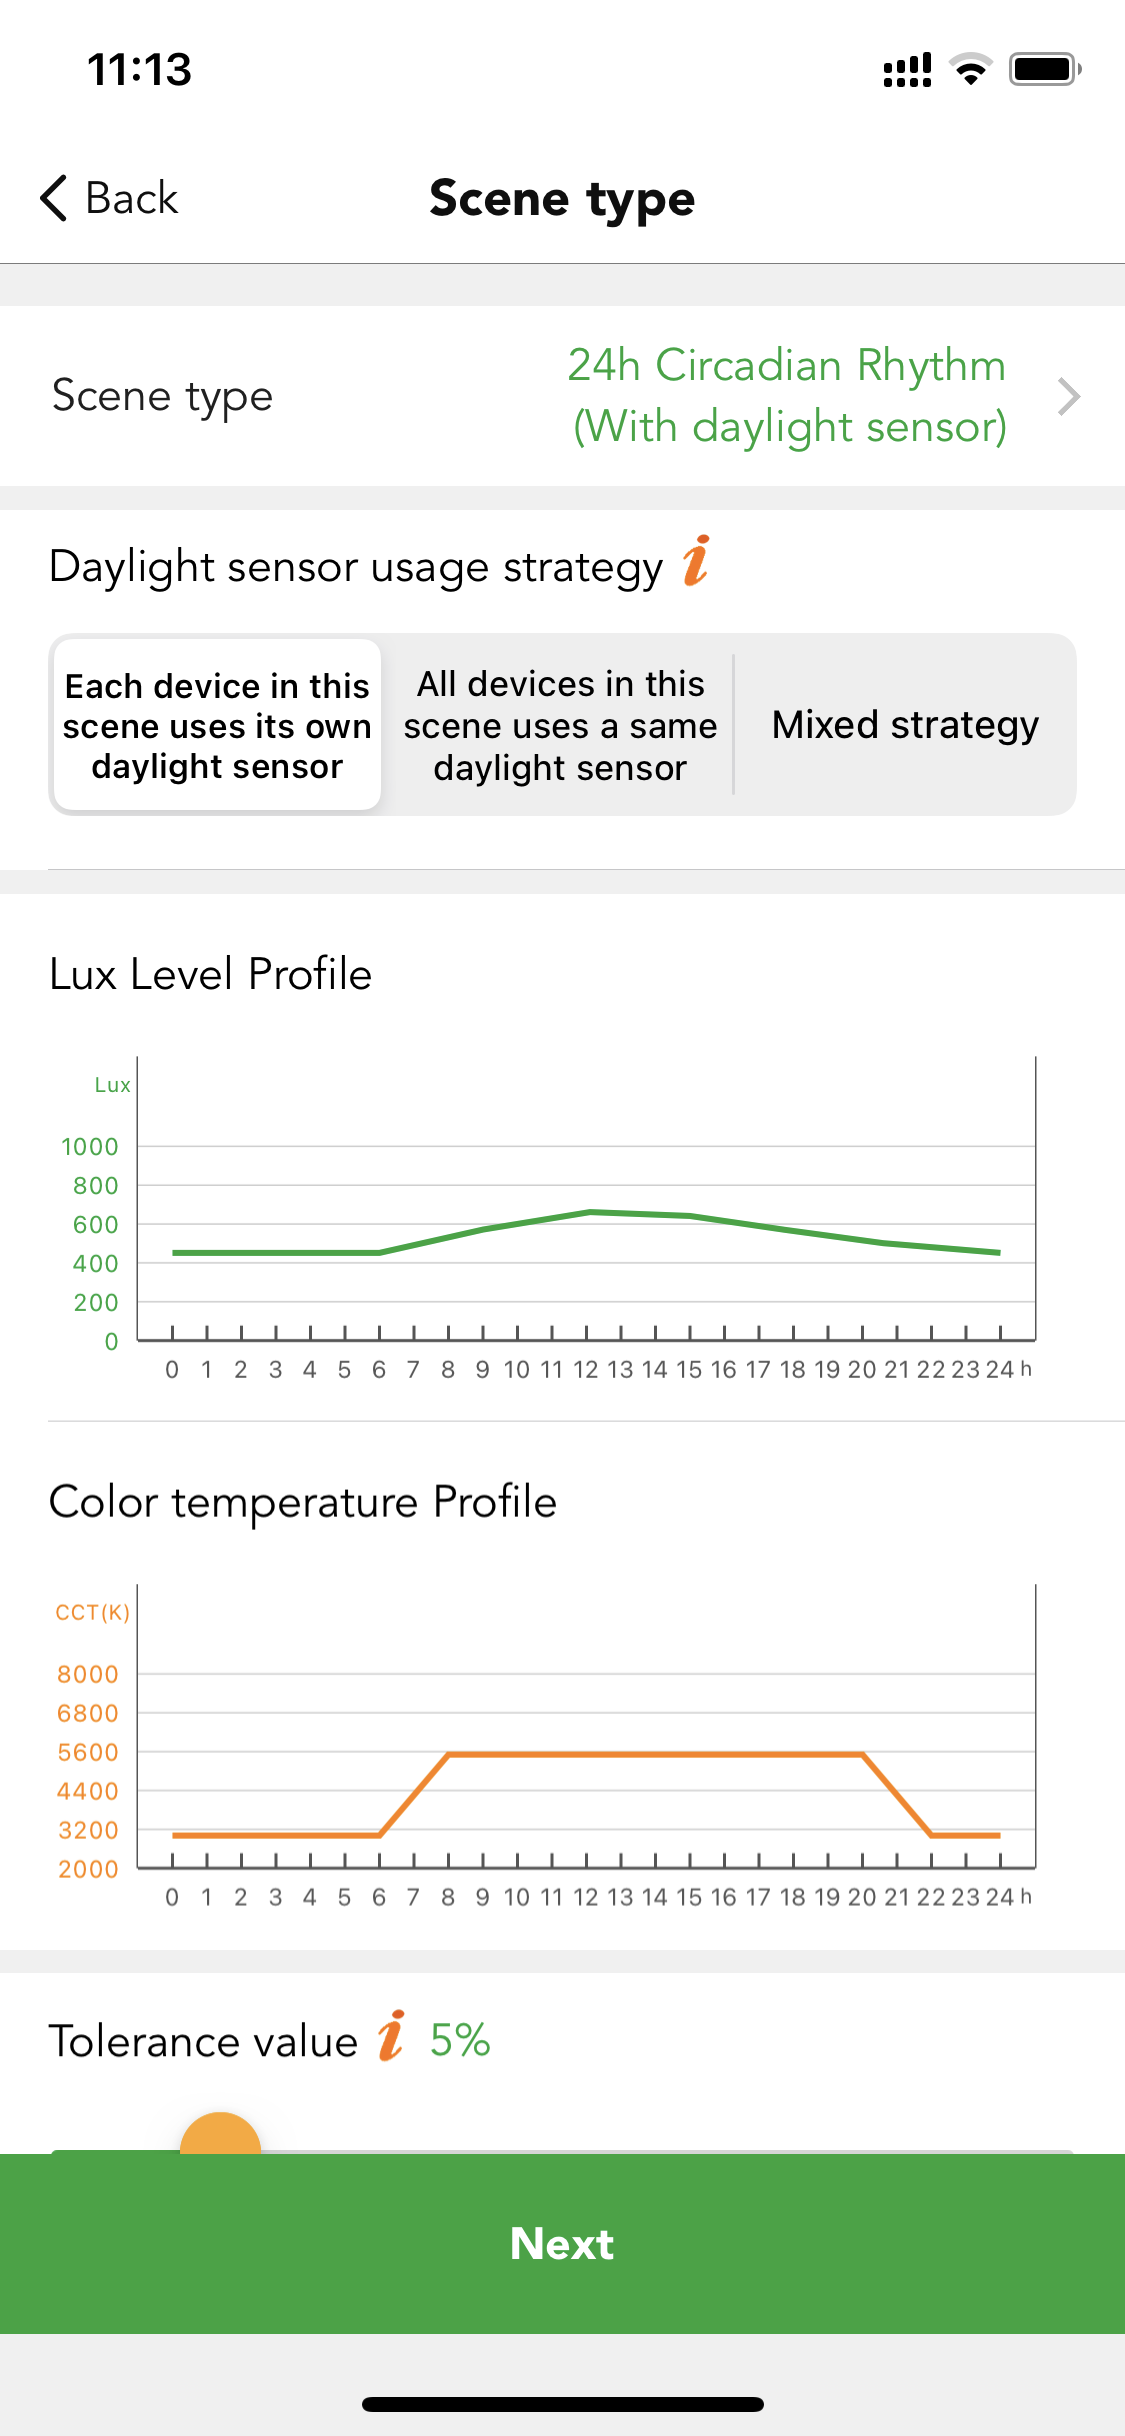
24 hours circadian rhythm (with daylight sensor)
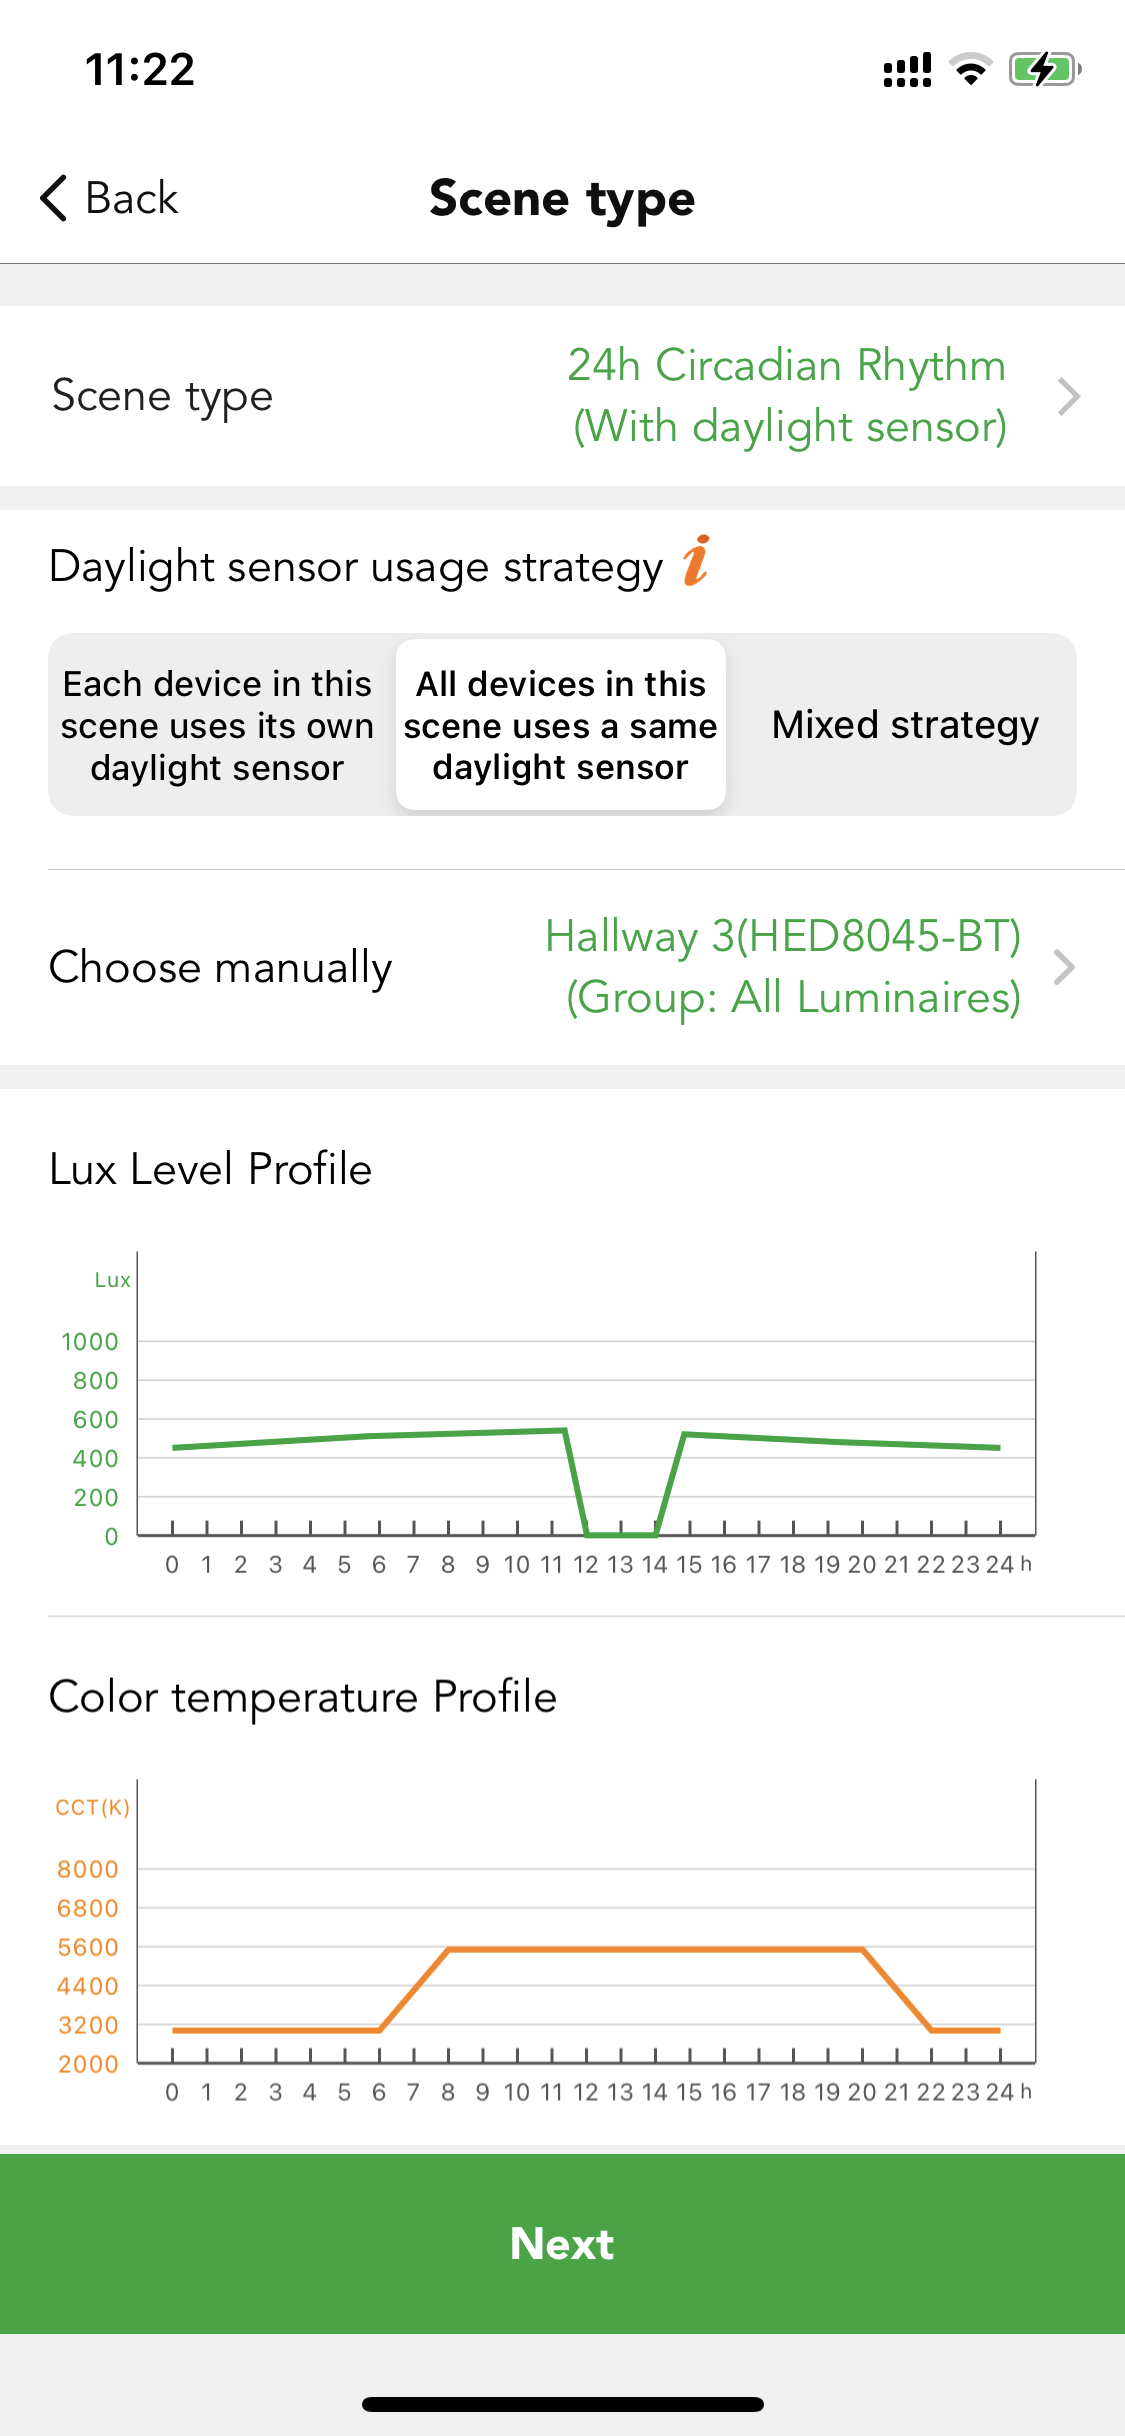
Automatically adjust luminaire’s output based on the preset lux level and color temperature over the course of the day. There are many settings inside the scene.
● Daylight sensor usage strategy
If a dedicated sensor is selected and a daylight sensor is in the luminaire. The scene will run based on the lux reading from this dedicated sensor instead of using the external daylight sensor. If the dedicated daylight sensor is disabled, the scene will run based on lux reading from the external daylight sensor instead.
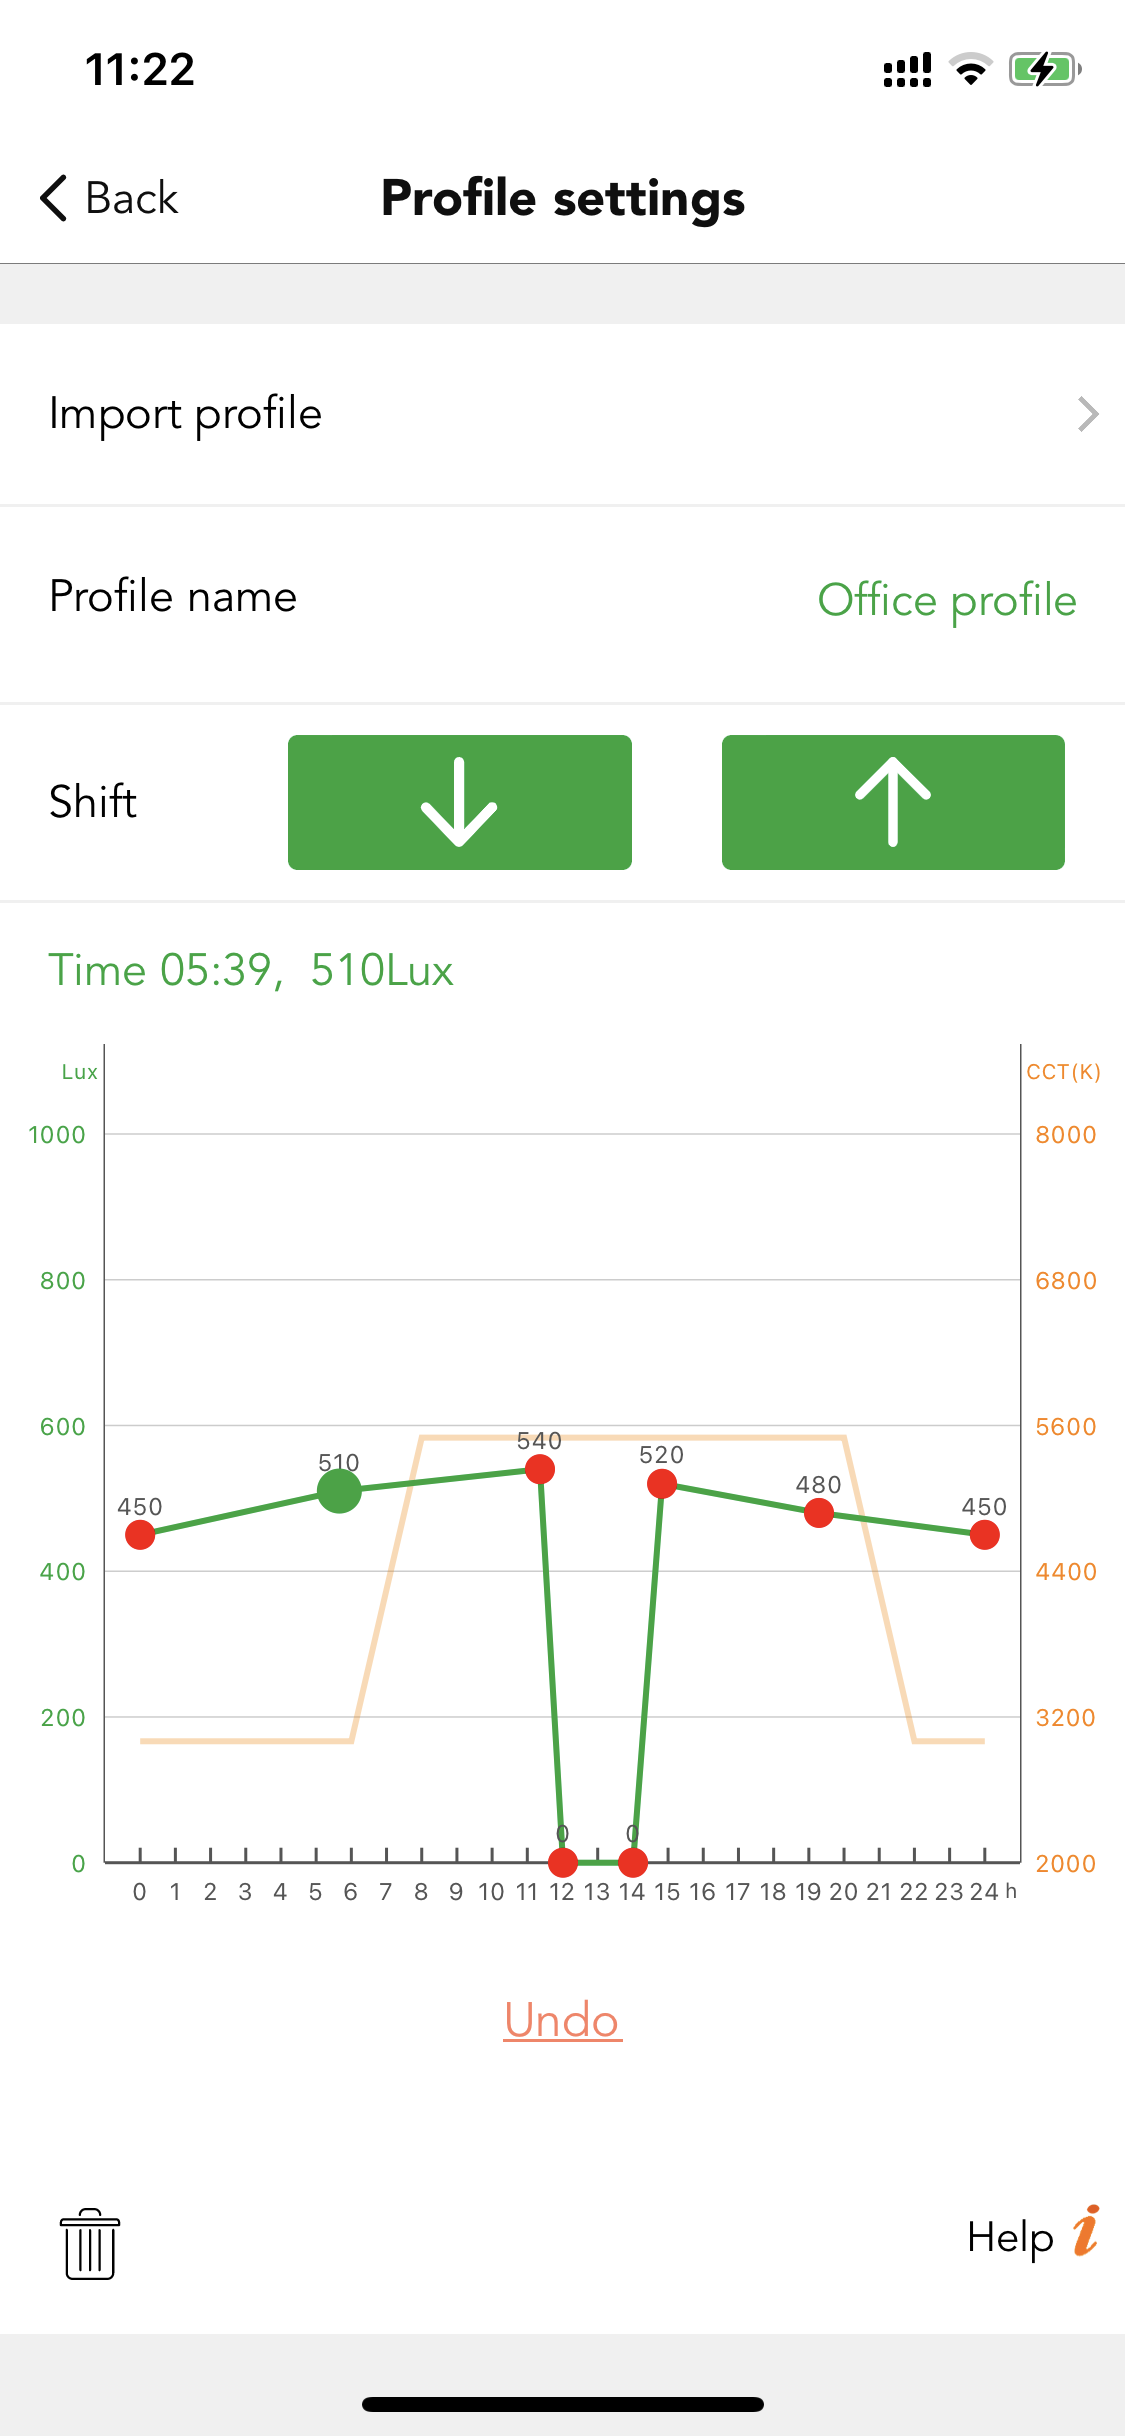
● Lux level profile
Users can define the profile name by themselves. They also can long press and hold the "Shift" button (↑↓) to move the entire profile upwards or downwards as a whole. Users can long press on the diagram to add a new coordinate point to the lux curve, they can adjust it in the diagram or just tap on the coordinate then on the top left to quickly insert the lux value and time.
They also can zoom in to achieve more precise setup. Triple-tap on the screen to enter full screen mode. If the previous setting on the diagram is not what they want, they can use the undo button or tap on the coordinate and choose the delete option on the bottom left corner. After the scene is saved, this lux profile will be saved to this account and next time when users create a new scene, they can just go the import profile option, to quick select the relevant profile, Koolmesh system also pre-set two default profile: office profile and health profile for the users' reference.
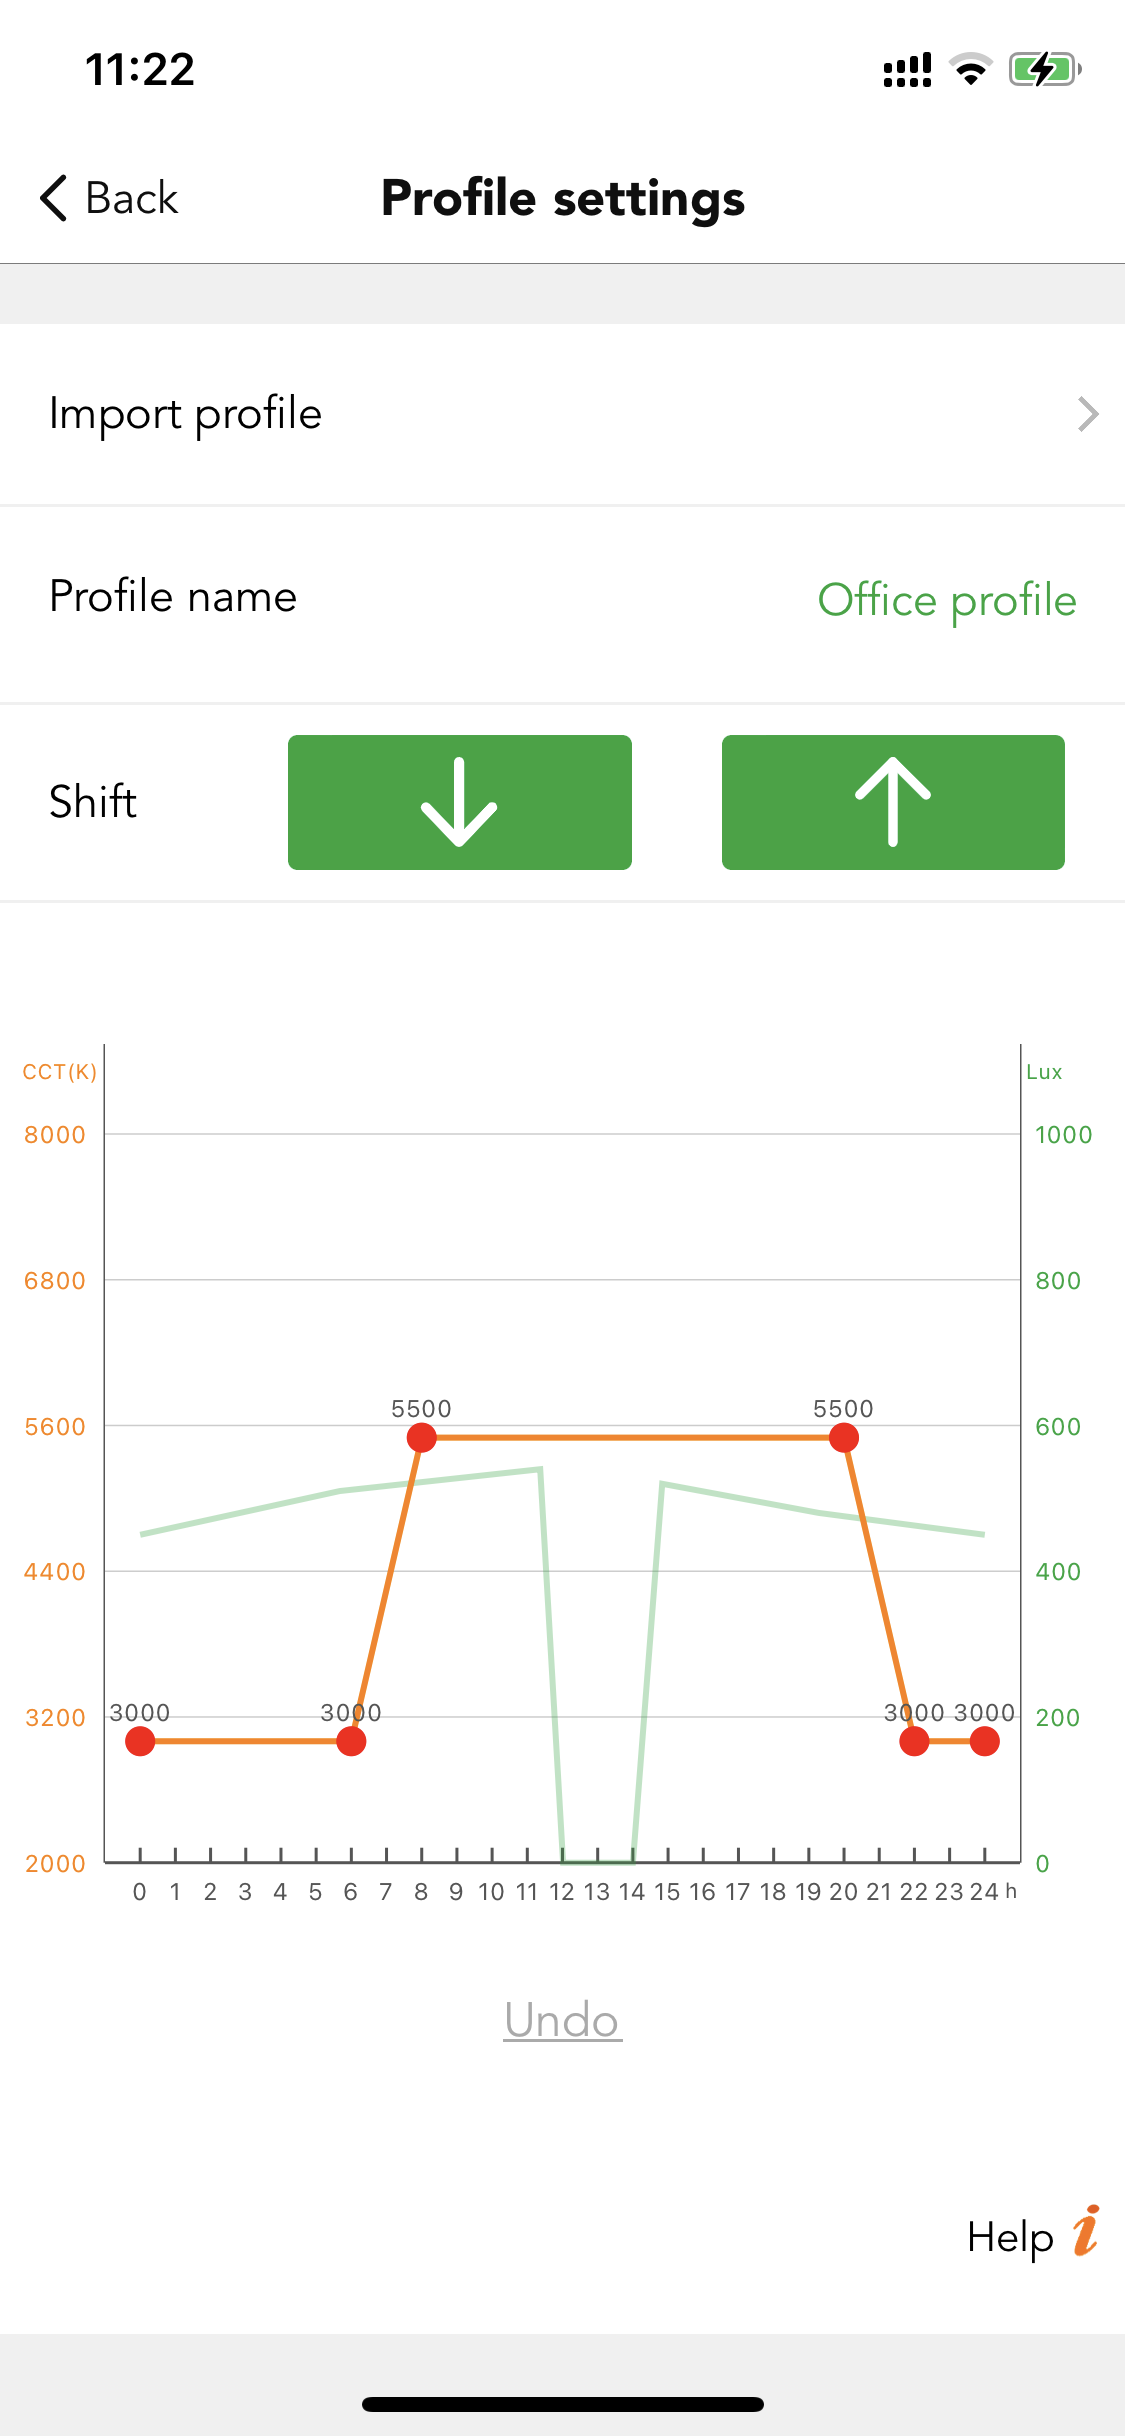
● Color temperature profile
Same setting as the lux profile, just replace the lux level to the CCT level.
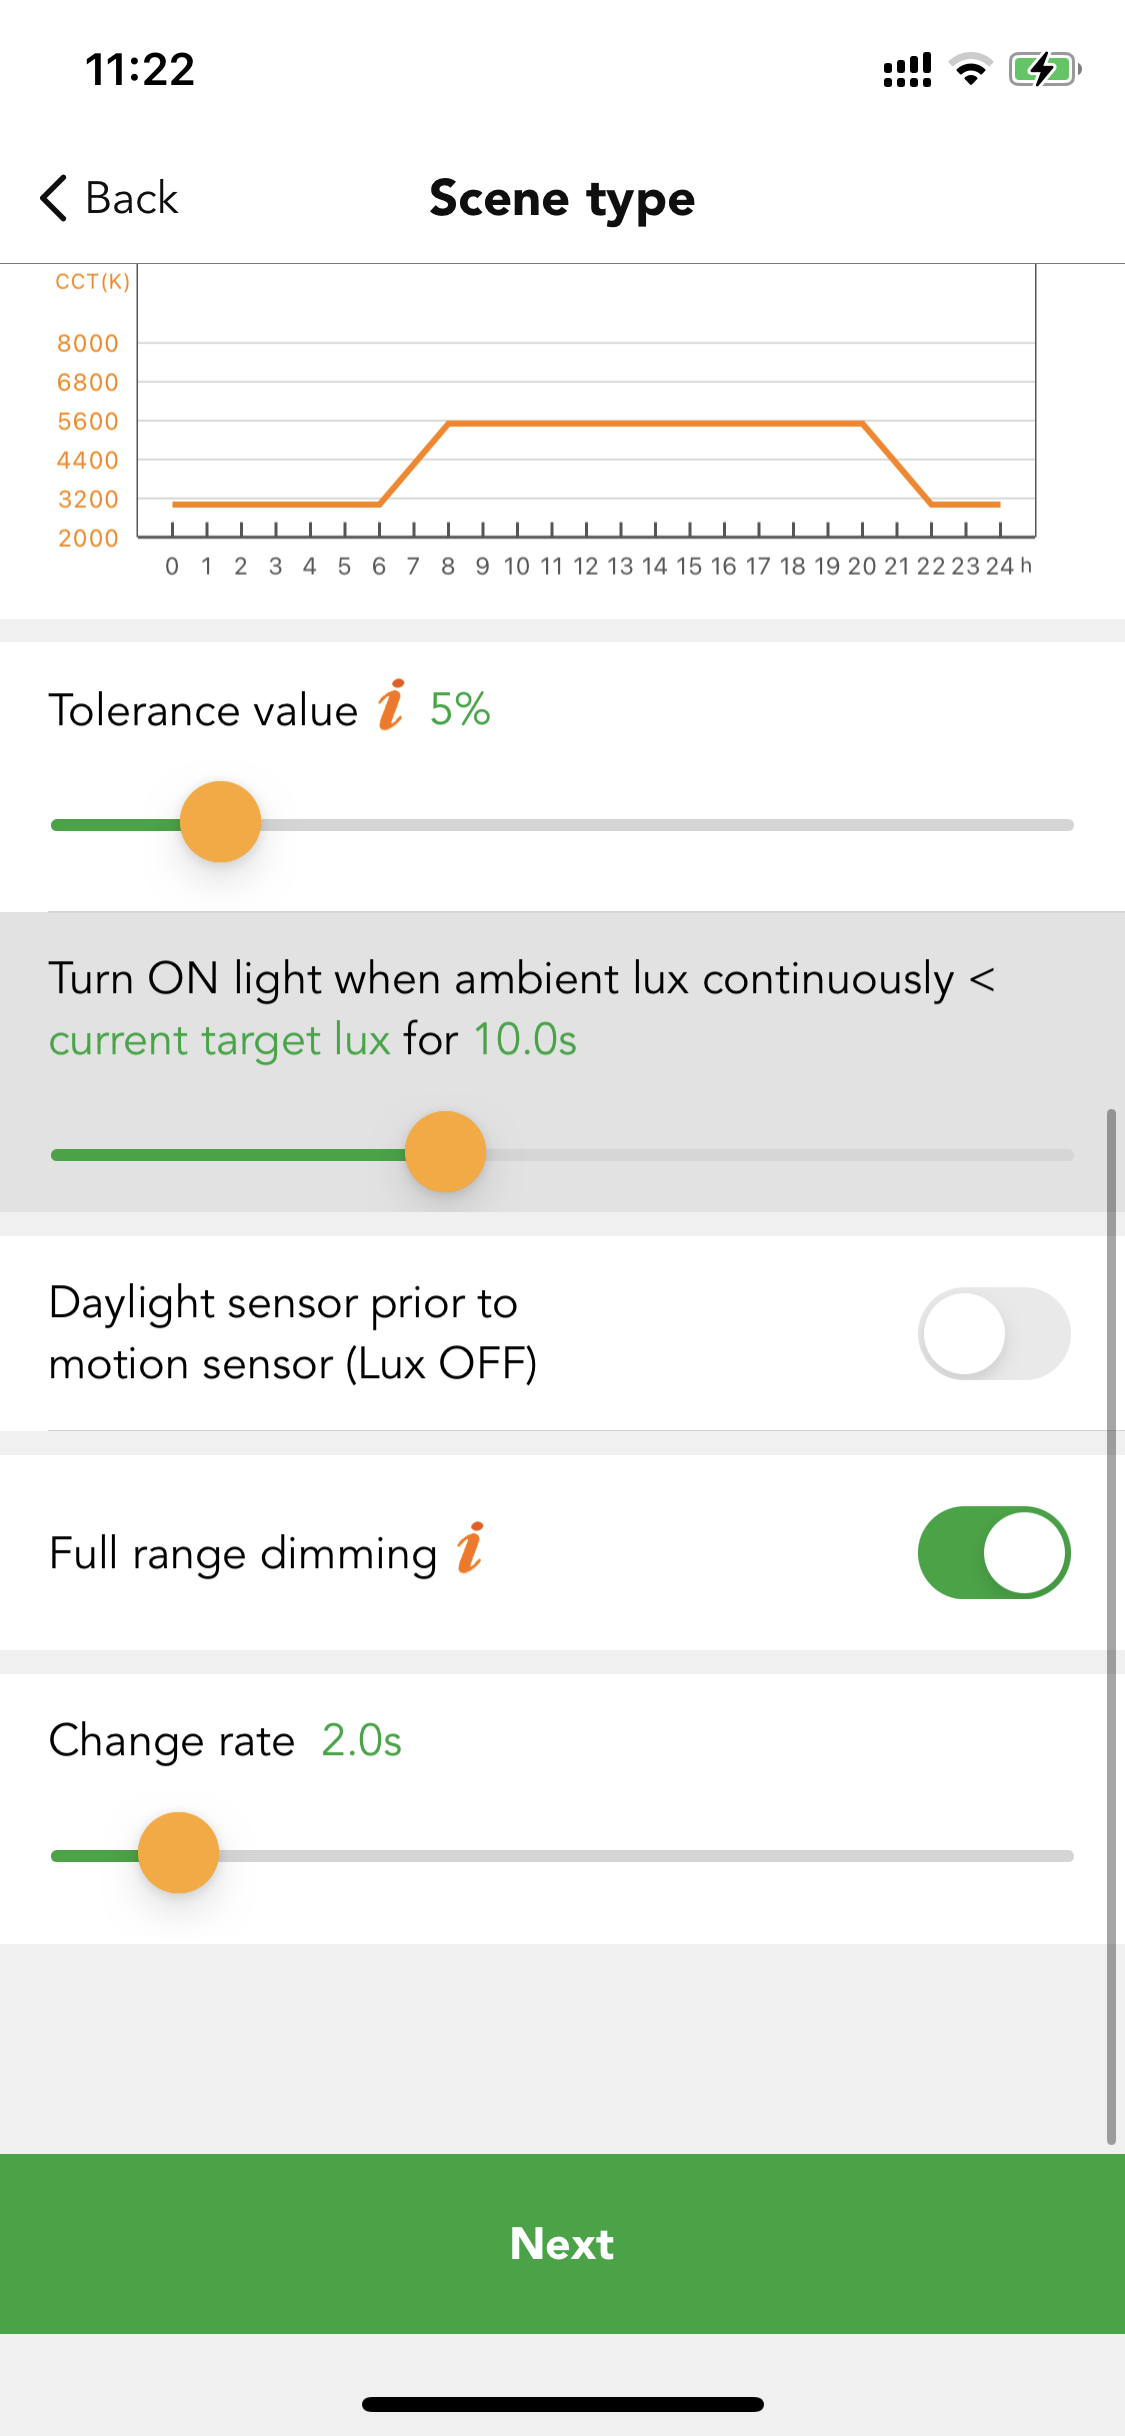
● Tolerance value
For example, when the tolerance value is set to 10%, the lux value on the circadian rhythm profile has a tolerance range from -10% to + 10%.
● Daylight sensor prior to motion sensor (Lux off)
When the ambient lux is strong enough and exceeds the "Lux off value", then the luminaires will be turned off by the daylight sensor. If this function is disabled, when the daylight threshold scene is activated, then the luminaires will not be turned off by the daylight sensor but will dim down to a small low level.
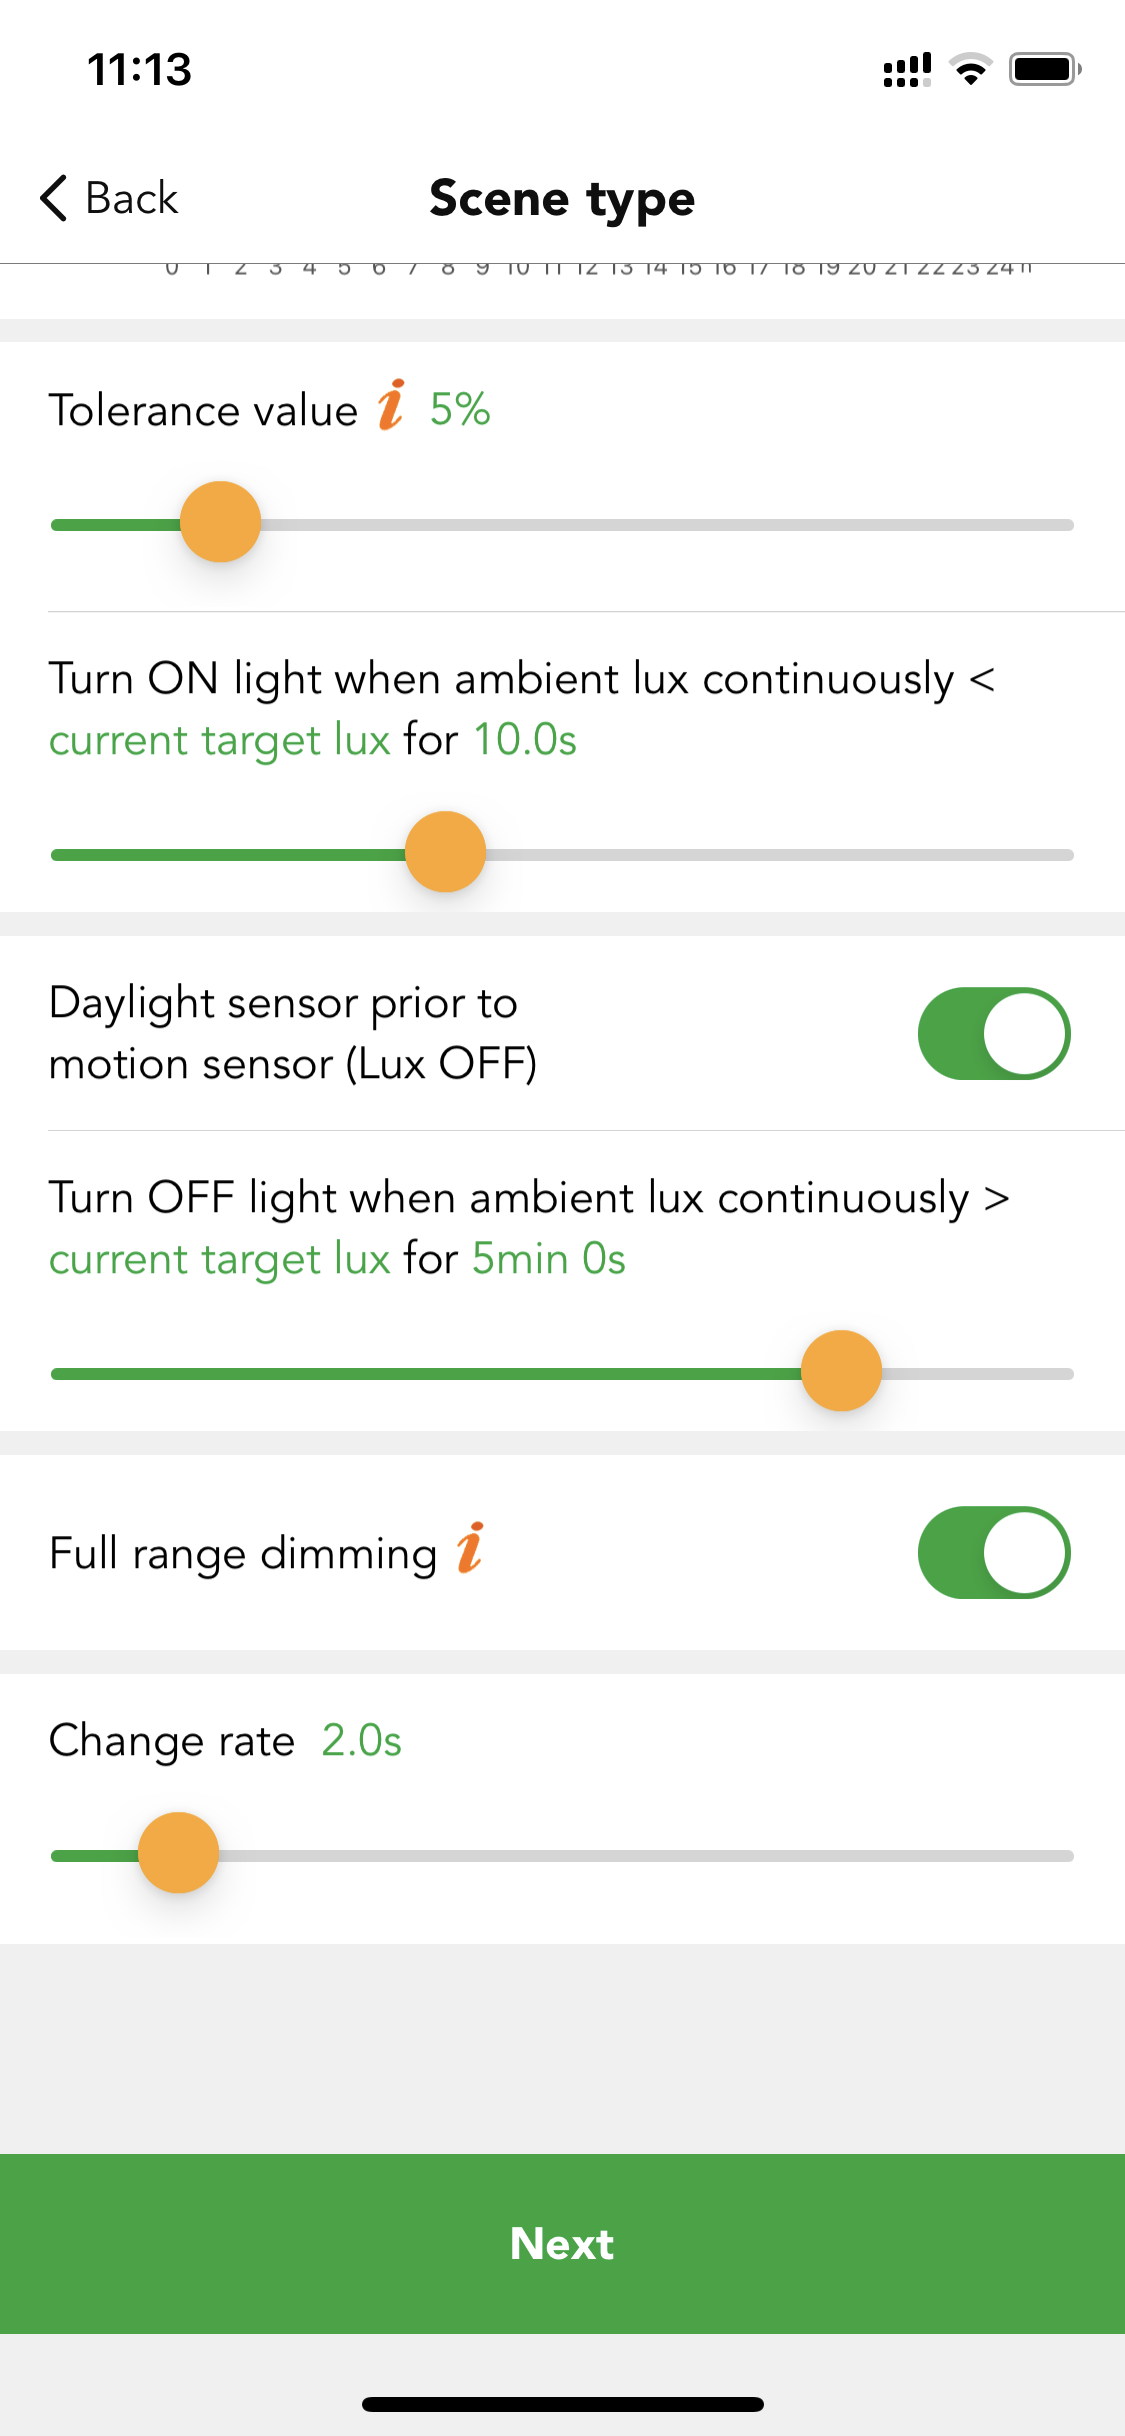
Measuring time Users can define the measuring time. For how late luminaries will turn on/off before ambient lux continuously detected lower/higher than daylight threshold value.
● Full range dimming
This is the valid dimming range when the device is running this scene.
On: range from device min. Brightness level to device max. brightness level.
Off: range from device min. brightness level to scene brightness level.
Case 4:How to implement the 24 hours circadian rhythm scene (with daylight sensor) combined with time-based scene into a classroom application?
Requirement: from sunrise, the luminaries need to run the 24 hours circadian rhythm when the motion sensor detects the movement (presence). But during noon, when the students are sleeping in the classroom, the luminaries need to be off from 12:00 to 14:00. When the teacher is presenting a PPT during a class, the teacher can interrupt the circadian rhythm scene by Push Switch, to dim down the lights as they need. But the luminaries need to switch back to the circadian rhythm scene automatically after the Presentation is over. So, when the next class is coming, the luminaries should follow the circadian scene as usual. When no movements are detected after the hold time, the luminaries need to be dimmed down to 10% brightness for the stand-by status. Here clients suggest that the hold time will be 20 minutes, and stand-by time should be 10 minutes. After 21:00 PM, there will be a security person who needs to walk through all the classrooms to ensure everything is okay. When the motion sensor was activated, then the luminaires should be at full brightness for 20 minutes and then into a 10% brightness stand-by status for 10 minutes. Here, we can use a time-based scene to make the hold time scene to be decided by the motion sensor triggered time.
Step 1.Create a 24-hour circadian rhythm scene (with daylight sensor). For the daylight sensor usage strategy,clients can decide by themselves. If each luminaire has an individual daylight sensor, then they can choose "each device in this scene uses its own daylight sensor". If they want to make the whole classroom luminaires' brightness and color temperature more united, then they can choose an external daylight sensor as the main daylight sensor.
Step 2.For the lux curve setting, because from 12:00 to 14:00, the whole classroom luminaires need to be turned off.So, clients need to modify the curve to be 0 lux during the 2 hours. Then set the CCT curve as they want. Due to it’s a classroom application, even though the ambient lux level is enough,the client does not want the daylight sensor to turn off the luminaires. So, they disable the "daylight sensor prior to motion sensor (lux off)". Which means even the ambient lux is enough, but the motion sensor still can recall the circadian rhythm scene and the luminaires will hold on to a very low output.
Step 3. For the 100% brightness scene and 10% brightness scene, we have the two default scenes in the app, so clients do not need to create, but if they are preferring other scenes or other brightness, they need to create the scene first.
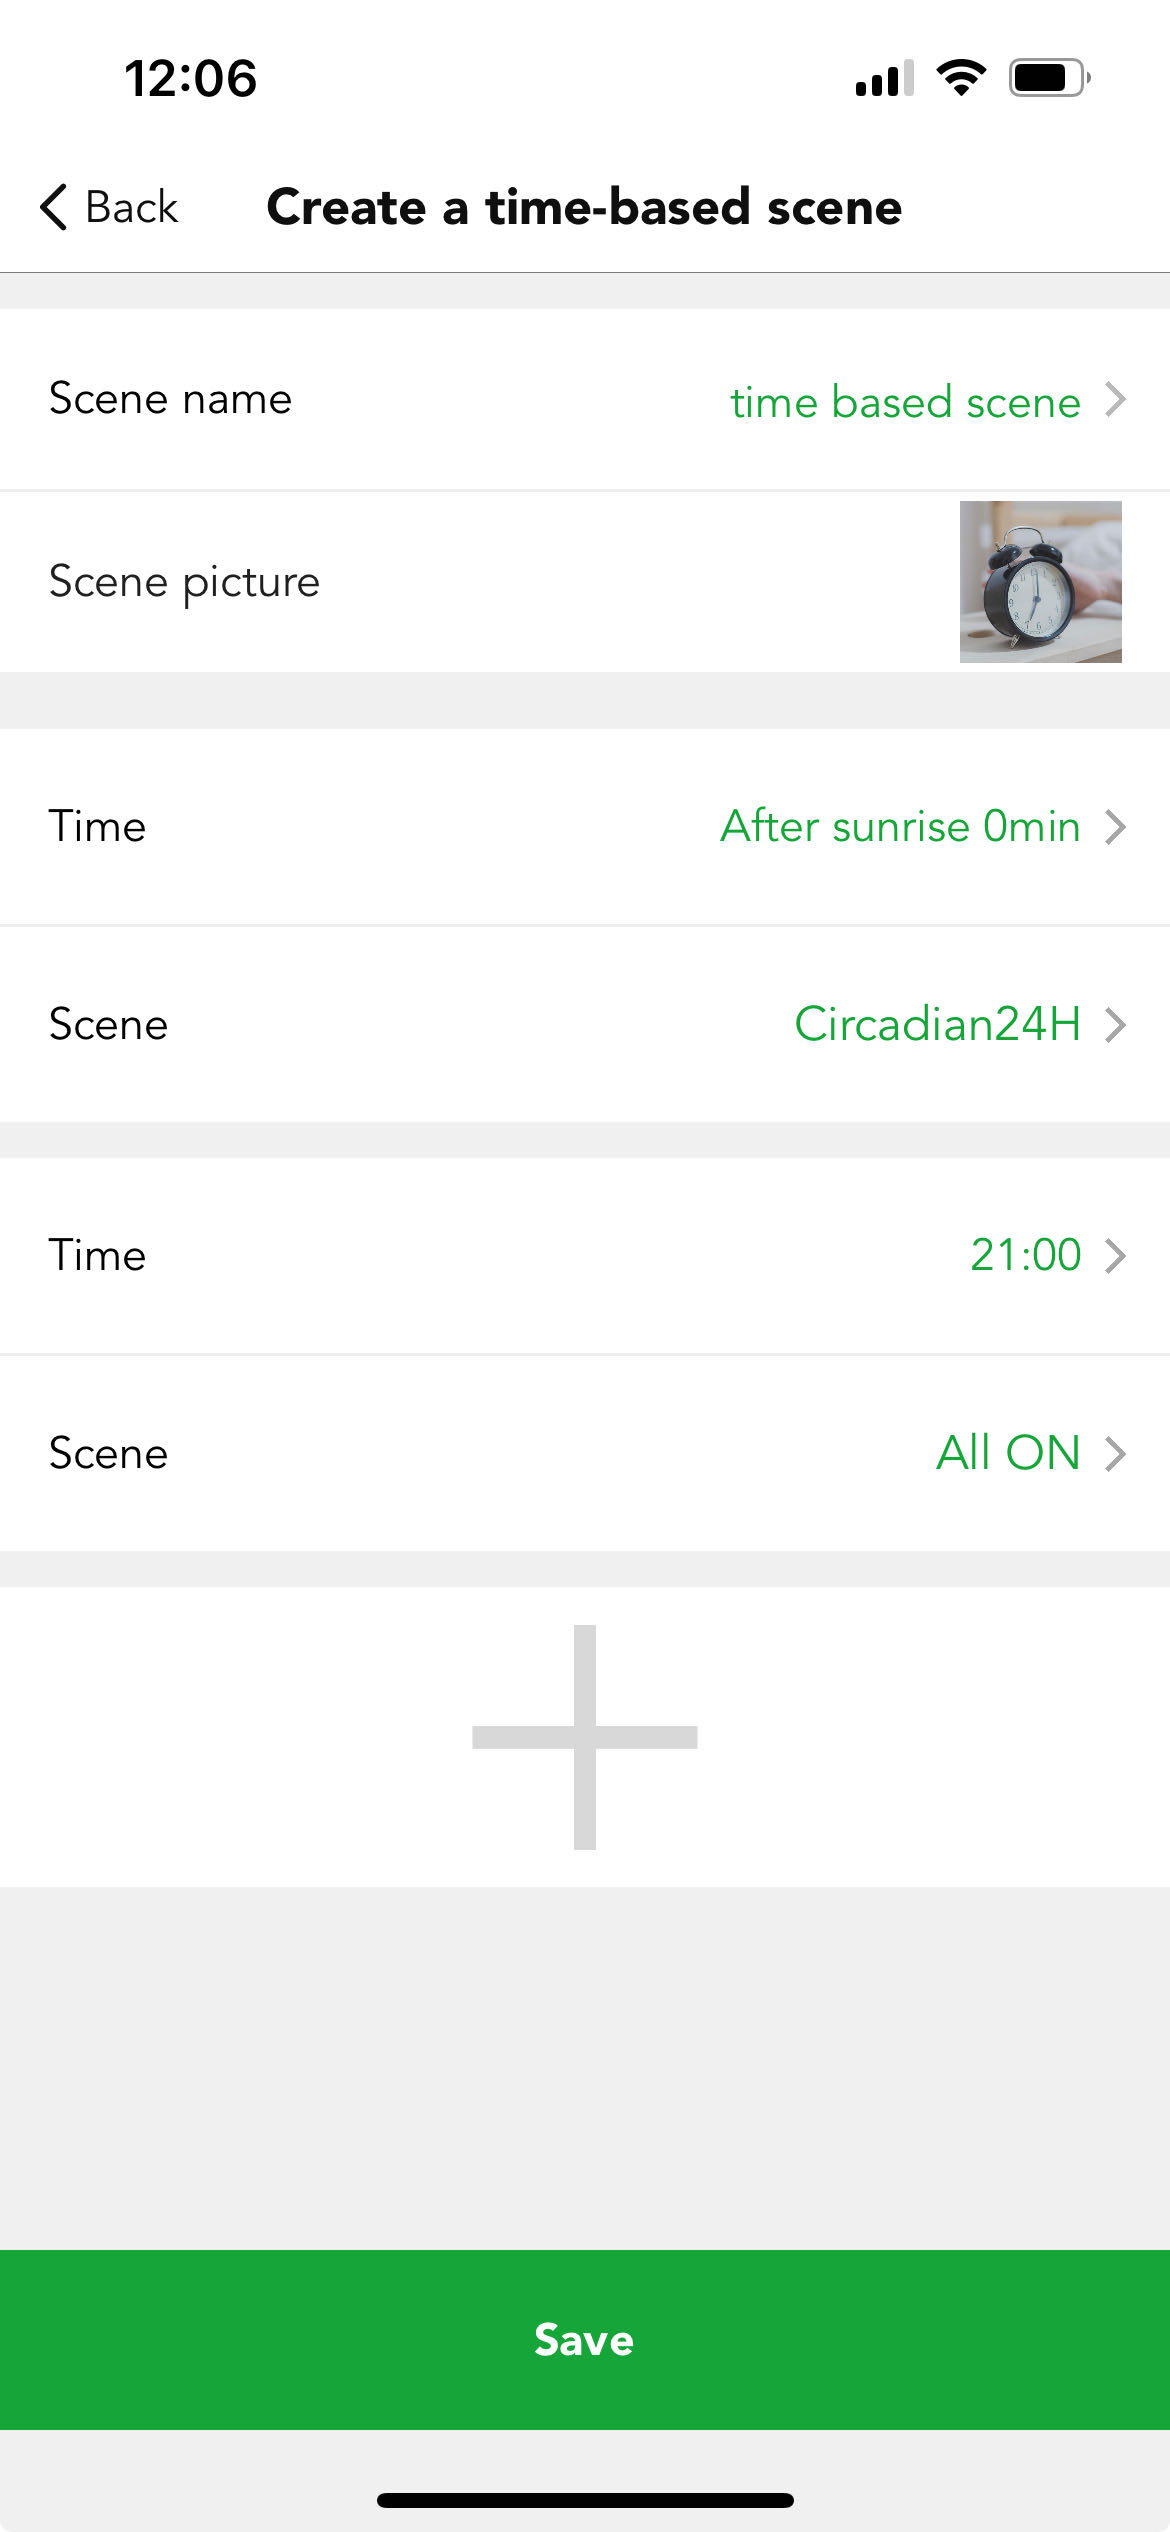
Step 4. Long press on the "circadian" scene to access the time-based scene tab. Then for the first scene, please select the "circadian" scene, and define the time to sunrise. For the second scene, choose the "100% brightness" scene and define the time to 21:00. Save the scene.

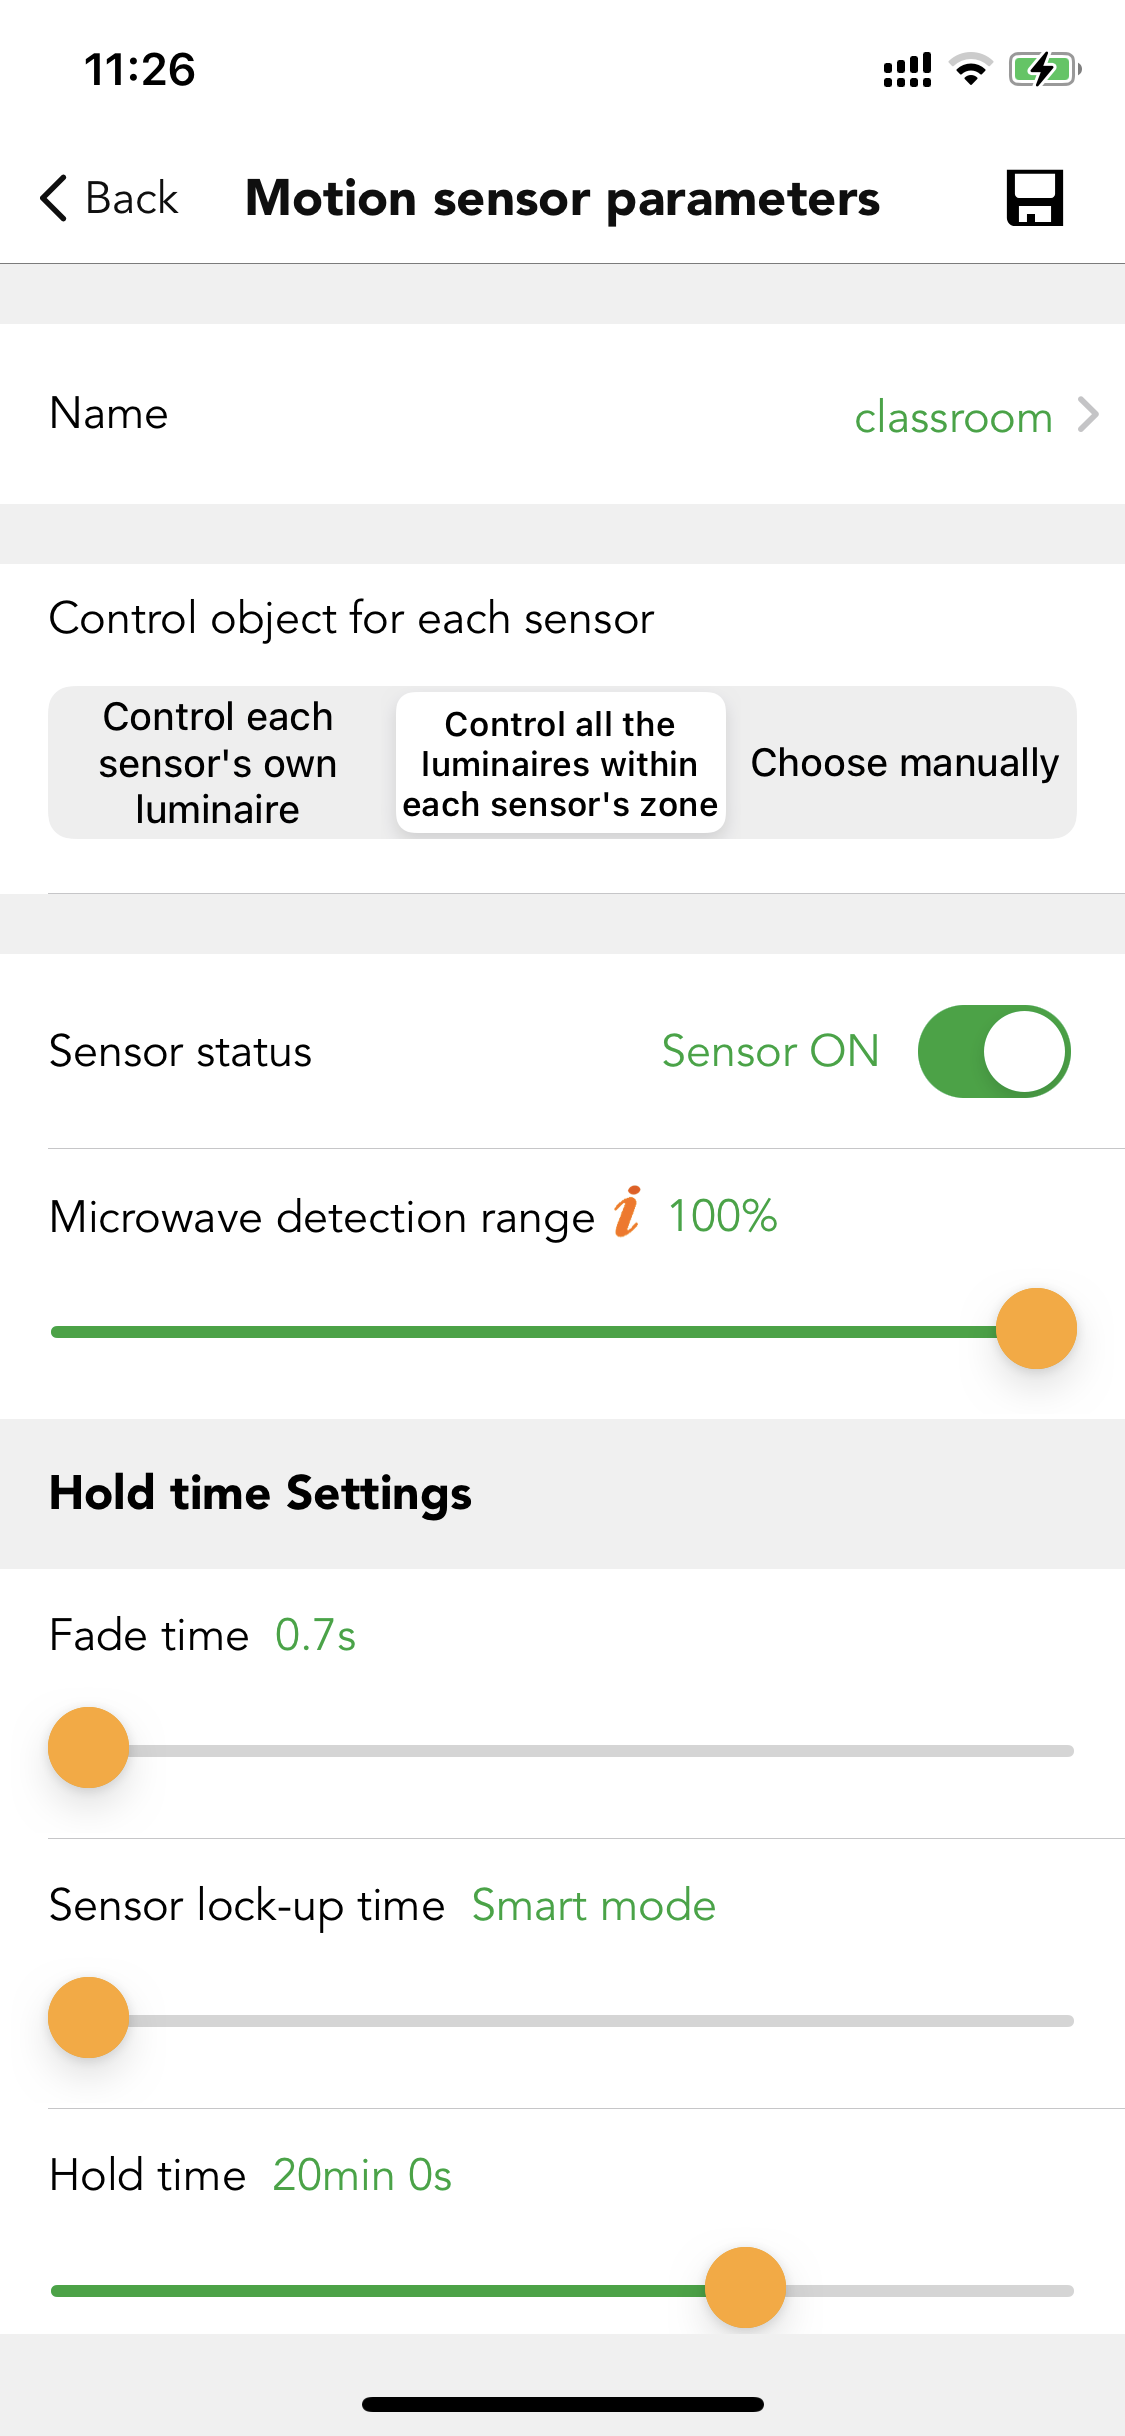
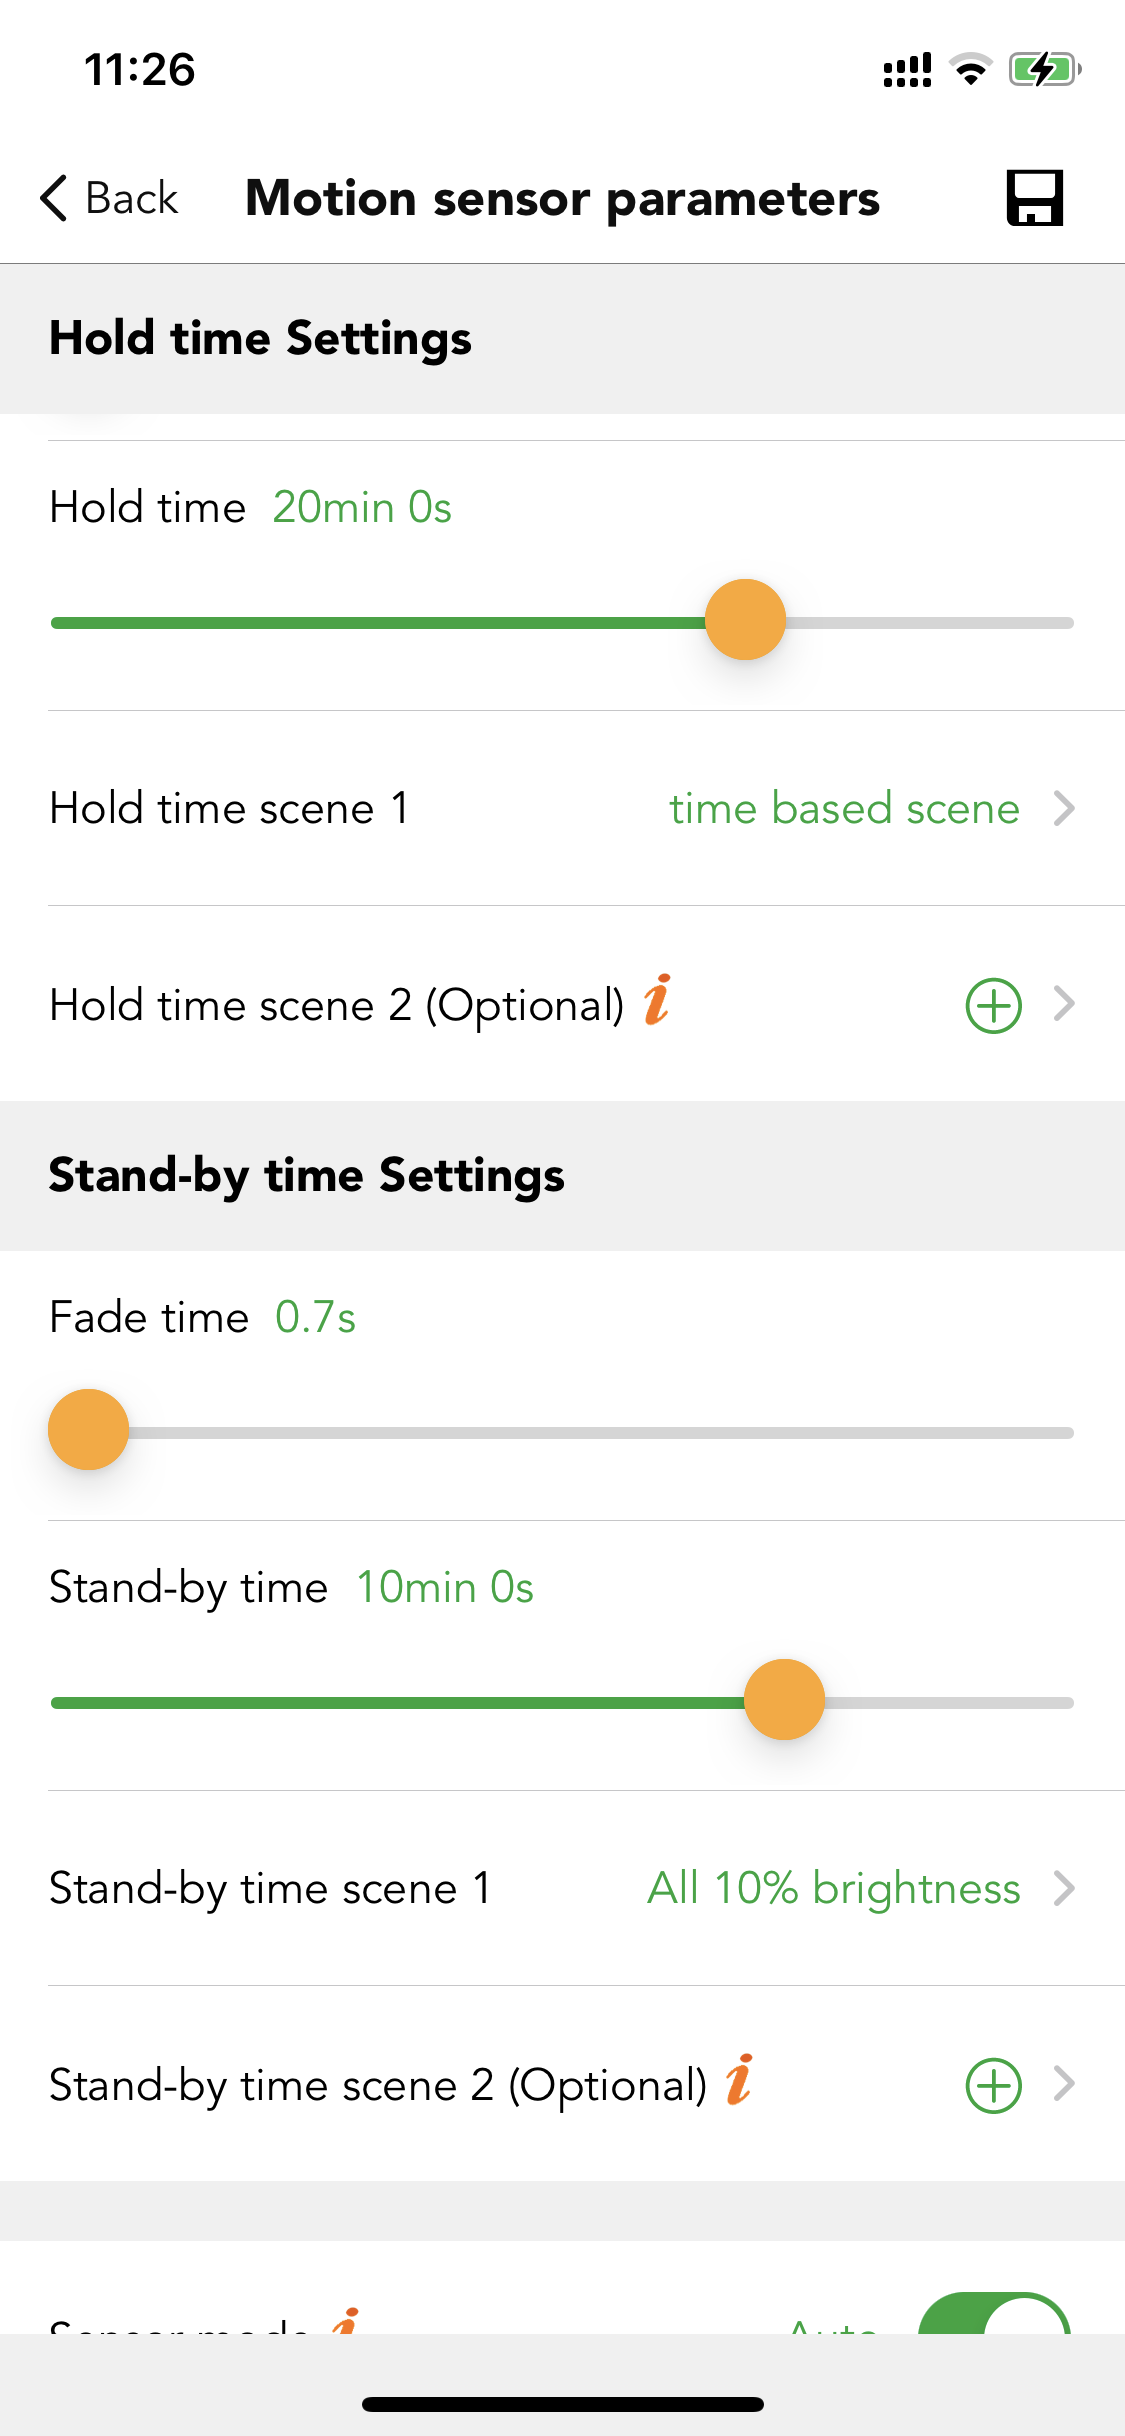
Step 5. Go to bulk commissioning, select "set motion sensor parameters in batch volume". Create a new profile and change the settings. Set the hold time to 20 mins, set the hold time scene to the "time-based scene". Set the stand-by time to 10 mins, set the stand-by time scene to "10% brightness" scene. Set the sensor mode to "auto". Set the mode in priority to "manual prior to sensor". Sync to all the relevant sensors.
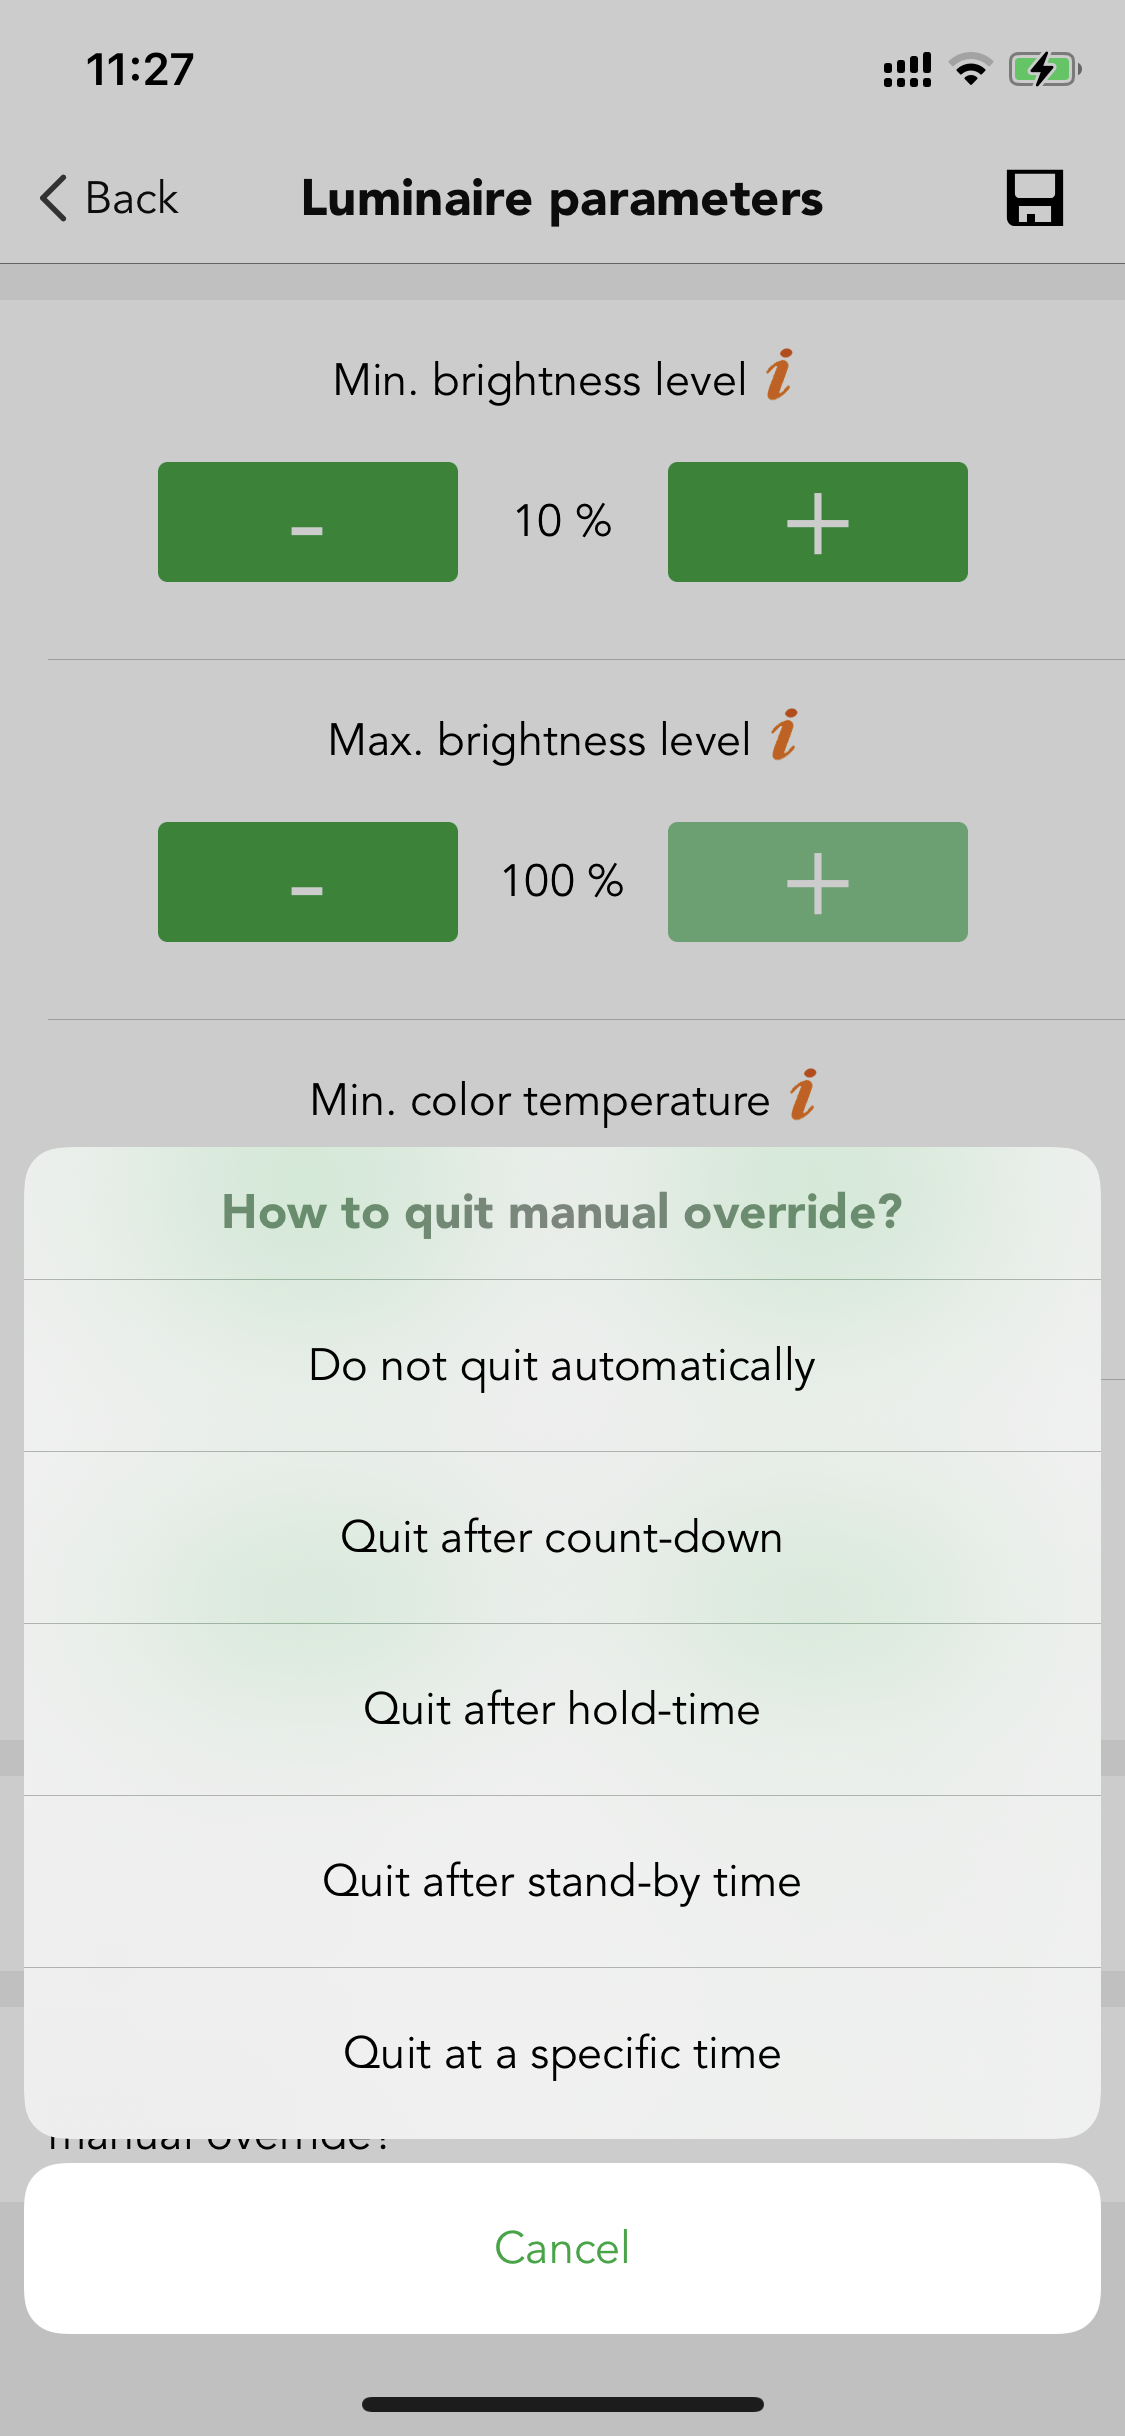
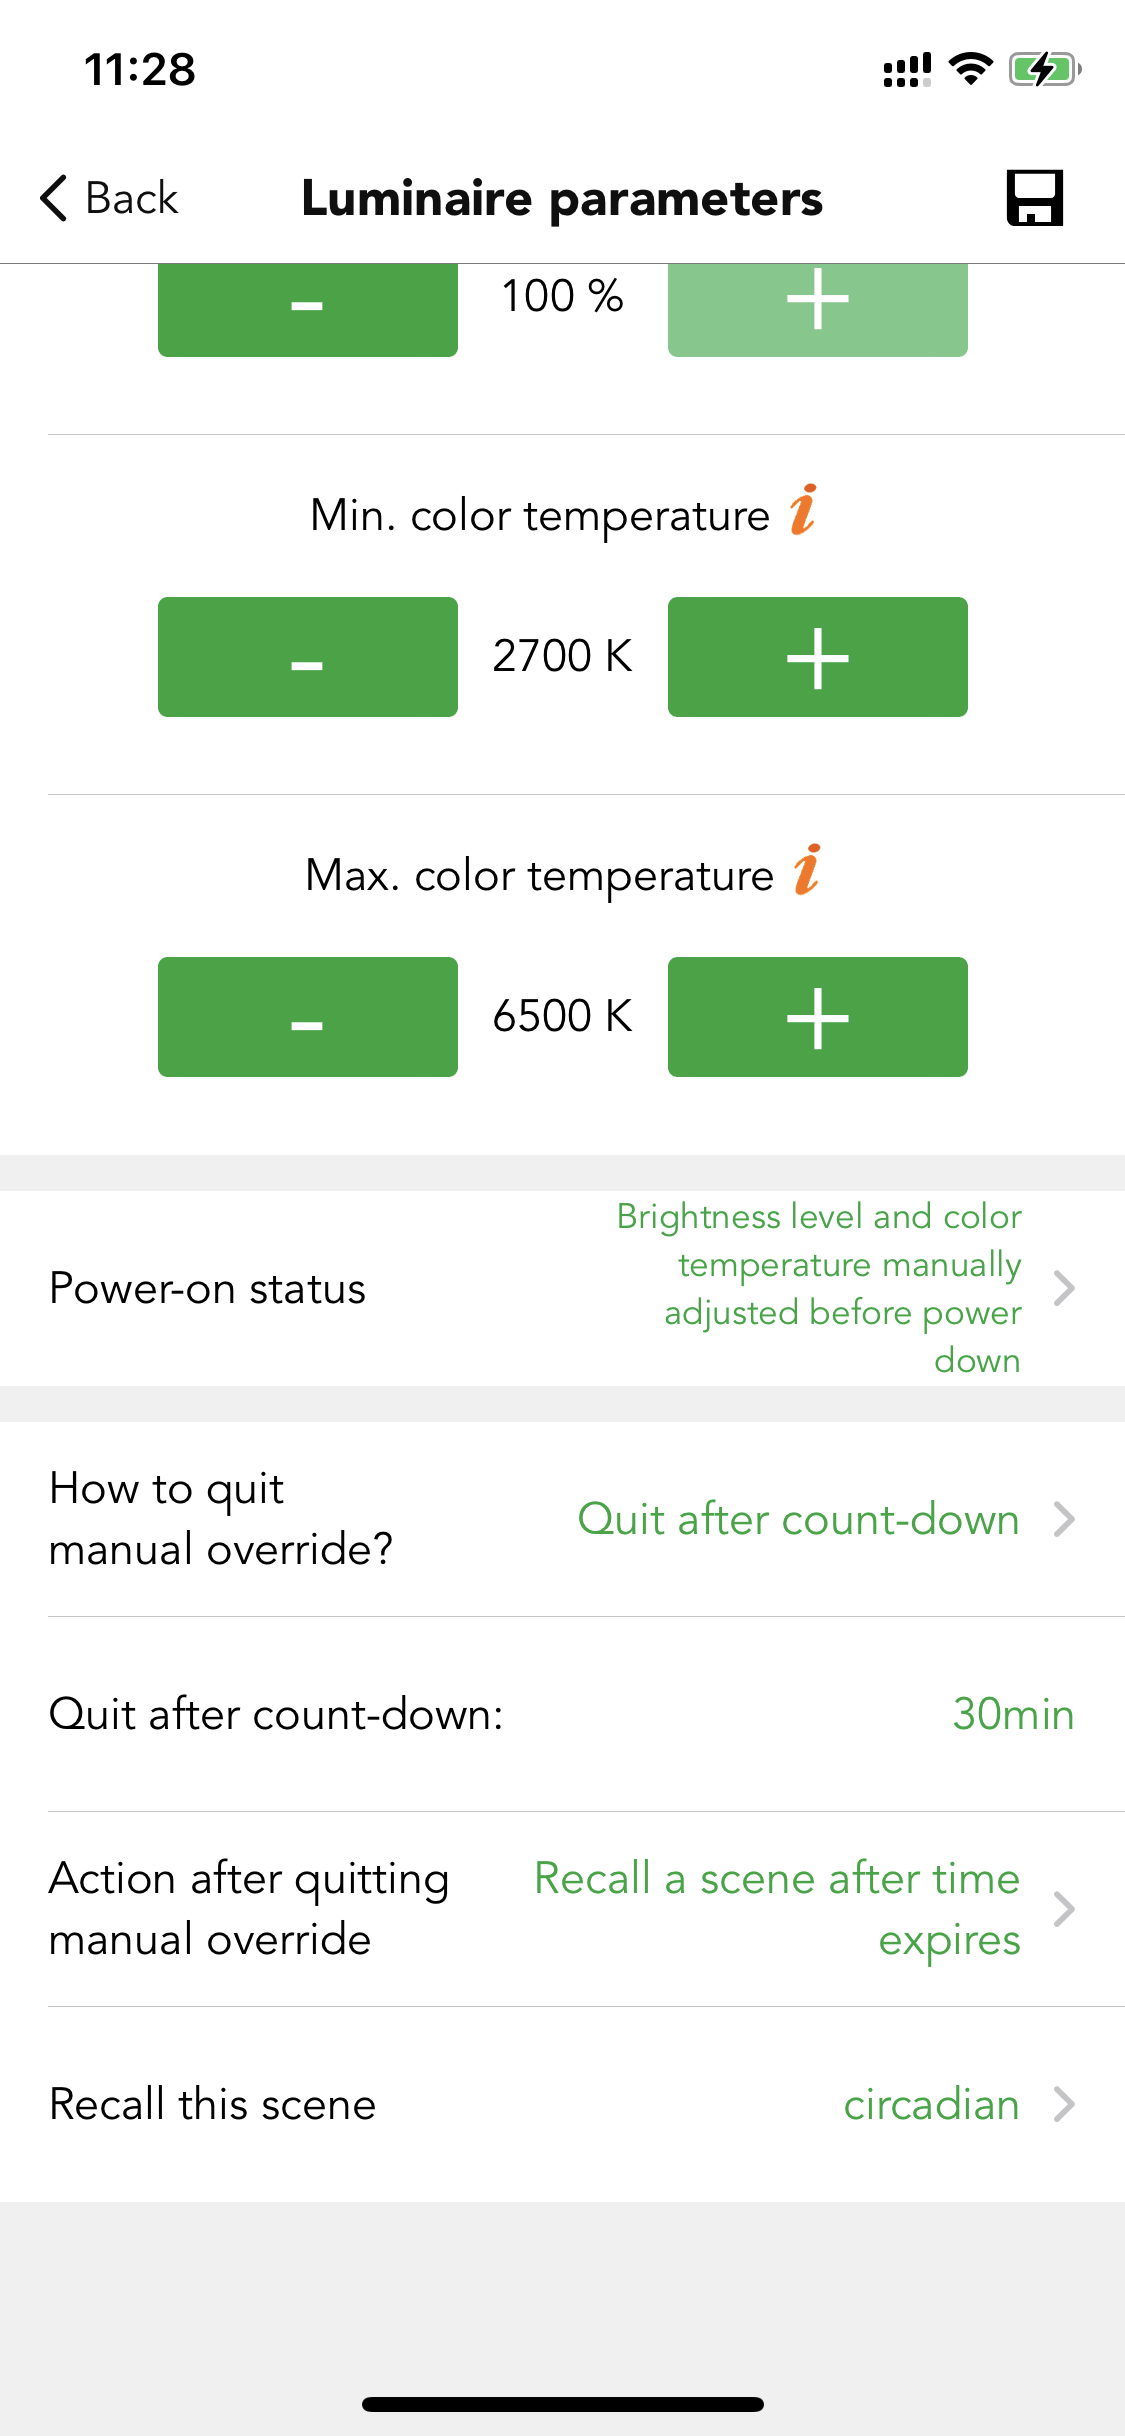
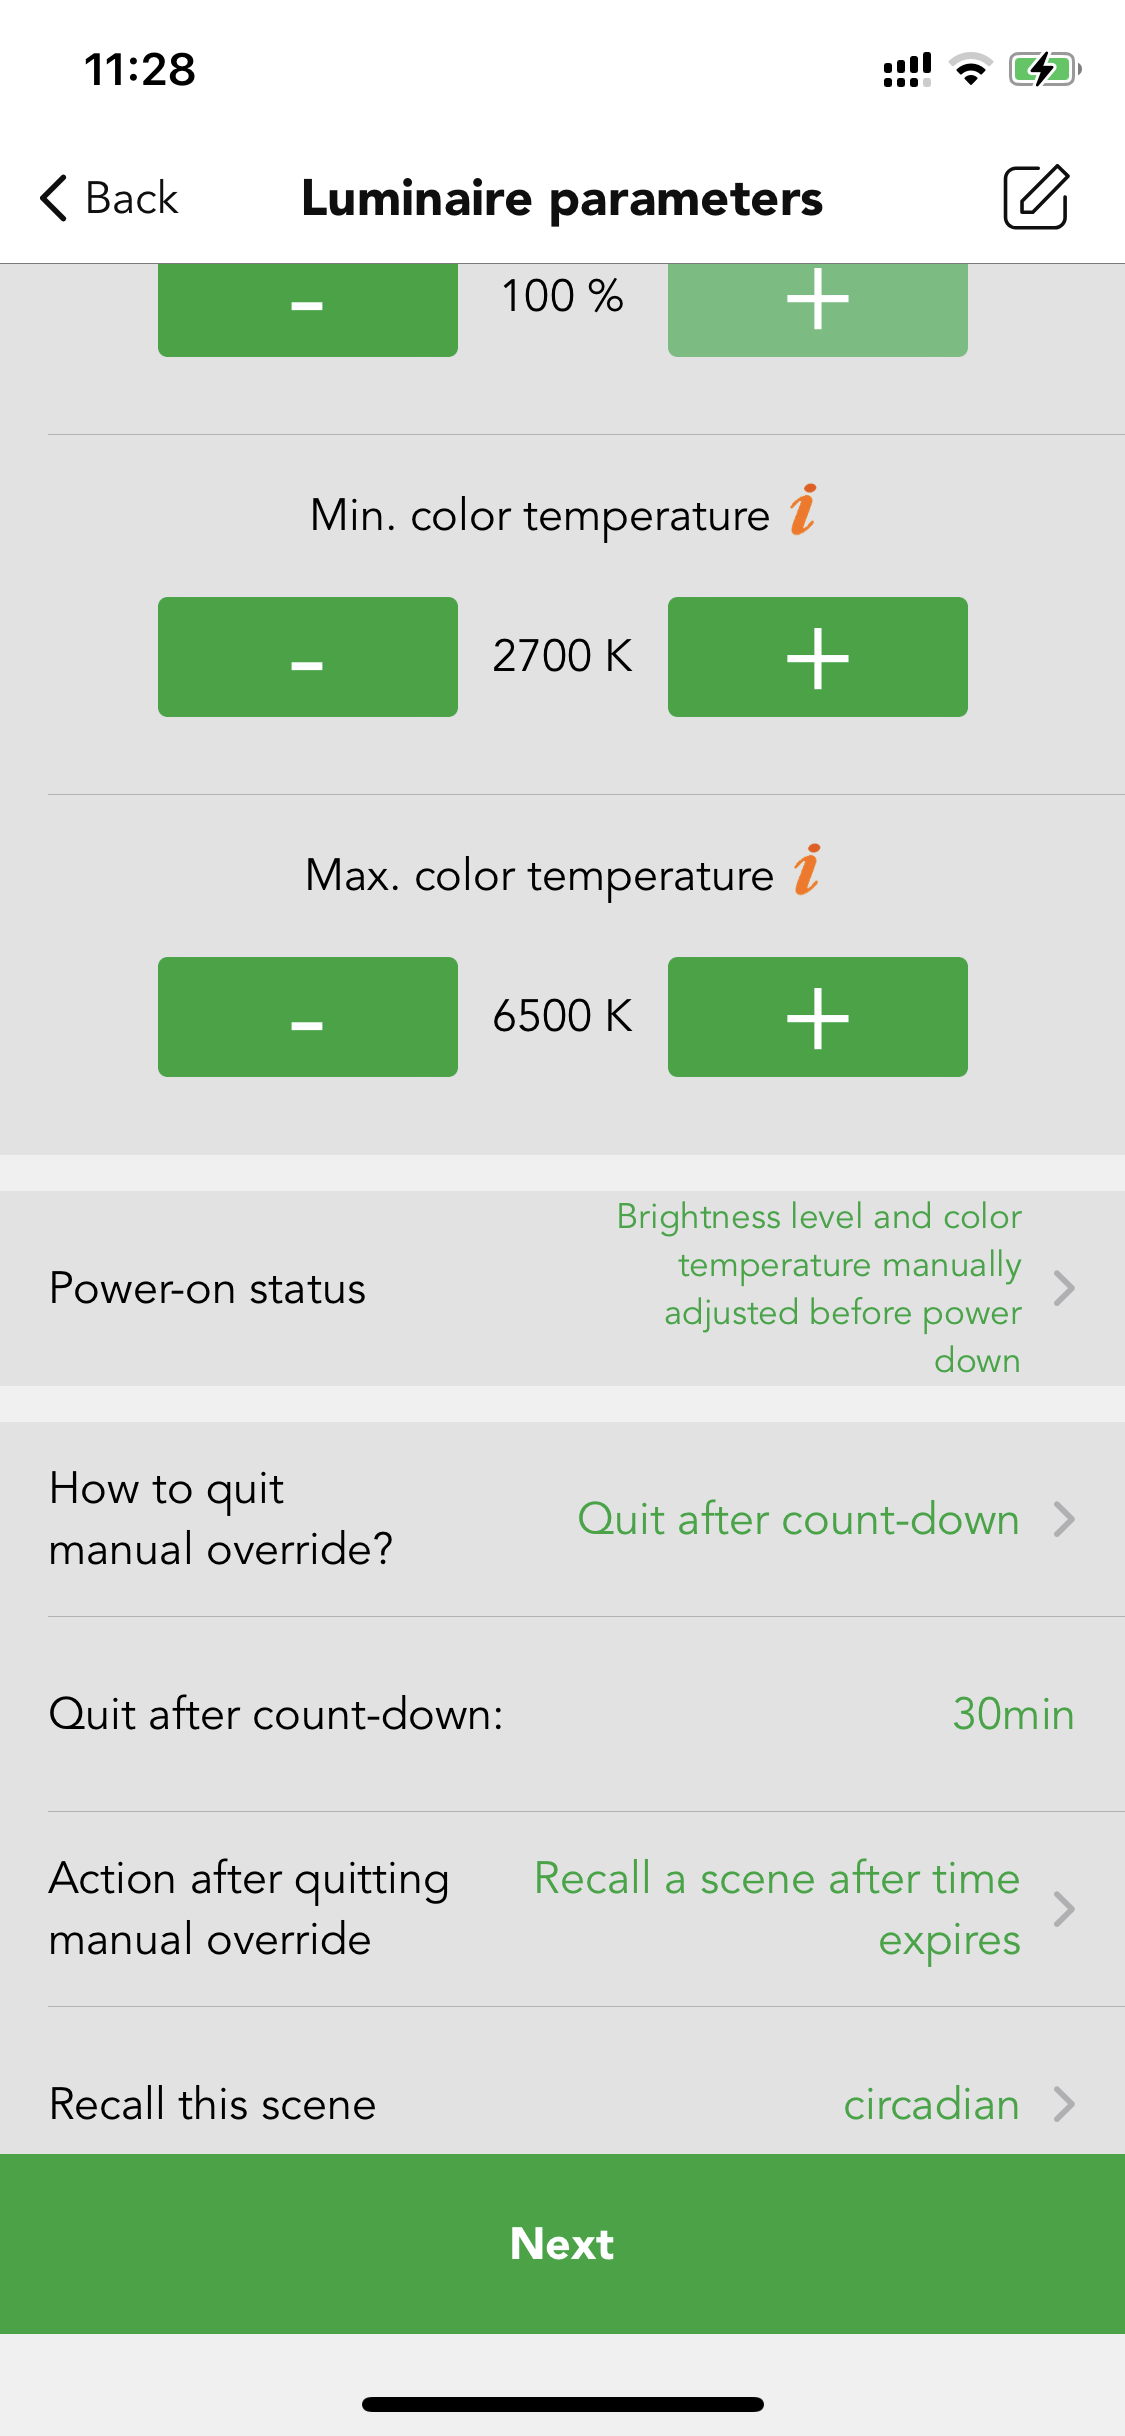
Step 6. Still in the bulk commissioning, select "set luminaires parameters in batch volume", create new profile and change the settings, but need to modify the "how to quit manual override" option, as mentioned in the case,teachers can interrupt the circadian scene by Push switch, after the presentation is over, the luminaires need to be switch back to the circadian rhythm scene automatically. sync to all the relevant luminaires. The default is "quit after hold time (20 mins in this case)". They also can quit after a specific time or count down time. Here we suggest quitting after "count-down" 30 mins. Action after quitting manual override to set as "recall a scene after time expires". Then recall the "circadian" scene again. So, when the teacher finishes the PPT (30 mins), the luminaires will switch back the circadian rhythm scene automatically.

24 hours circadian rhythm (without daylight sensor)
In this scene, there is no daylight sensor involved. The luminaire's brightness output and color temperature will be adjusted automatically based on the pre-set brightness level profile and color temperature profile. The brightness level profile and color temperature profile setting please refer to the "24 hours circadian rhythm (with daylight sensor)".
Astro-time Circadian Rhythm Scene
Astro-time circadian rhythm (with daylight sensor)
Same settings as the "24 hours circadian rhythm (with daylight sensor)". But just change the time from the whole 24 hours to sunrise- sunset time. The sunrise and sunset time are automatically calculated by the app based on the geographic location of the project.
Astro-time circadian rhythm (without daylight sensor)
In this scene, there is no daylight sensor involved. The luminaire's brightness output and color temperature will be adjusted automatically based on the pre-set brightness level profile and color temperature profile. The brightness level profile and color temperature profile setting please refer to the "24 hours circadian rhythm (with daylight sensor)". But just change the time from the whole 24 hours to sunrise- sunset time. The sunrise and sunset time are automatically calculated by the app based on the geographic location of the project.
Time-based scene
A time-based scene can be used to achieve a different dim level of a scene or activate different lighting scenarios depending on when the time-based scene is activated. A time-based scene has the advantage over a Schedule that it can be triggered at random time, therefore only activating scenes when needed. Time-based scenes are primarily designed to be used in conjunction with motion sensors.
Users can edit the existing scene by clicking on the top left corner or just long press on the scene cover. Then it will pop up some options including the "create a time-based scene". So, to make the time-based scene working normally, users need to create at least one scene to access the function, after clicking on the "create a time-based scene".
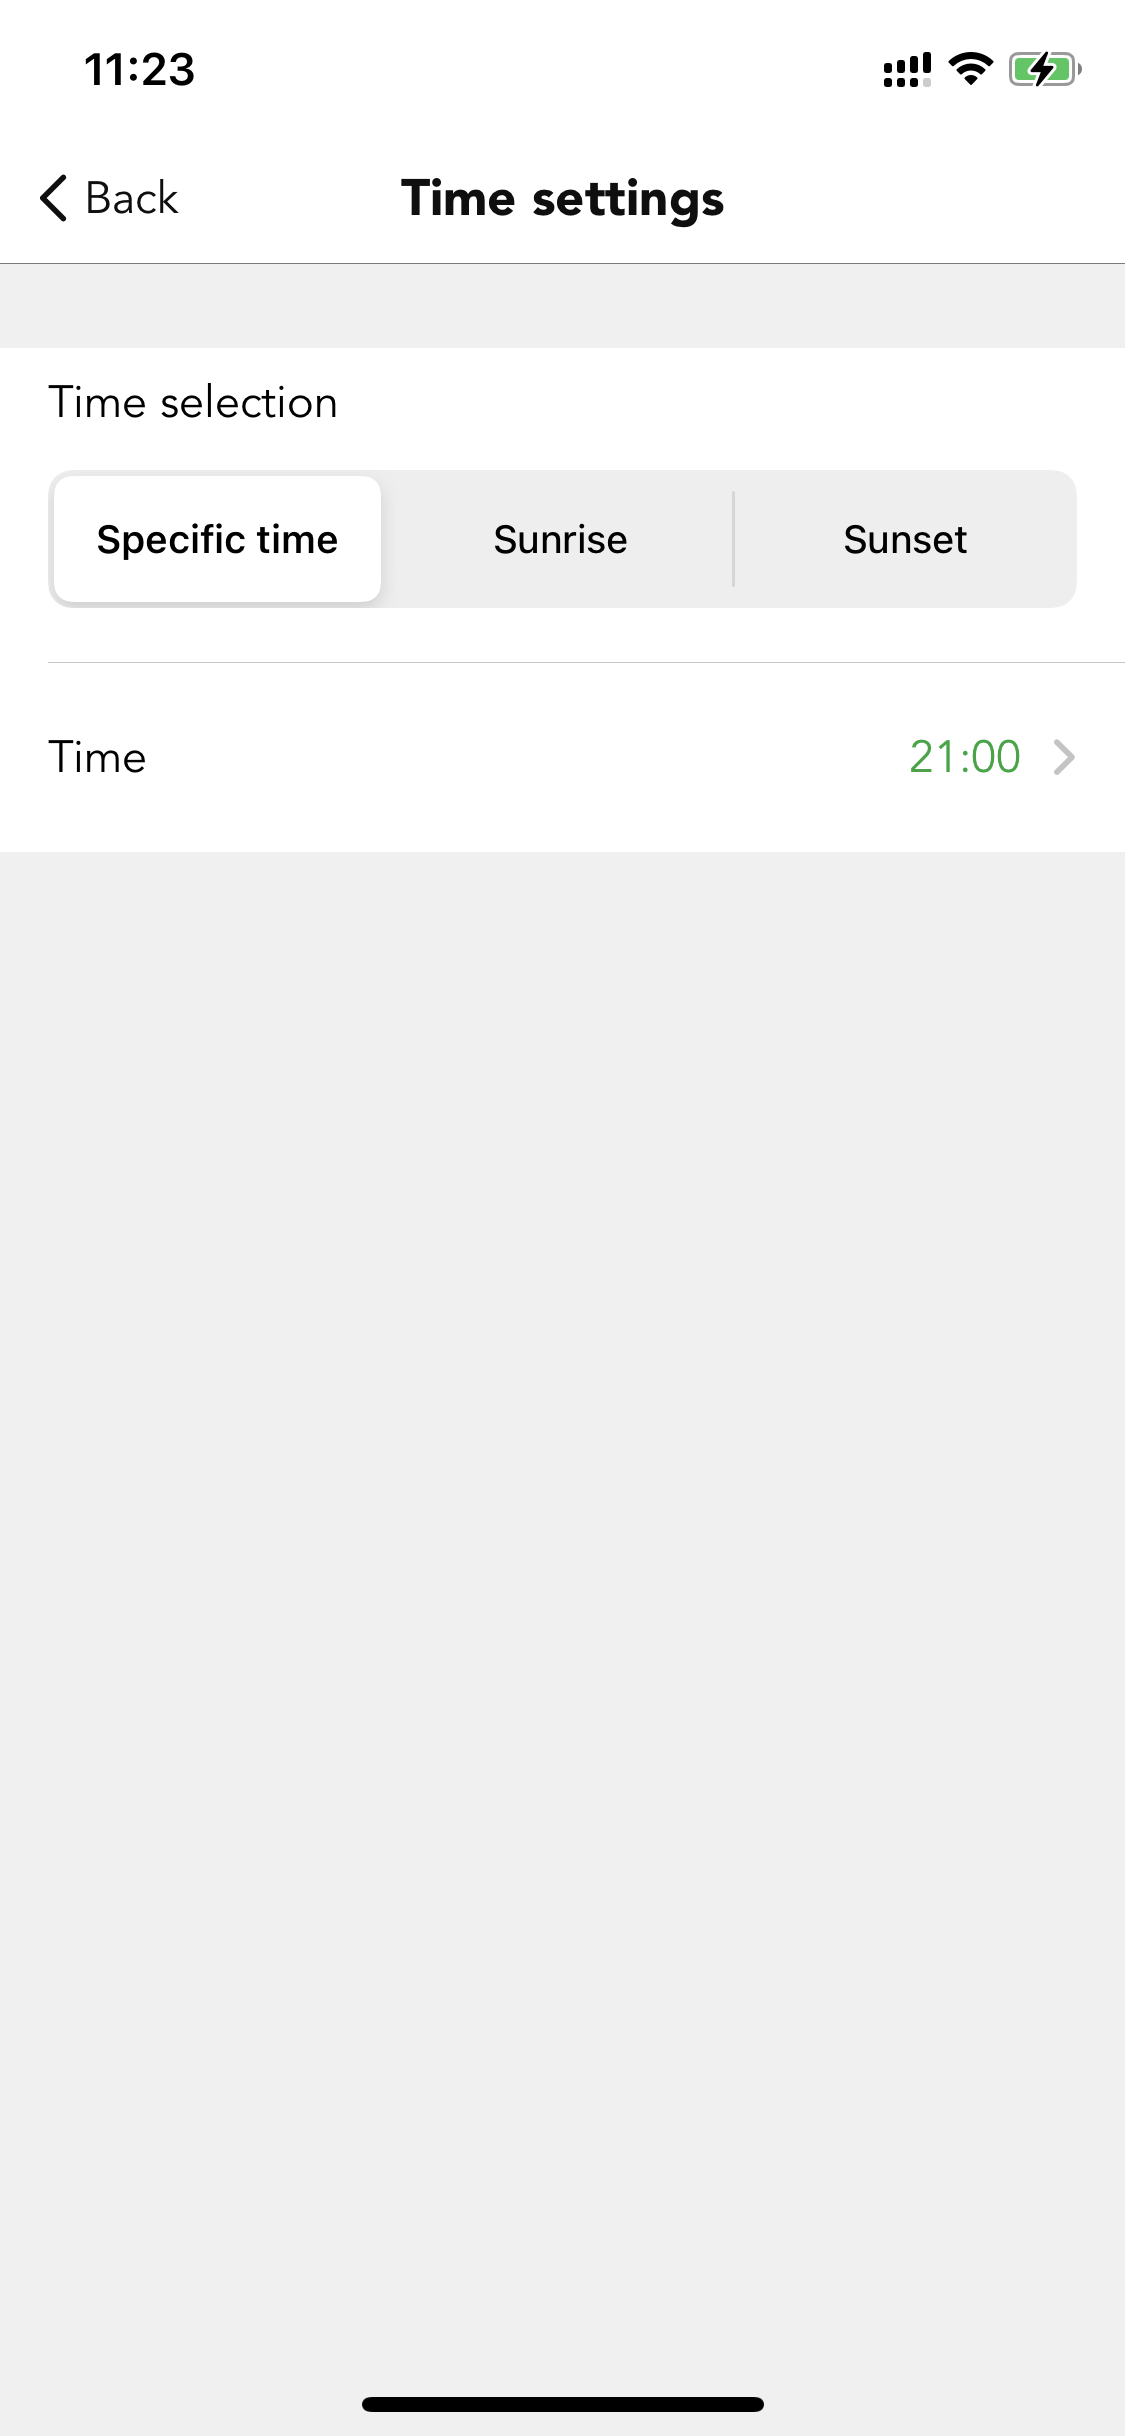
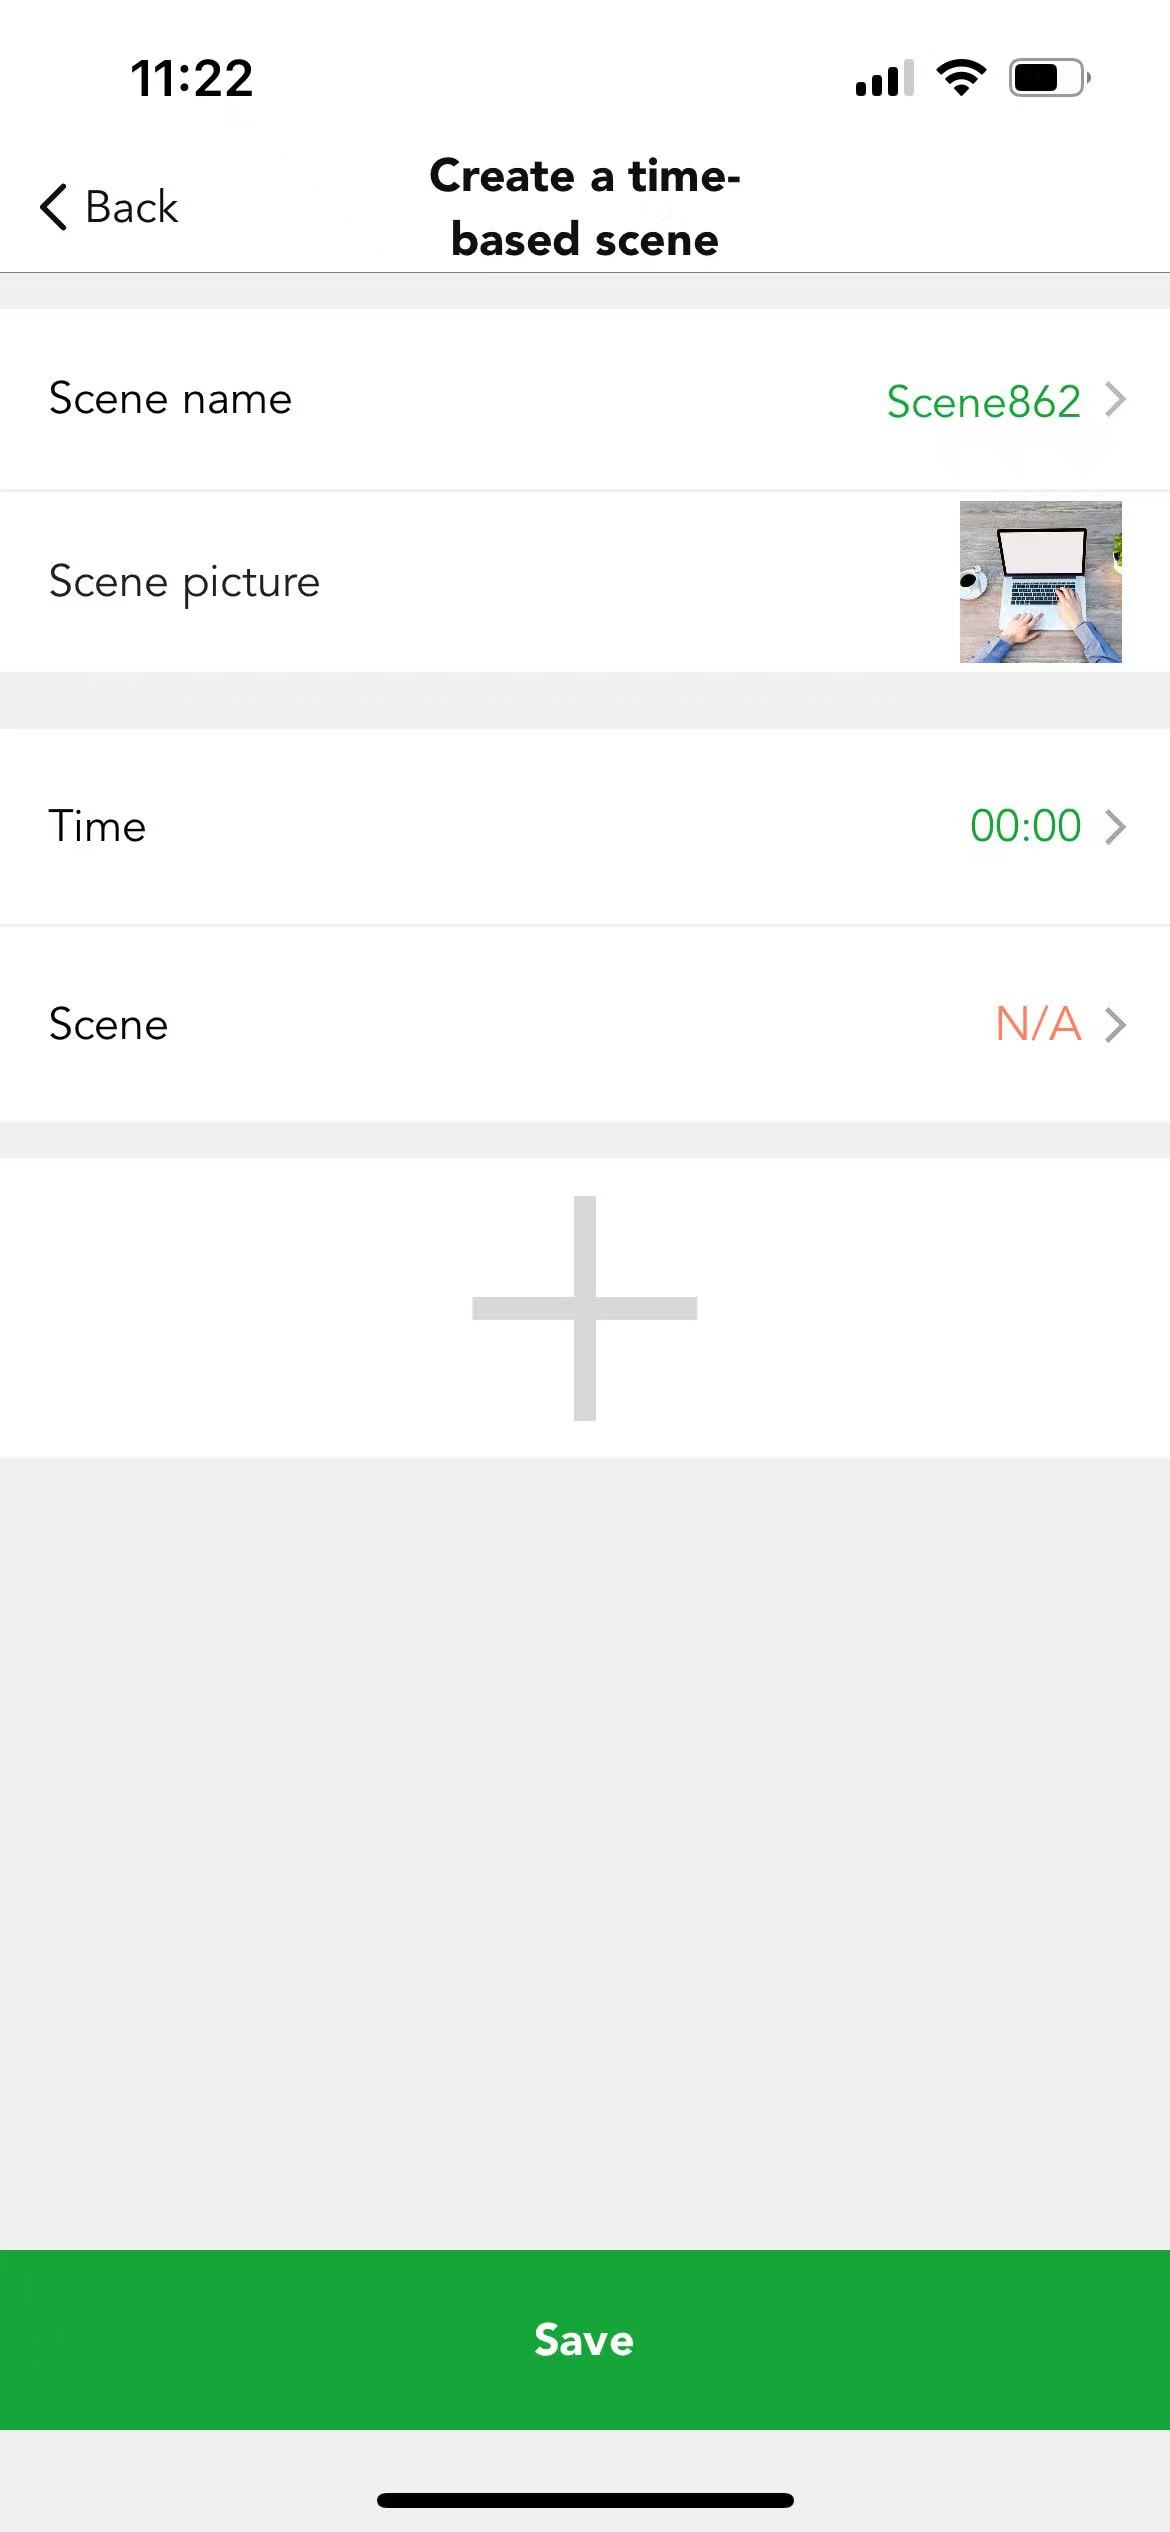
There will be a new interface, users can name and define the scene pictures as the normal scene. Then they can define the first time and first scene, in the time setting, the time can be a specific time, or can be the sunrise or sunset time if the location permission is allowed. Then select the existing scene from the list. Repeat the same process for the second, for the third…etc.
For example, time 9:00 to recall a 100% brightness scene, 10:00 to recall a 50% brightness scene. 12:00 to recall a 10% brightness scene, so when the users activated the motion sensor (the motion sensor setting needs to be configured first, hold time scene or stand-by time scene need to be the "time-based scene") at 9:00. It will run at 100% brightness automatically. If the users activate the motion sensor at 10:00, then it will run the 50% brightness scene automatically. If the users activate the motion sensor at 12:00, then it will run the 10% brightness scene
automatically.
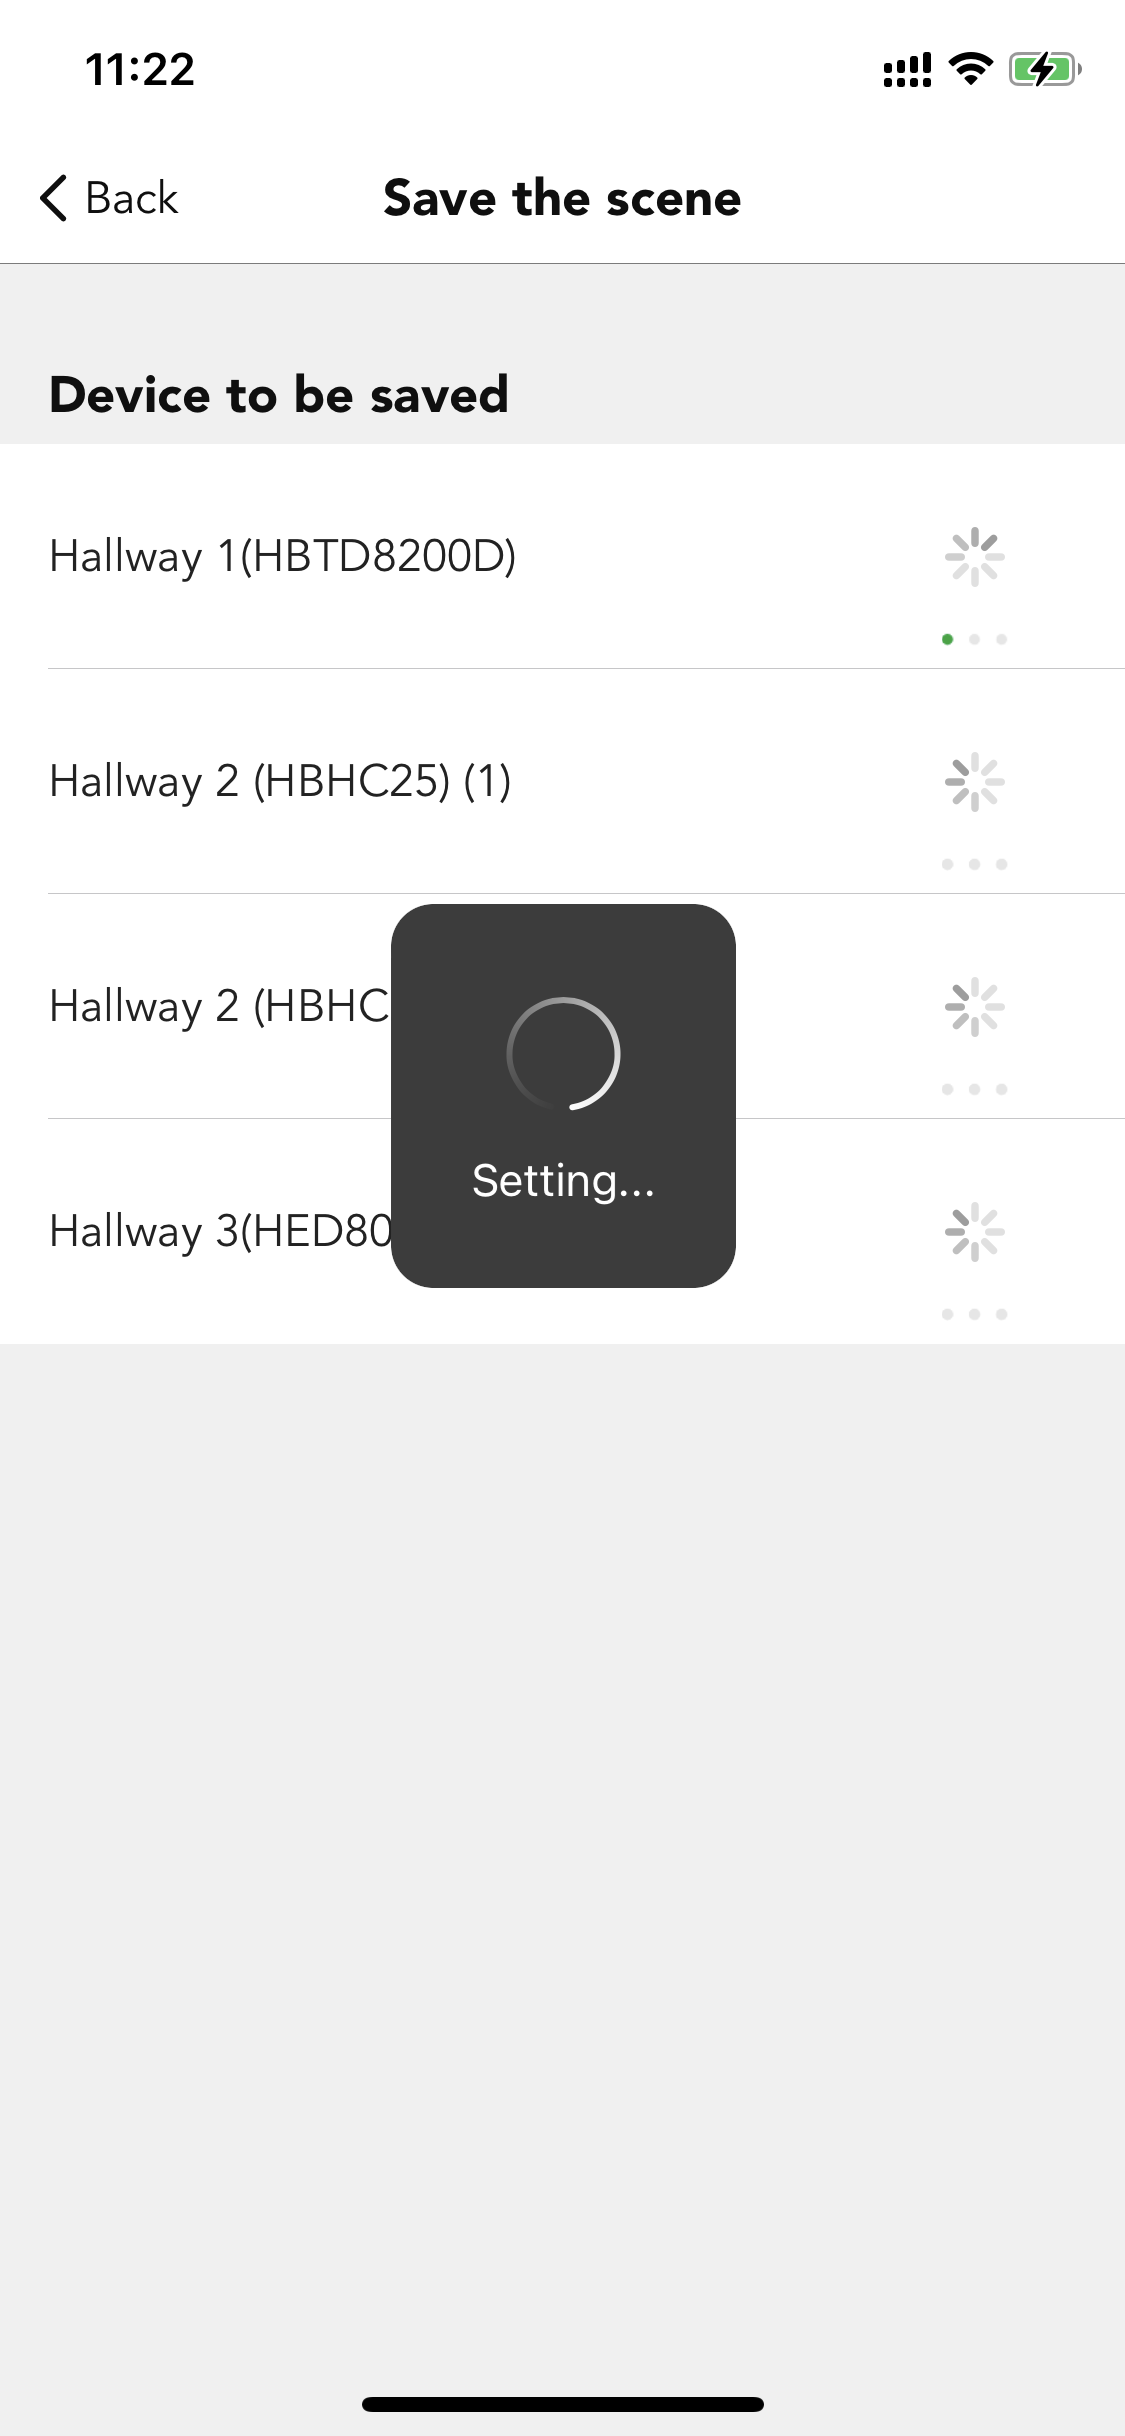
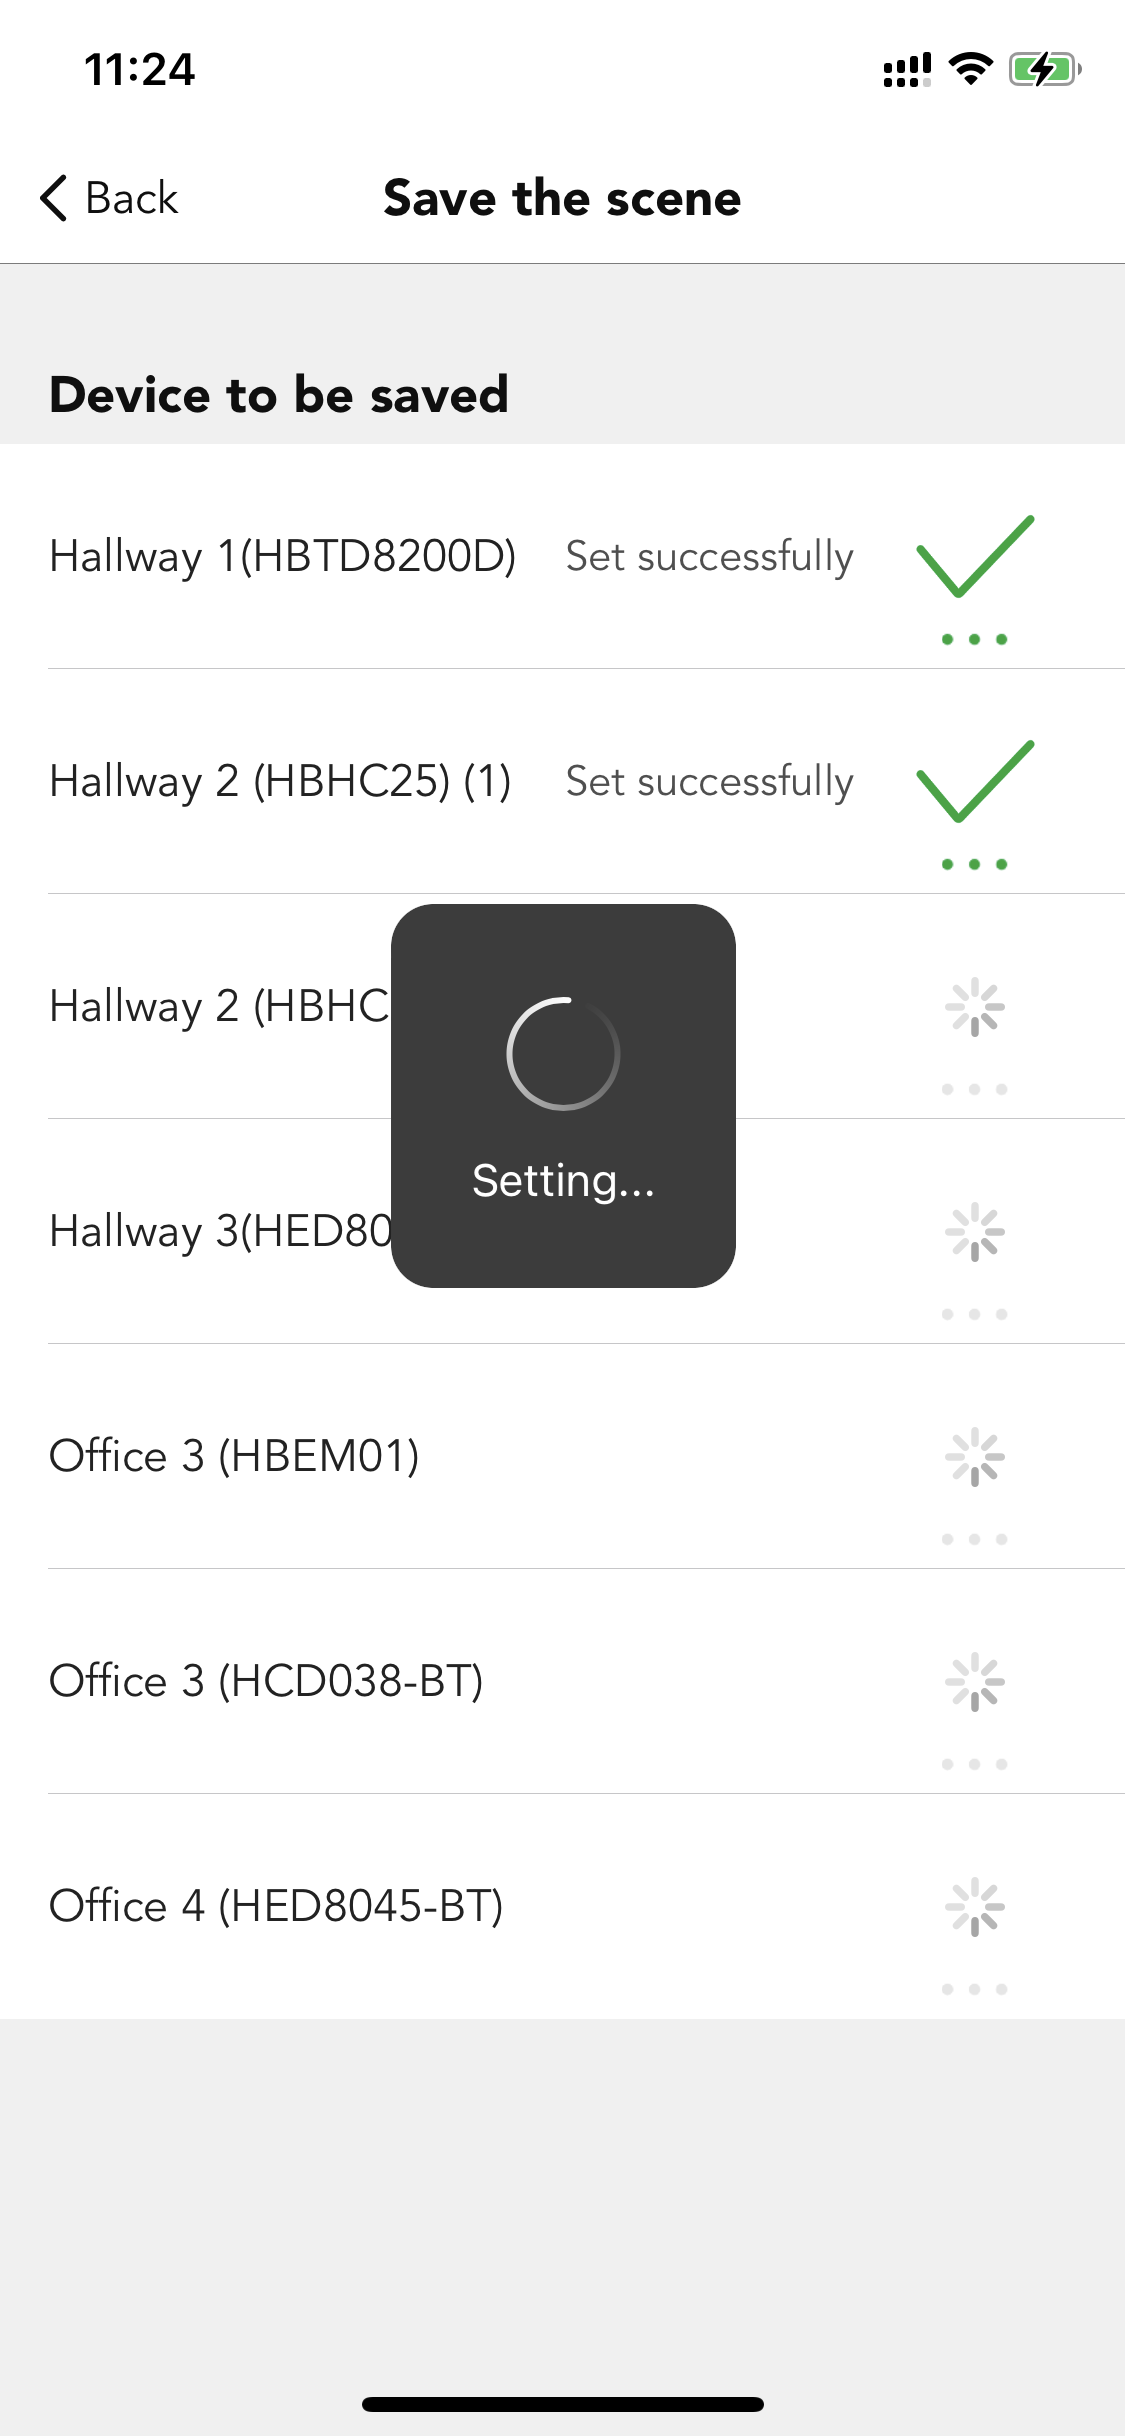
After "setting" is finished, click on the "save" button. And this time-based scene will be displayed on the scene tab.
Animation scene
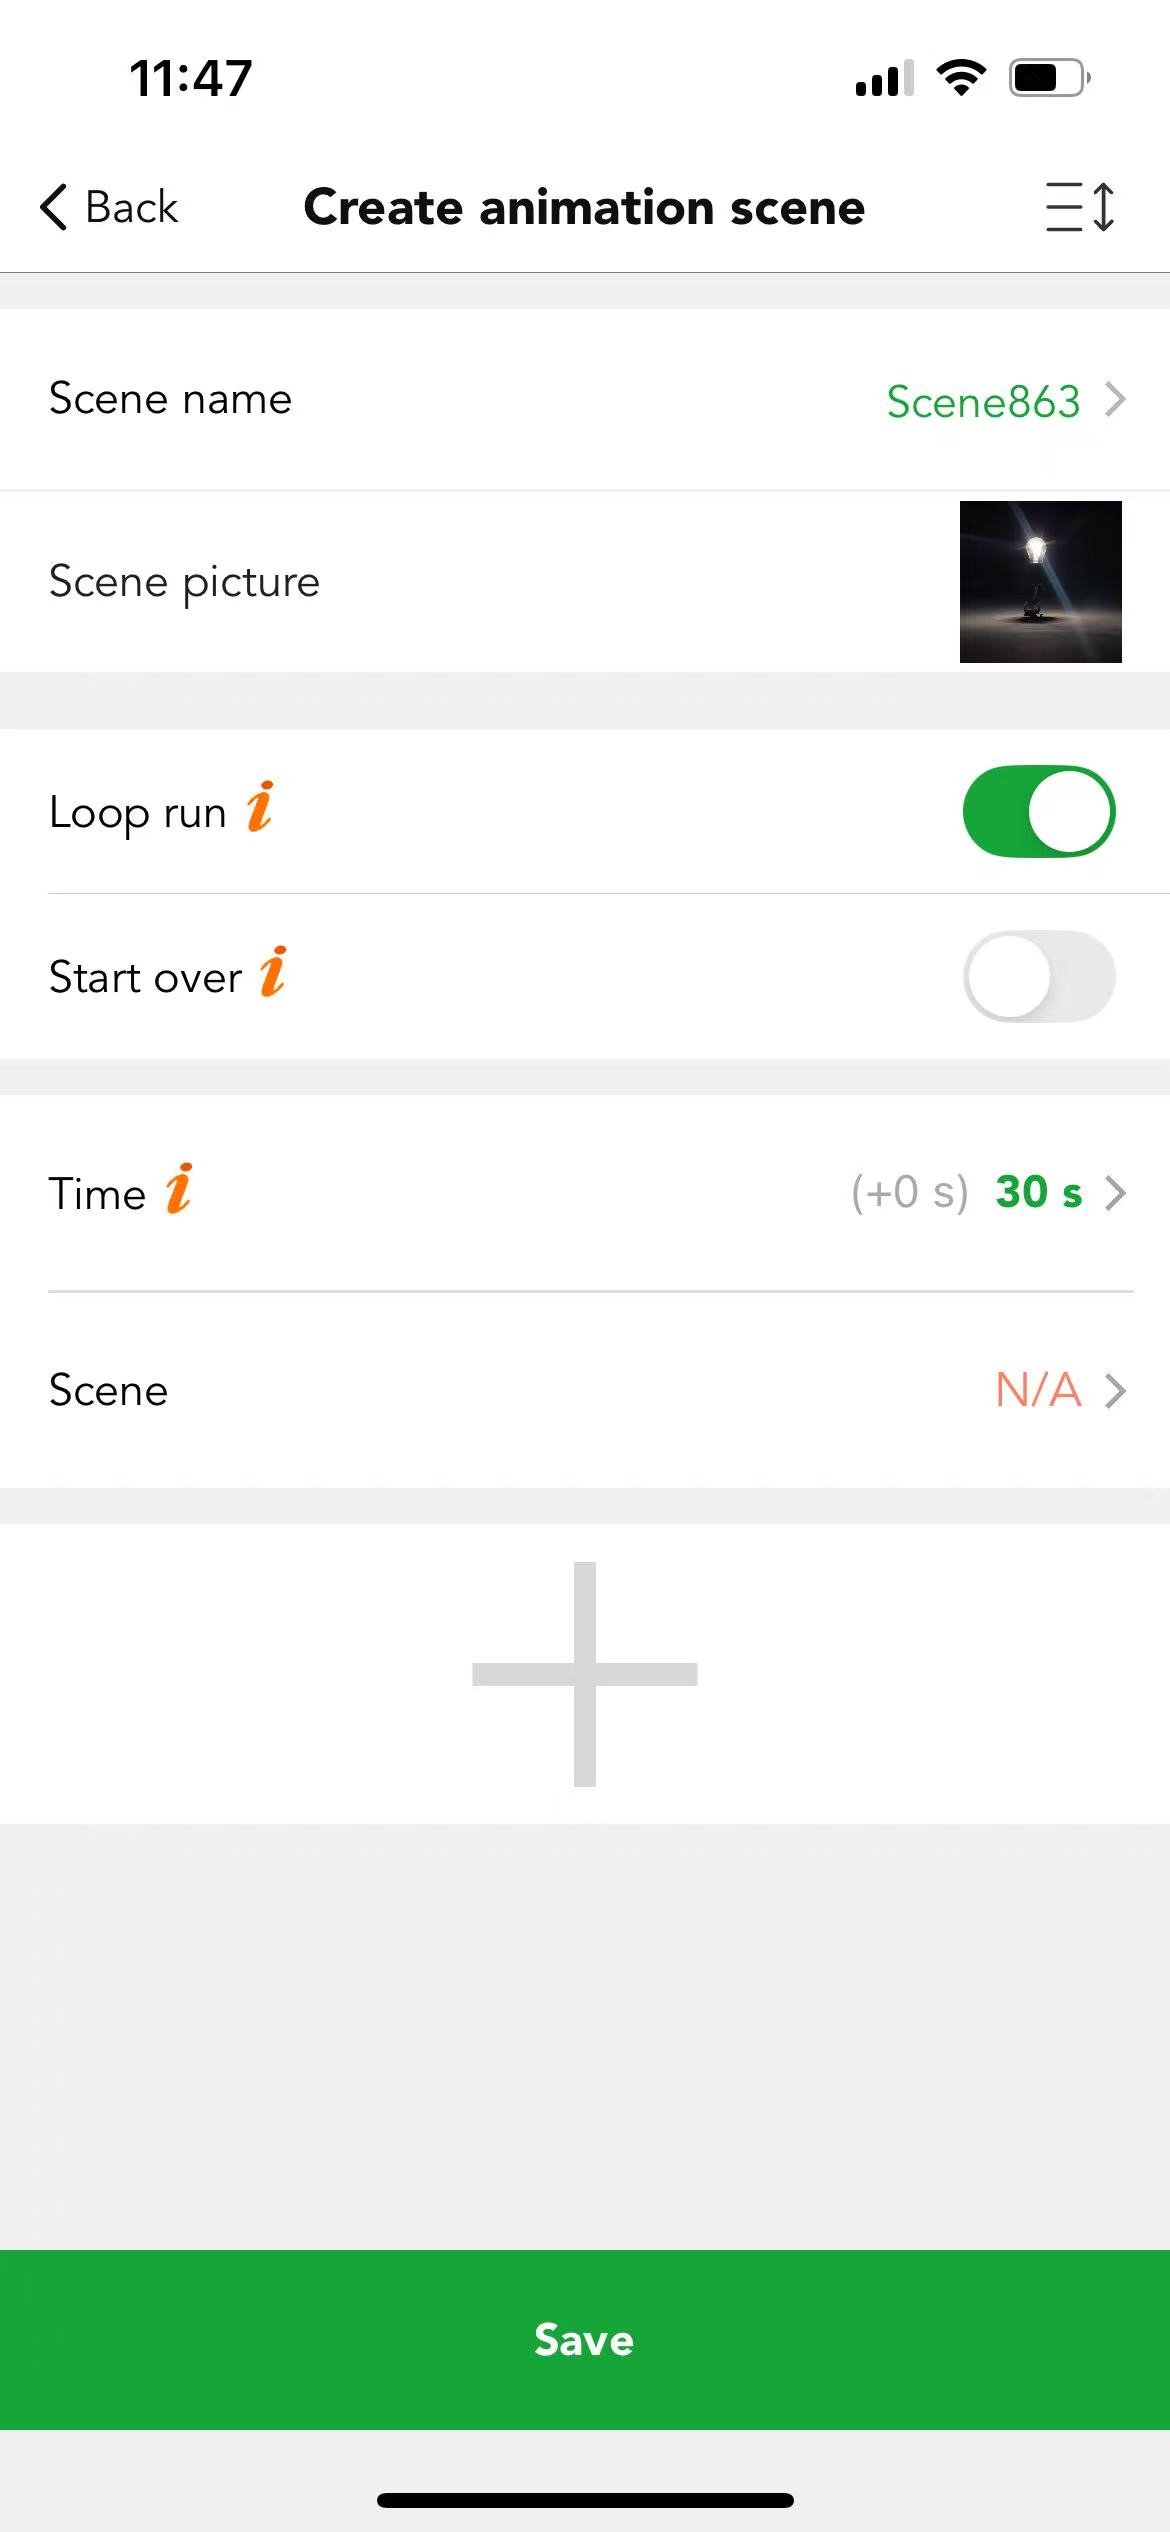
An animation scene is created to loop through different scenes at a set sequence and pace.
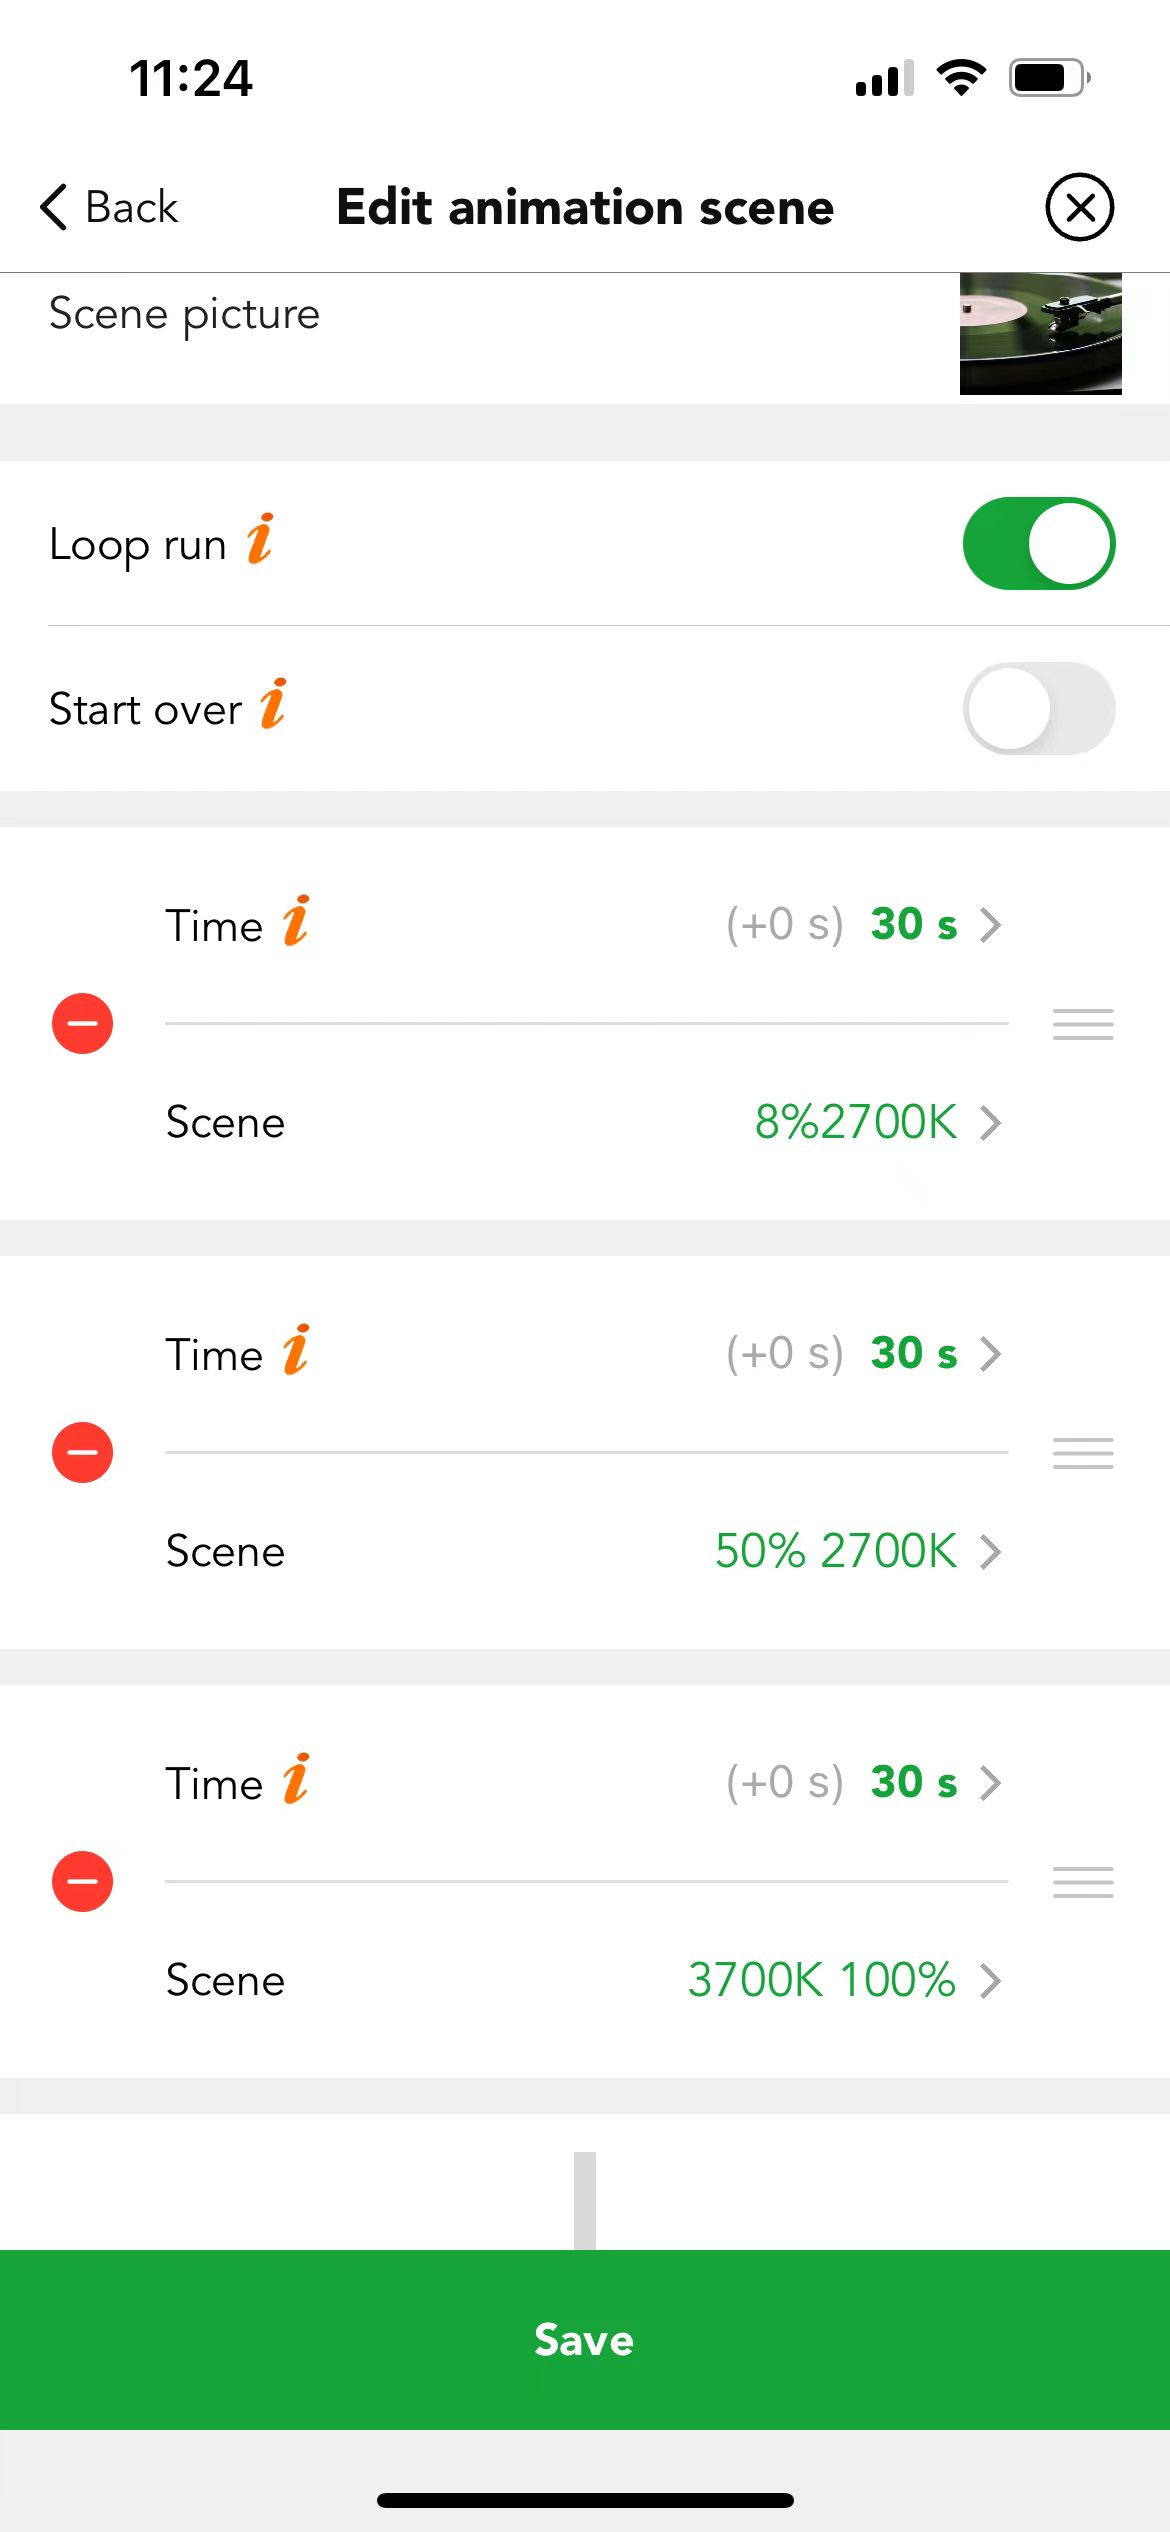
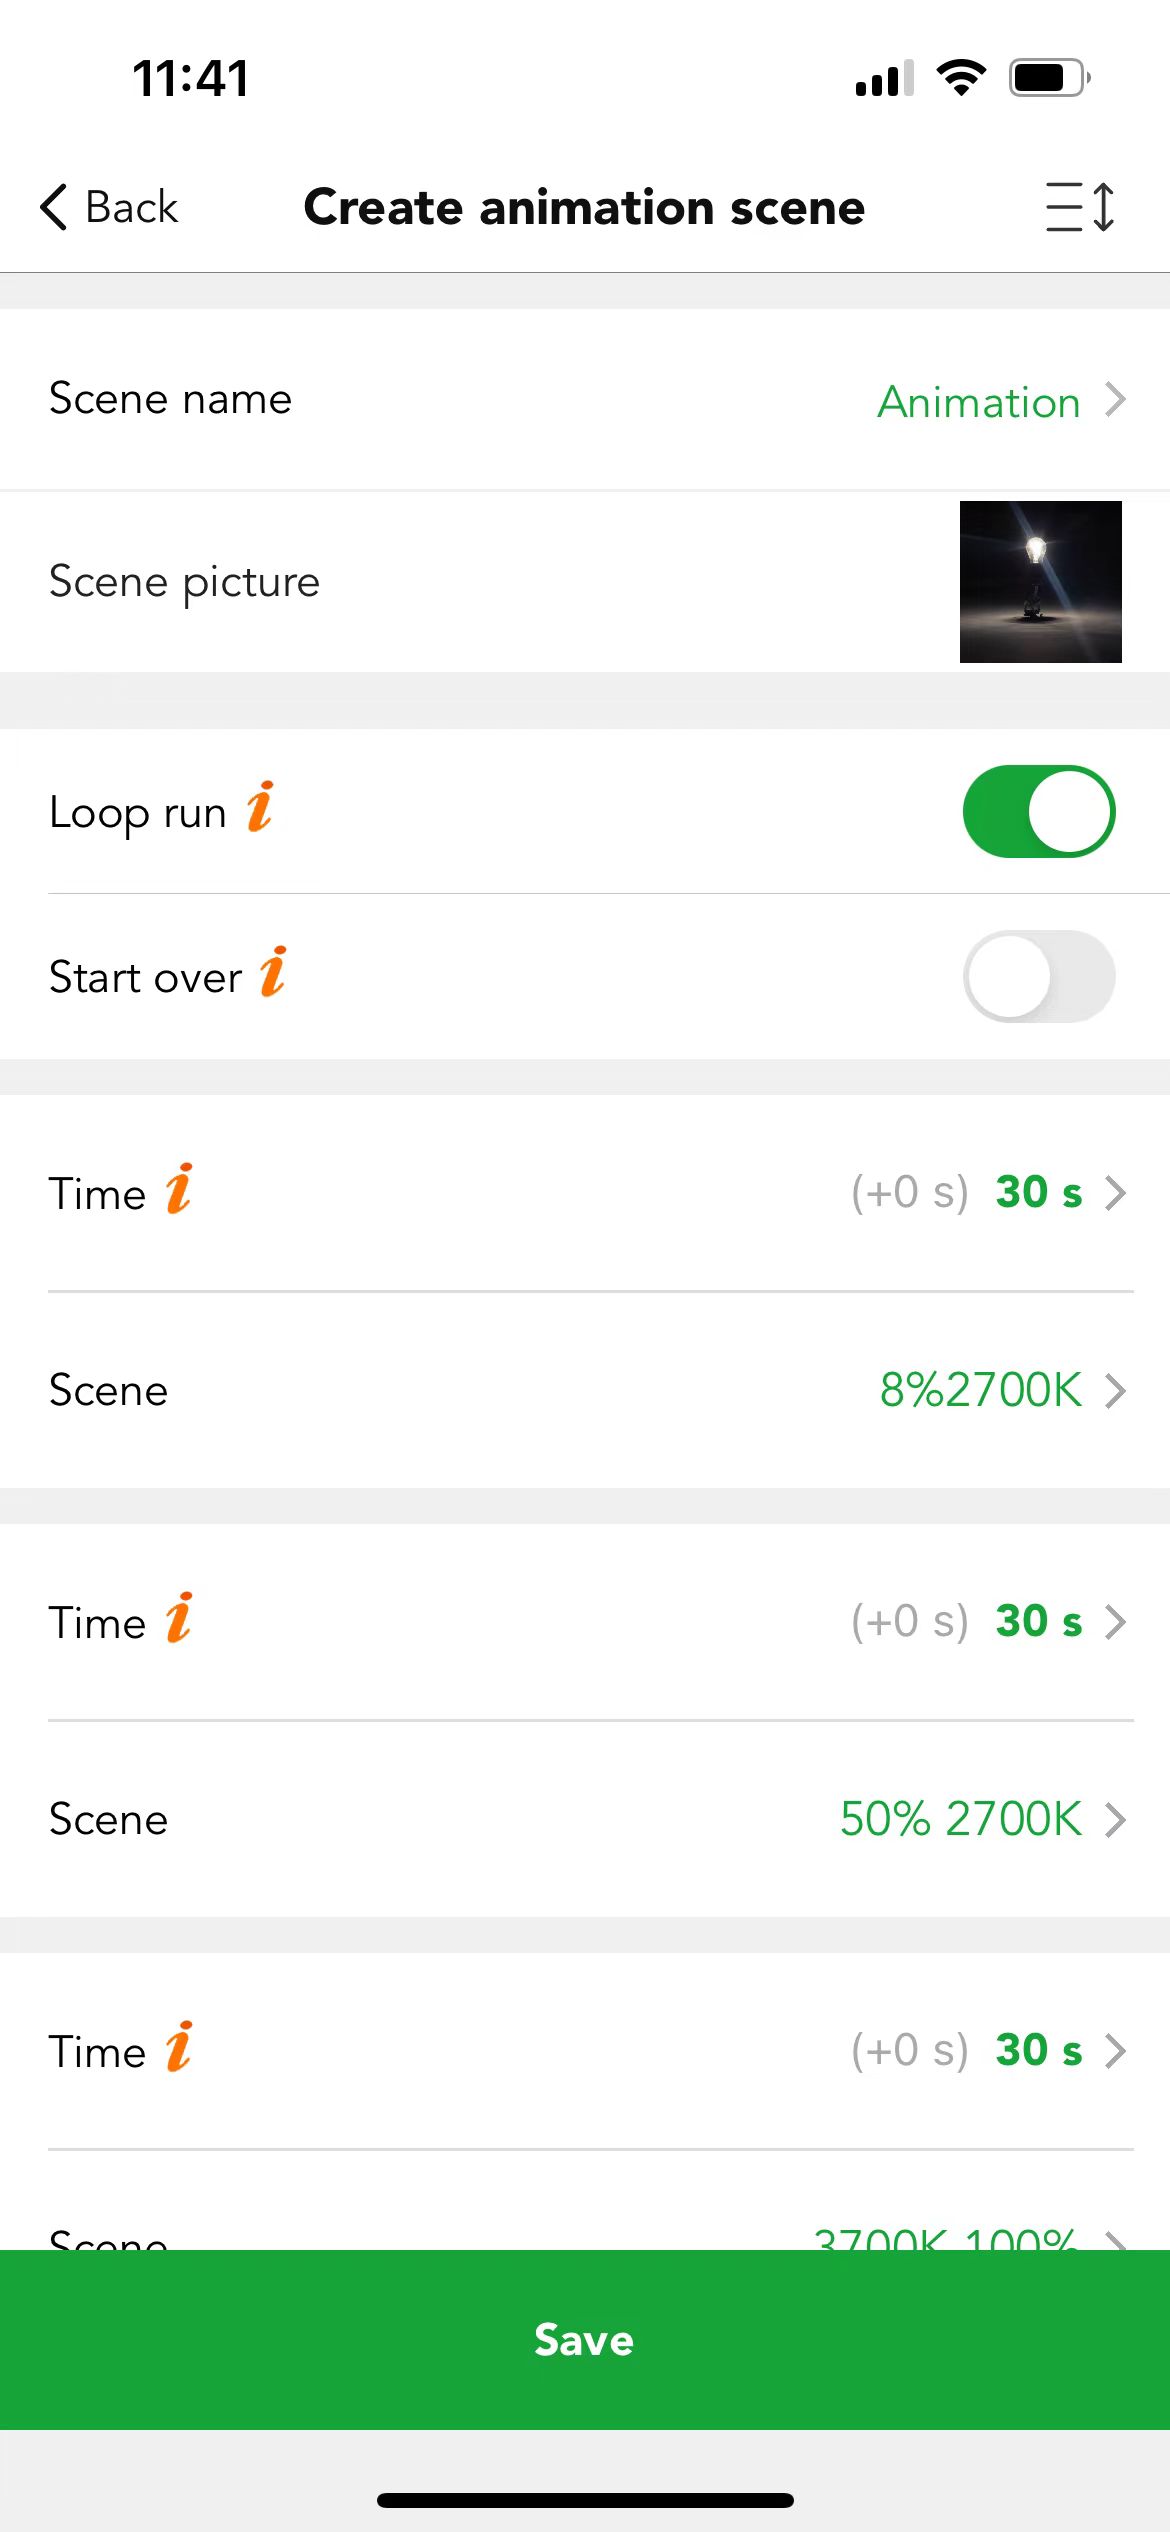
● Loop run
When turned on, the animation scene will continuously play, looping back to the first scene after reaching the last one. When turned off, the animation will stop and remain in the last scene's state after completion.
● Start over
When turned on, if the animation scene is triggered again (manually or by a sensor) while already running, it will restart from the first scene. When turned off, the animation scene will continue without interruption.
● Time
Each scene will first fade to its initial state during the fade time, run during the dwell time, and then fade to the next scene. This process will repeat for each scene in the sequence.
Case 5.
In a lighting store, there's a showcase used to present LED light products. The owner wants the luminaires in the showcase to automatically display different light colors and brightness levels. This can be achieved by setting an animation scene on the Koolmesh app.
Step 1. Create the desired scenes and add them in a loop in the desired sequence. In this case, you can have three generic scenes: 8% brightness at 2700K -> 50% brightness at 2700K -> 3700K at 100% brightness
Step 2. Determine the fade time and dwell time.
Step 3. Trigger the scene.
※ Users can change the loop playback sequence by clicking on the  icon at the top right corner of the screen, when the icon turns into
  you can long press and slide the
  icon by each scene to shift the scene sequence.
※ Maximum 10 sub-scenes can be added in an animation.